Introduction
Trigger.dev v3 allows you to integrate long-running async tasks into your application and run them in the background. This allows you to offload tasks that take a long time to complete, such as sending multi-day email campaigns, processing videos, or running long chains of AI tasks. For example, the below task processes a video withffmpeg and sends the results to an s3 bucket, then updates a database with the results and sends an email to the user.
/trigger/video.ts
The CLI
Trigger.dev comes with a CLI that allows you to initialize Trigger.dev into your project, deploy your tasks, and run your tasks locally. You can run it vianpx like so:
Trigger.dev architecture
Trigger.dev implements a serverless architecture (without timeouts!) that allows you to run your tasks in a scalable and reliable way. When you runnpx trigger.dev@latest deploy, we build and deploy your task code to your Trigger.dev instance. Then, when you trigger a task from your application, it’s run in a secure, isolated environment with the resources you need to complete the task. A simplified diagram for a task execution looks like this:
In reality there are many more components involved, such as the task queue, the task scheduler, and the task worker pool, logging (etc.), but this diagram gives you a high-level overview of how Trigger.dev works.
The Checkpoint-Resume System
Trigger.dev implements a powerful Checkpoint-Resume System that enables efficient execution of long-running background tasks in a serverless-like environment. This system allows tasks to pause, checkpoint their state, and resume seamlessly, optimizing resource usage and enabling complex workflows. Here’s how the Checkpoint-Resume System works:- Task Execution: When a task is triggered, it runs in an isolated environment with all necessary resources.
-
Subtask Handling: If a task needs to trigger a subtask, it can do so and wait for its completion using
triggerAndWait -
State Checkpointing: While waiting for a subtask or during a programmed pause (e.g.,
wait.for({ seconds: 30 })), the system uses CRIU (Checkpoint/Restore In Userspace) to create a checkpoint of the task’s entire state, including memory, CPU registers, and open file descriptors. - Resource Release: After checkpointing, the parent task’s resources are released, freeing up the execution environment.
- Efficient Storage: The checkpoint is efficiently compressed and stored on disk, ready to be restored when needed.
- Event-Driven Resumption: When a subtask completes or a wait period ends, Trigger.dev’s event system triggers the restoration process.
- State Restoration: The checkpoint is loaded back into a new execution environment, restoring the task to its exact state before suspension.
- Seamless Continuation: The task resumes execution from where it left off, with any subtask results or updated state seamlessly integrated.
This is why, in the Trigger.dev Cloud, we don’t charge for the time waiting for subtasks or the
time spent in a paused state.
Durable execution
Trigger.dev’s Checkpoint-Resume System, combined with idempotency keys, enables durable execution of complex workflows. This approach allows for efficient retries and caching of results, ensuring that work is not unnecessarily repeated in case of failures.How it works
- Task breakdown: Complex workflows are broken down into smaller, independent subtasks.
- Idempotency keys: Each subtask is assigned a unique idempotency key.
- Result caching: The output of each subtask is cached based on its idempotency key.
- Intelligent retries: If a failure occurs, only the failed subtask and subsequent tasks are retried.
Example: Video processing workflow
Let’s rewrite theconvert-video task above to be more durable:
How retries work
Let’s say the email sending fails in our video processing workflow. Here’s how the retry process works:- The main task throws an error and is scheduled for retry.
- When retried, it starts from the beginning, but leverages cached results for completed subtasks.
The build system
When you runnpx trigger.dev@latest deploy or npx trigger.dev@latest dev, we build your task code using our build system, which is powered by esbuild. When deploying, the code is packaged up into a Docker image and deployed to your Trigger.dev instance. When running in dev mode, the code is built and run locally on your machine. Some features of our build system include:
- Bundled by default: Code + dependencies are bundled and tree-shaked by default.
- Build extensions: Use and write custom build extensions to transform your code or the resulting docker image.
- ESM ouput: We output to ESM, which allows tree-shaking and better performance.
--dry-run flag, which will output the Containerfile and the build output.
Learn more about working with our build system in the configuration docs.
Dev mode
When you runnpx trigger.dev@latest dev, we run your task code locally on your machine. All scheduling is still done in the Trigger.dev server instance, but the task code is run locally. This allows you to develop and test your tasks locally before deploying them to the cloud, and is especially useful for debugging and testing.
- The same build system is used in dev mode, so you can be sure that your code will run the same locally as it does in the cloud.
- Changes are automatically detected and a new version is spun up when you save your code.
- Add debuggers and breakpoints to your code and debug it locally.
- Each task is run in a separate process, so you can run multiple tasks in parallel.
- Auto-cancels tasks when you stop the dev server.
Trigger.dev currently does not support “offline” dev mode, where you can run tasks without an
internet connection. Please let us know if this is a feature you
want/need.
Staging and production environments
Trigger.dev supports deploying toprod and staging environments. This allows you to test your tasks in a staging environment before deploying them to production. You can deploy to a different environment by running npx trigger.dev@latest deploy --env <env>, where <env> is either prod or staging. Each environment has its own API Key, which you can use to trigger tasks in that environment.
For additional isolated environments, you can use preview branches, which allow you to create separate environments for each branch of your code.
OpenTelemetry
The Trigger.dev logging and task dashboard is powered by OpenTelemetry traces and logs, which allows you to trace your tasks and auto-instrument your code. We also auto-correlate logs from subtasks and parent tasks, making it easy view the entire trace of a task execution. A single run of the video processing task above looks like this in the dashboard: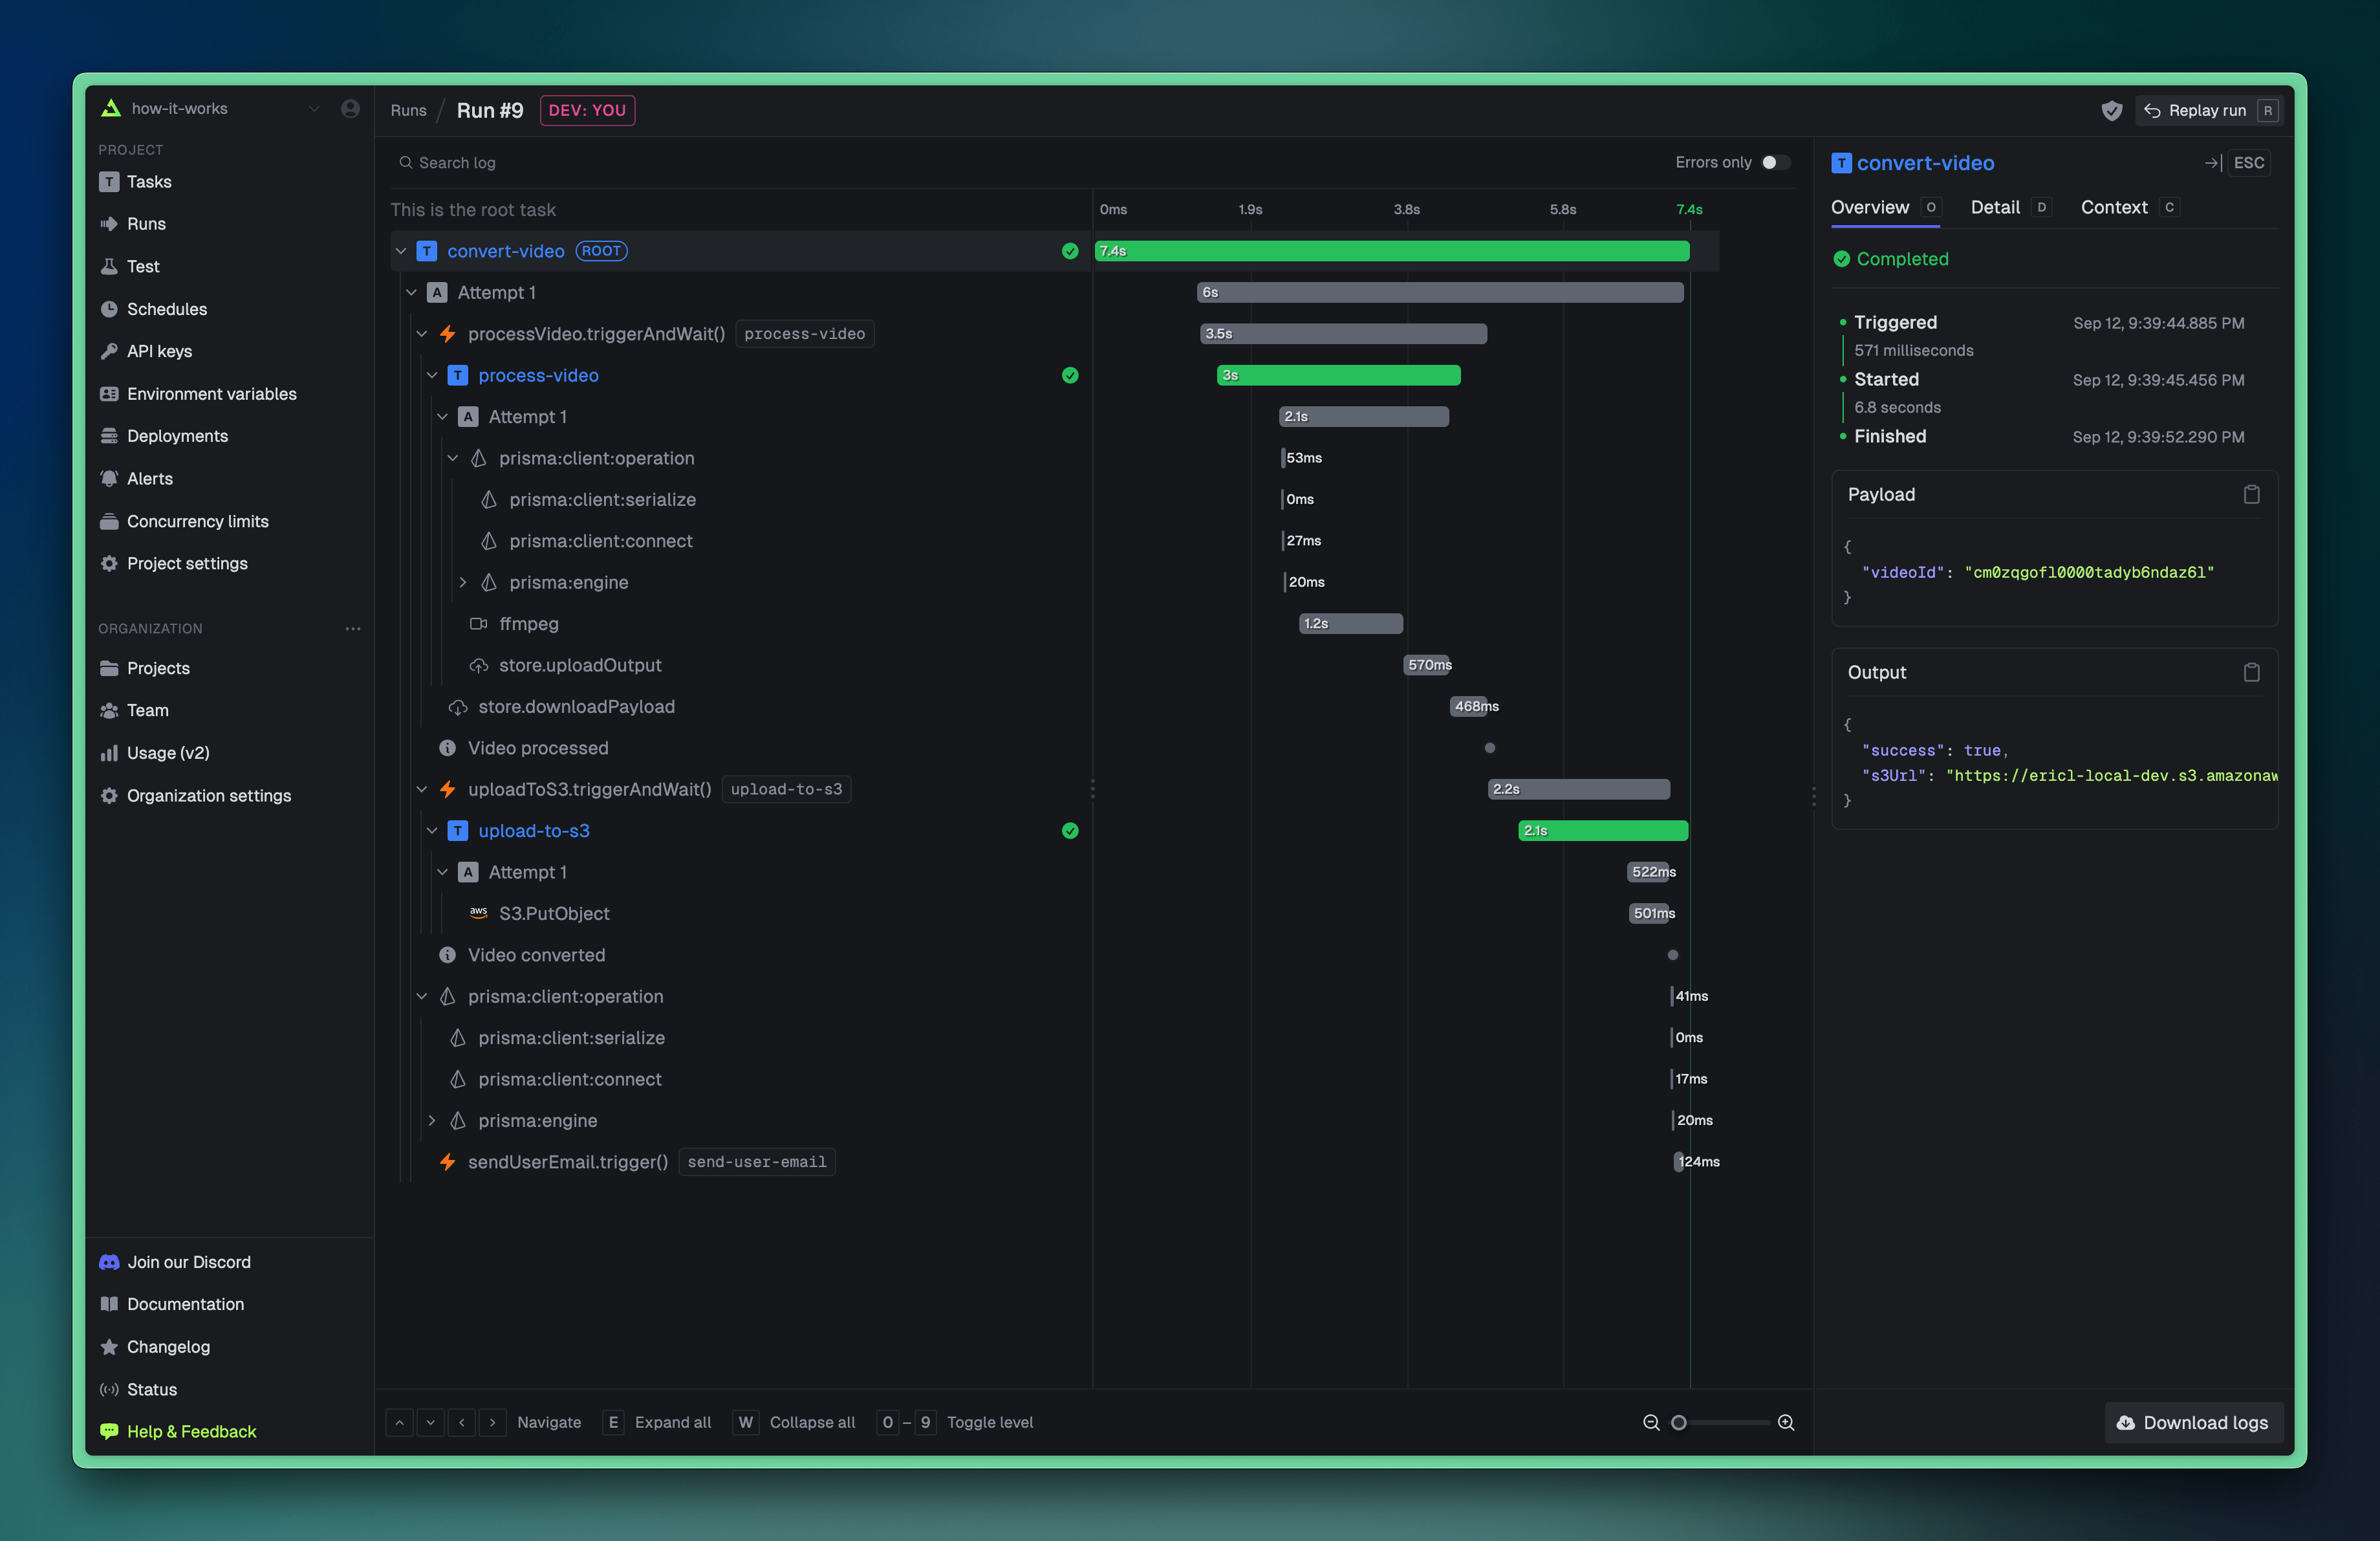
trigger.config.ts