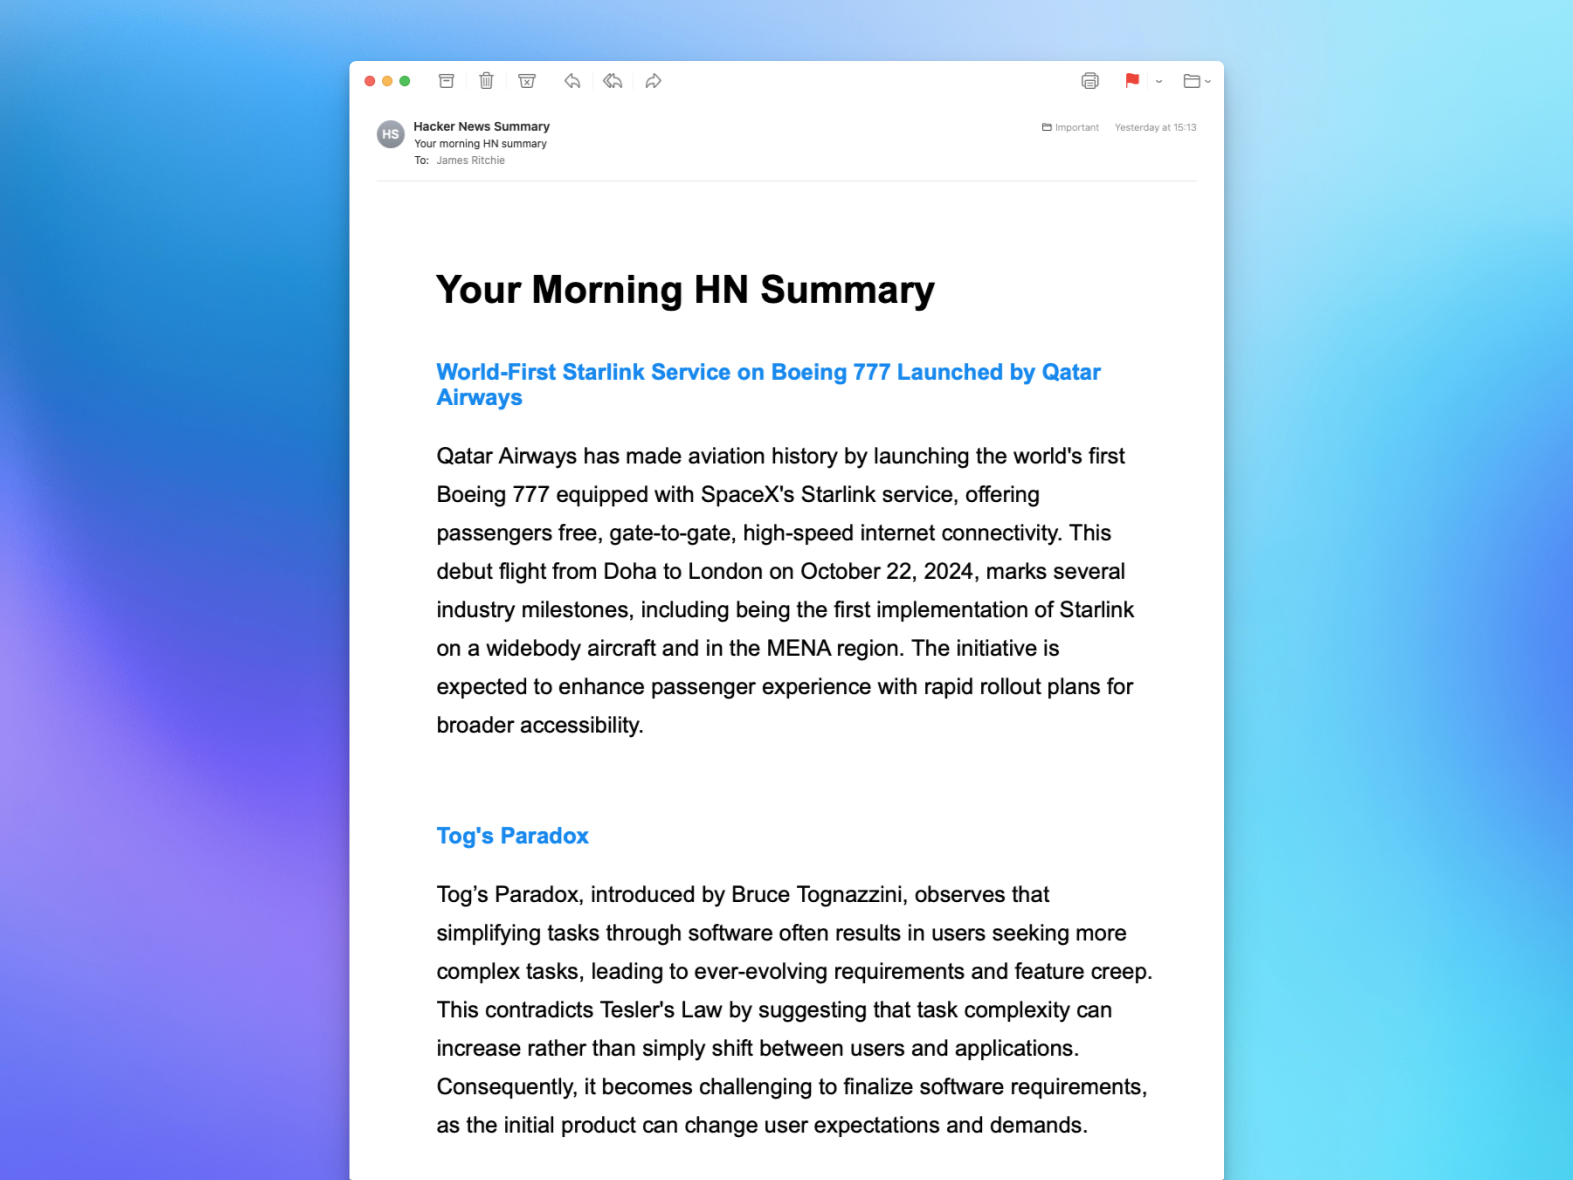
Article

·

How to scrape Hacker News to create a daily email summary

James Ritchie

James Ritchie

Co-founder, Trigger.dev

Image for How to scrape Hacker News to create a daily email summary

What you'll build

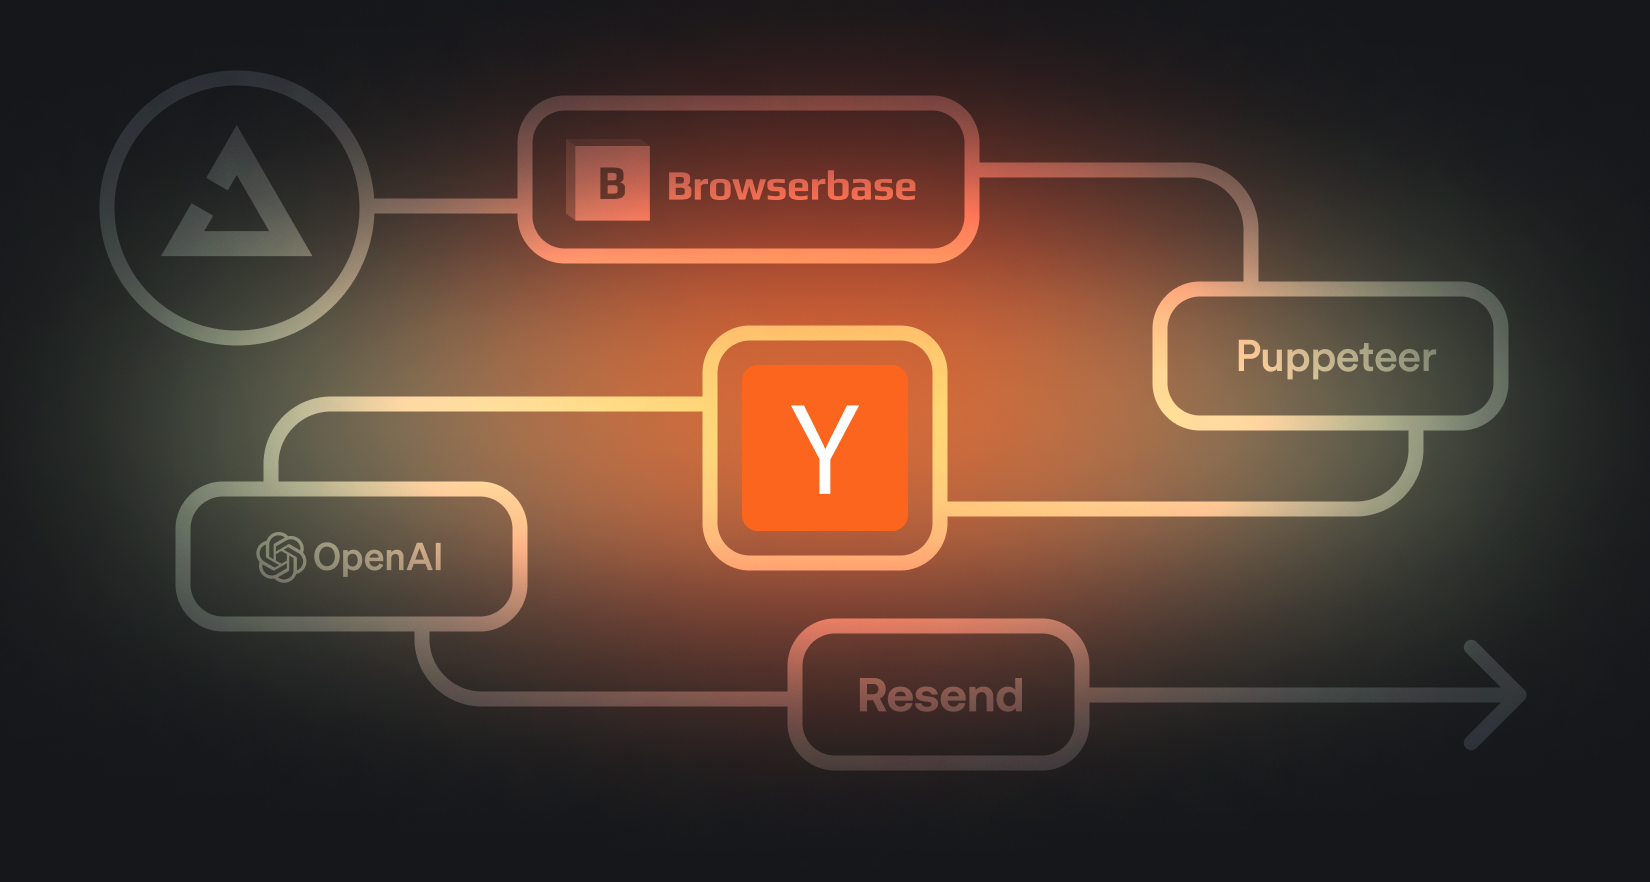
In this tutorial, you'll create a Trigger.dev task that scrapes the top 3 articles from Hacker News using BrowserBase and Puppeteer, summarizes them with ChatGPT and sends a nicely formatted email summary to yourself every weekday at 9AM using Resend.

Before you begin…

Check out this 4 minute video overview of this tutorial to get an idea of what we'll be building.

Prerequisites

Warning

When web scraping, you MUST use a proxy to comply with our terms of service. Direct scraping of third-party websites without the site owner’s permission using Trigger.dev Cloud is prohibited and will result in account suspension.

Configure your environment variables

Login to each of the services and grab the API keys. Add them to your local .env file so we can run a local test of our task later on.


_10
BROWSERBASE_API_KEY: "<your BrowserBase API key>"
_10
OPENAI_API_KEY: "<your OpenAI API key>"
_10
RESEND_API_KEY: "<your Resend API key>"

Install Puppeteer

Before you can run your task locally, you need to install Puppeteer on your local machine. Check out the Puppeteer installation guide for more information.


_10
npm i puppeteer

Write your task code

Create a new file called trigger/scrape-hacker-news.ts in the trigger folder in your project and add the following code below.

The best way to understand how the following 2 tasks work is by following the comments, but here's a quick overview:

  1. The parent task summarizeHackerNews is set to run every weekday at 9AM using the cron property.
  2. It connects to BrowserBase to proxy the scraping of the Hacker News articles.
  3. It then gets the title and link of the top 3 articles on Hacker News.
  4. Next, it triggers a child task called scrapeAndSummarizeArticle for each of our 3 articles using the batchTriggerAndWait method. You can learn more about batching in the docs.
  5. The child task, scrapeAndSummarizeArticle, scrapes the content of each article using Puppeteer and summarizes it using ChatGPT.
  6. The parent task waits for all of the child tasks to complete before continuing.
  7. Finally, the parent task sends an email summary to you using Resend and React Email using the 'summaries' it's generated from the child tasks.

Ensure you replace the placeholder email addresses with your own.

trigger/scrape-hacker-news.ts

_137
import { render } from "@react-email/render";
_137
import { logger, schedules, task, wait } from "@trigger.dev/sdk/v3";
_137
import { OpenAI } from "openai";
_137
import puppeteer from "puppeteer-core";
_137
import { Resend } from "resend";
_137
import { HNSummaryEmail } from "./summarize-hn-email";
_137
_137
const openai = new OpenAI({ apiKey: process.env.OPENAI_API_KEY });
_137
const resend = new Resend(process.env.RESEND_API_KEY);
_137
_137
// Parent task (scheduled to run 9AM every weekday)
_137
export const summarizeHackerNews = schedules.task({
_137
id: "summarize-hacker-news",
_137
cron: {
_137
pattern: "0 9 * * 1-5",
_137
timezone: "Europe/London",
_137
}, // Run at 9 AM, Monday to Friday
_137
run: async () => {
_137
// Connect to BrowserBase to proxy the scraping of the Hacker News articles
_137
const browser = await puppeteer.connect({
_137
browserWSEndpoint: `wss://connect.browserbase.com?apiKey=${process.env.BROWSERBASE_API_KEY}`,
_137
});
_137
logger.info("Connected to Browserbase");
_137
_137
const page = await browser.newPage();
_137
_137
// Navigate to Hacker News and scrape top 3 articles
_137
await page.goto("https://news.ycombinator.com/news", {
_137
waitUntil: "networkidle0",
_137
});
_137
logger.info("Navigated to Hacker News");
_137
_137
const articles = await page.evaluate(() => {
_137
const items = document.querySelectorAll(".athing");
_137
return Array.from(items)
_137
.slice(0, 3)
_137
.map((item) => {
_137
const titleElement = item.querySelector(".titleline > a");
_137
const link = titleElement?.getAttribute("href");
_137
const title = titleElement?.textContent;
_137
return { title, link };
_137
});
_137
});
_137
logger.info("Scraped top 3 articles", { articles });
_137
_137
await browser.close();
_137
await wait.for({ seconds: 5 });
_137
_137
// Use batchTriggerAndWait to process articles
_137
const summaries = await scrapeAndSummarizeArticle
_137
.batchTriggerAndWait(
_137
articles.map((article) => ({
_137
payload: { title: article.title!, link: article.link! },
_137
idempotencyKey: article.link,
_137
}))
_137
)
_137
.then((batch) =>
_137
batch.runs.filter((run) => run.ok).map((run) => run.output)
_137
);
_137
_137
// Send email using Resend
_137
await resend.emails.send({
_137
from: "Hacker News Summary <[email protected]>",
_137
_137
subject: "Your morning HN summary",
_137
html: render(<HNSummaryEmail articles={summaries} />),
_137
});
_137
_137
logger.info("Email sent successfully");
_137
},
_137
});
_137
_137
// Child task for scraping and summarizing individual articles
_137
export const scrapeAndSummarizeArticle = task({
_137
id: "scrape-and-summarize-articles",
_137
retry: {
_137
maxAttempts: 3,
_137
minTimeoutInMs: 5000,
_137
maxTimeoutInMs: 10000,
_137
factor: 2,
_137
randomize: true,
_137
},
_137
run: async ({ title, link }: { title: string; link: string }) => {
_137
logger.info(`Summarizing ${title}`);
_137
_137
const browser = await puppeteer.connect({
_137
browserWSEndpoint: `wss://connect.browserbase.com?apiKey=${process.env.BROWSERBASE_API_KEY}`,
_137
});
_137
const page = await browser.newPage();
_137
_137
// Prevent all assets from loading, images, stylesheets etc
_137
await page.setRequestInterception(true);
_137
page.on("request", (request) => {
_137
if (
_137
["script", "stylesheet", "image", "media", "font"].includes(
_137
request.resourceType()
_137
)
_137
) {
_137
request.abort();
_137
} else {
_137
request.continue();
_137
}
_137
});
_137
_137
await page.goto(link, { waitUntil: "networkidle0" });
_137
logger.info(`Navigated to article: ${title}`);
_137
_137
// Extract the main content of the article
_137
const content = await page.evaluate(() => {
_137
const articleElement = document.querySelector("article") || document.body;
_137
return articleElement.innerText.trim().slice(0, 1500); // Limit to 1500 characters
_137
});
_137
_137
await browser.close();
_137
_137
logger.info(`Extracted content for article: ${title}`, { content });
_137
_137
// Summarize the content using ChatGPT
_137
const response = await openai.chat.completions.create({
_137
model: "gpt-4o",
_137
messages: [
_137
{
_137
role: "user",
_137
content: `Summarize this article in 2-3 concise sentences:\n\n${content}`,
_137
},
_137
],
_137
});
_137
_137
logger.info(`Generated summary for article: ${title}`);
_137
_137
return {
_137
title,
_137
link,
_137
summary: response.choices[0].message.content,
_137
};
_137
},
_137
});

Create your React Email template

Install React Email and the @react-email/components package:


_10
npm i @react-email/components

Create a new file called summarize-hn-email.tsx in your project and add the following code. This is currently a simple but nicely styled email template that you can customize to your liking.

summarize-hn-email.tsx

_37
import {
_37
Html,
_37
Head,
_37
Body,
_37
Container,
_37
Section,
_37
Heading,
_37
Text,
_37
Link,
_37
} from "@react-email/components";
_37
_37
interface Article {
_37
title: string;
_37
link: string;
_37
summary: string | null;
_37
}
_37
_37
export const HNSummaryEmail: React.FC<{ articles: Article[] }> = ({
_37
articles,
_37
}) => (
_37
<Html>
_37
<Head />
_37
<Body style={{ fontFamily: "Arial, sans-serif", padding: "20px" }}>
_37
<Container>
_37
<Heading as="h1">Your Morning HN Summary</Heading>
_37
{articles.map((article, index) => (
_37
<Section key={index} style={{ marginBottom: "20px" }}>
_37
<Heading as="h3">
_37
<Link href={article.link}>{article.title}</Link>
_37
</Heading>
_37
<Text>{article.summary || "No summary available"}</Text>
_37
</Section>
_37
))}
_37
</Container>
_37
</Body>
_37
</Html>
_37
);

Do a test run locally

Once you've written your task code, you can do a test run locally to make sure everything is working as expected. Run the Trigger.dev dev command to start the background worker:


_10
npx trigger.dev@latest dev

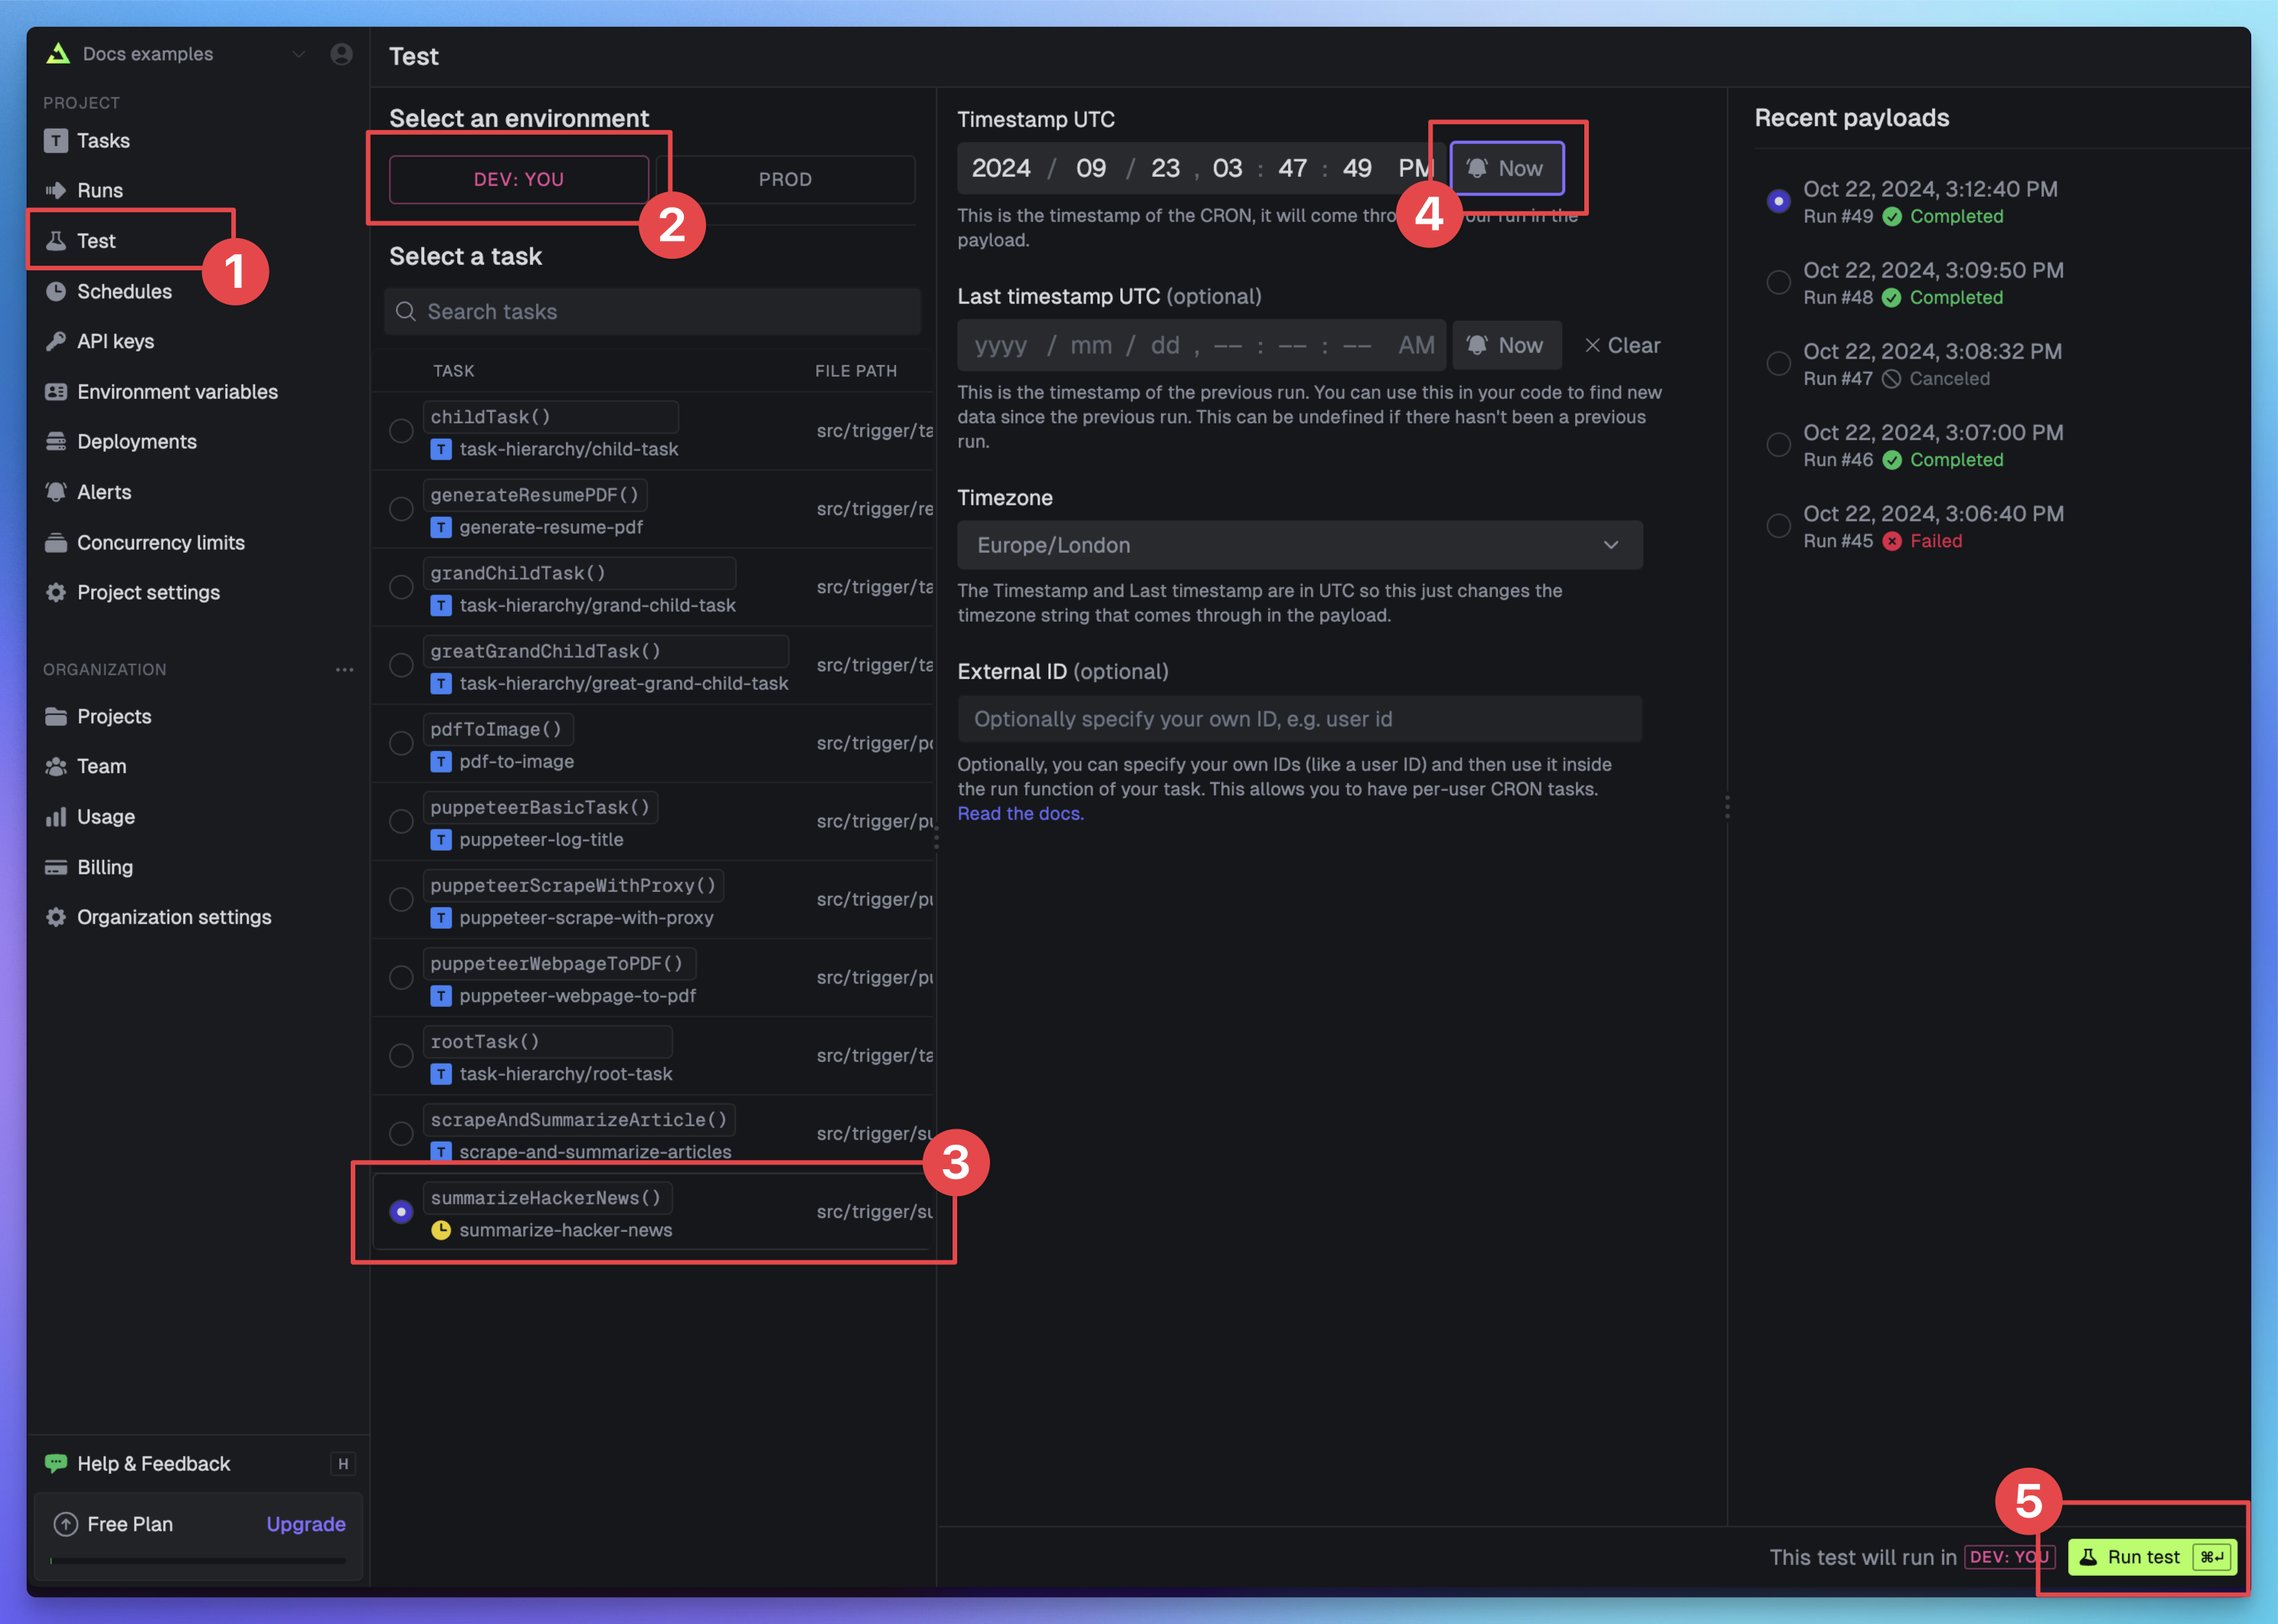
Next, go to the Trigger.dev dashboard and click Test in the left hand side menu (1). Choose DEV from the environment options at the top of the page (2), select your task (3), click Now to ensure your task runs immediately (4), and then click the Run test button to trigger your test (5).

Run test

You should see your task run and an email sent to you with the Hacker News summary.

It's worth noting that some Hacker News articles might not be accessible. The tasks will each attempt 3 times before giving up and returning an error. Some reasons for this could be that the main content of the article isn't accessible via the article HTML element or that the page has a paywall or the Hacker News post links to a video file. Feel free to edit the task code to handle these cases.

Deploy your task to the Trigger.dev cloud

Once you're happy with your task code, you can deploy it to the Trigger.dev cloud. To do this, you'll first need to add Puppeteer to your build configuration.

Add Puppeteer to your build configuration

trigger.config.ts

_11
import { defineConfig } from "@trigger.dev/sdk/v3";
_11
import { puppeteer } from "@trigger.dev/build/extensions/puppeteer";
_11
_11
export default defineConfig({
_11
project: "<project ref>",
_11
// Your other config settings...
_11
build: {
_11
// This is required to use the Puppeteer library
_11
extensions: [puppeteer()],
_11
},
_11
});

Add your environment variables to the Trigger.dev project

Previously, we added our environment variables to the .env file. Now we need to add them to the Trigger.dev project settings so our deployed task can access them. You can copy all of the environment variables from your .env file at once, and paste them all into the Environment variables page in the Trigger.dev dashboard.

Deploy your task

Finally, you can deploy your task to the Trigger.dev cloud by running the trigger.dev@latest deploy command.


_10
npx trigger.dev@latest deploy

Run your task in Production

Once your task is deployed, it will run every weekday at 9AM. You can check the status of your task in the Trigger.dev dashboard by clicking on the Runs tab in the left hand side menu.

If you want to manually trigger your task in production, you can repeat the steps from your local DEV test earlier but this time select PROD from the environment options at the top of the page.

Final email

Ready to start building?

Build and deploy your first task in 3 minutes.

Get started now
,