The Run Engine is the core code that takes a run from triggering to completion. It doesn't execute your task code but it does handle queuing, state management, and orchestrating execution.
Today we're announcing version 2.0 which is a complete rewrite of the engine. This new version is faster, more reliable, and more scalable than the previous version. It will be in early access and opt-in until it has exceeded all of our v1 engine benchmarks.
First I'll cover what's new and then we'll dig into some of the technical details.
Warm starts
At the moment all runs are "cold starts", which means we spin up a fresh container for every run. This means the best start times you'll see are just over 2 seconds.
The new engine allows us to do "warm starts", this means start times under 1 second. When a run finishes we try and dequeue another run from the same deployment (container image). If one exists we'll run it, avoiding a cold start. This means faster start times when lots of runs are happening. It also means higher overall throughput, as per unit time you can do more runs.
This is possible because of our new Run Queue, more on the technical details later…
Workers
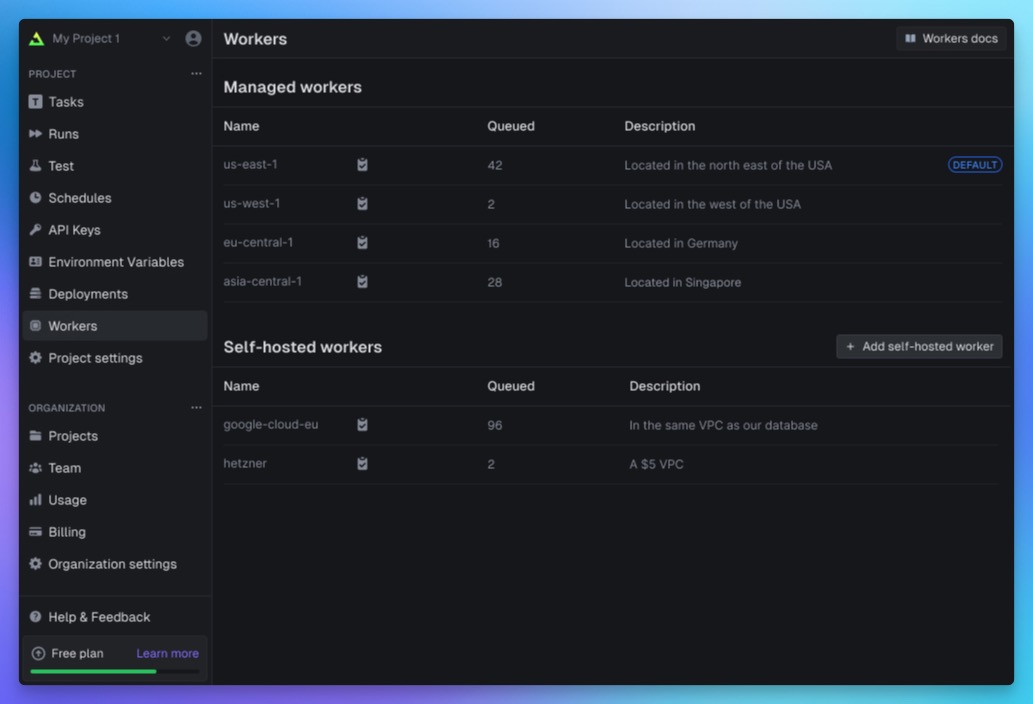
There are some big improvements coming to workers: multi-region and self-hosted workers.
Multi-region workers
We'll be rolling regions out based on demand, starting with our existing us-east-1 region and adding eu-central-1.
You can set your default region on the "Workers" dashboard page, plus you can specify a region when you trigger a run:
This means you can run your tasks closer to your data, or closer to your users. Note that this won't change where your run logs or run data is stored, that will still be in us-east-1.
Self-hosted workers
Up until now, all runs on the cloud have been executed on our infrastructure. This has a lot of advantages including auto-scaling, atomic versioning, checkpoints, and not having to think about infrastructure.
With self-hosted workers you can deploy workers where you'd like and connect them to the cloud. This means you can run tasks inside a private network with access to any private resources like databases.
You can set a worker group as the default, or decide when you trigger a run:
Self-hosted workers will have some trade-offs. They can't use checkpoints so machines won't spin to zero when you use our wait functions, you'll have to manage scaling, and when deploying you'll have to keep old versions around if runs are still executing.
We'll share more details at the start of next year, including pricing.
Star and watch our GitHub repo to keep up to date with the latest features.
Multi-cloud resiliency
Up until now we've only had support for a single connected worker cluster. This means in the rare times our cloud provider has an issue, we have an issue. With this change we will add multiple worker clusters in each region. This will be completely invisible to you, but it means if there is an issue we can divert runs to another cluster in the same region.
Waitpoints
Right now, inside your runs you can wait for a point in time and wait for subtasks to complete.
In the new Run Engine we’ve created a new primitive called a “Waitpoint” that will power our existing waits and provide additional capabilities.
A Waitpoint is something that can block runs from continuing until conditions are met.
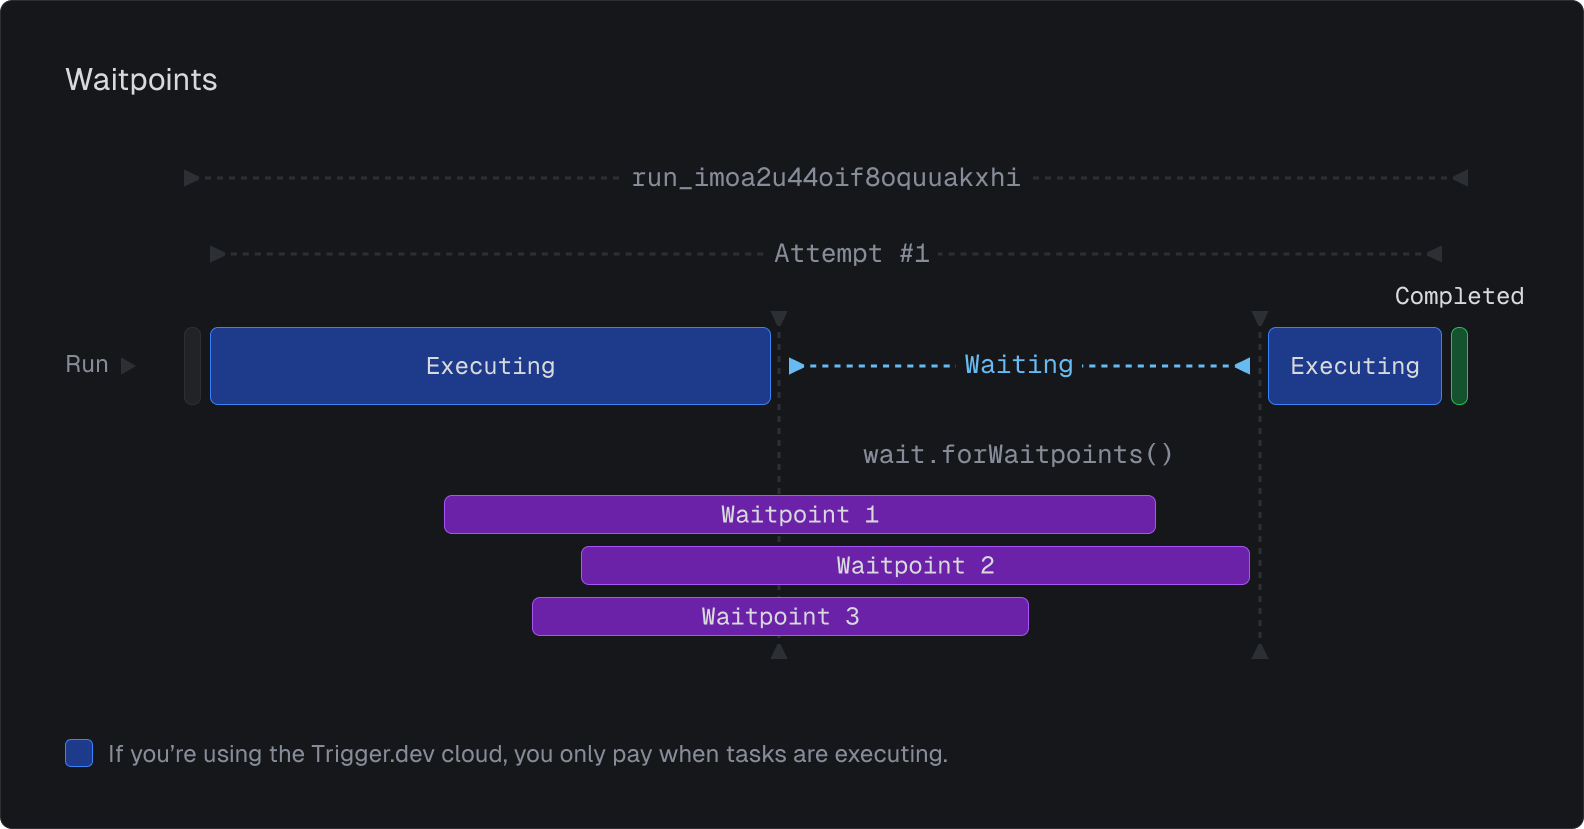
A single waitpoint can block multiple runs, and a single run can be blocked by multiple waitpoints.
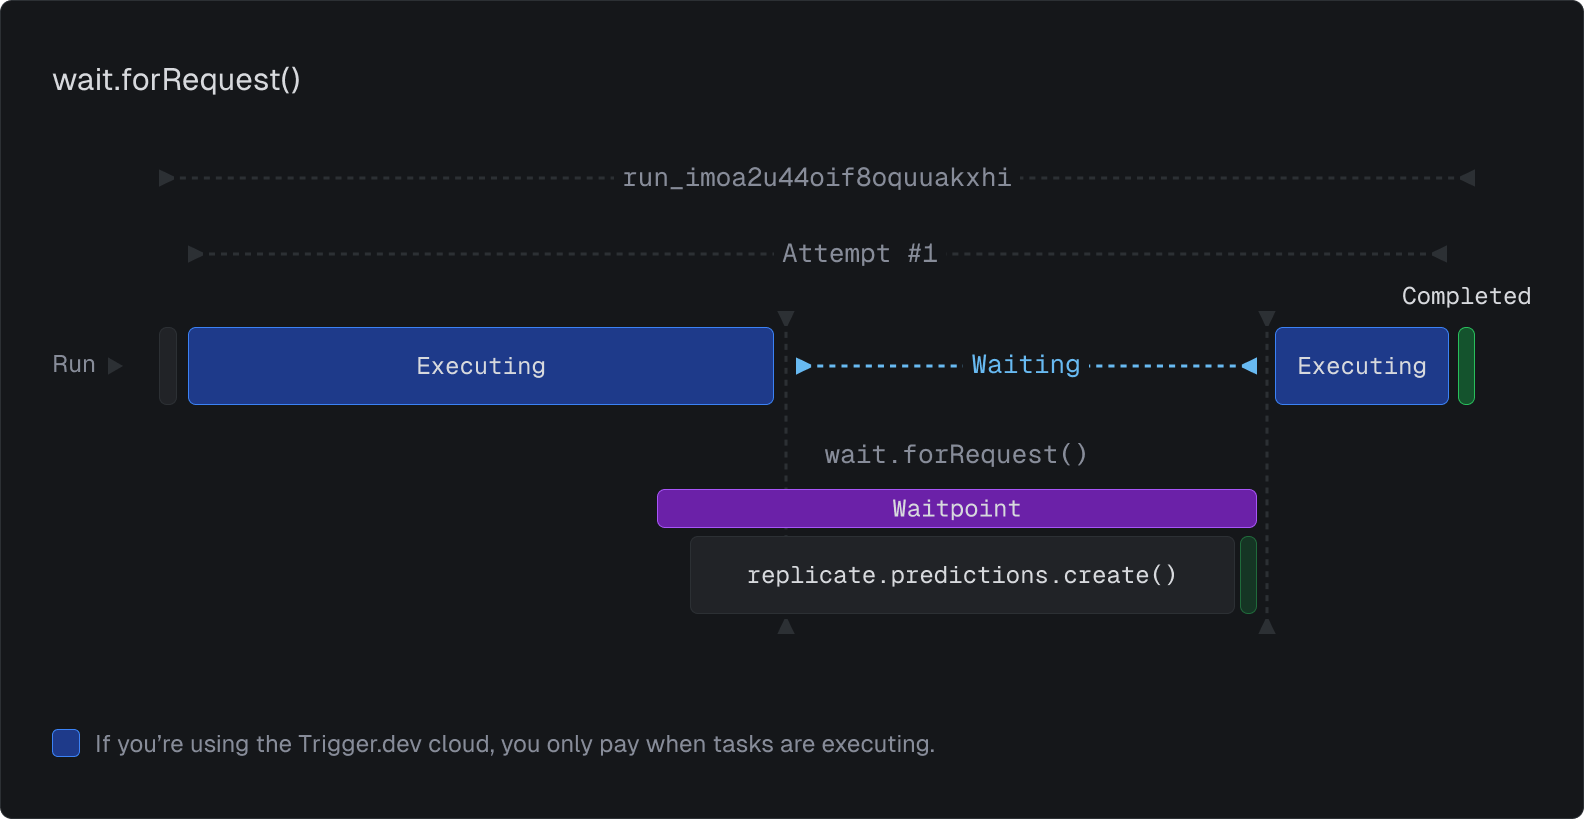
With our cloud managed workers you're not charged for compute time in your tasks while waitpoints are pending.
Let's look at the new ways you can use waitpoints:
Wait for request
Wait until a request is made to the URL we provide you. This is really useful for APIs that accept callback URLs, like Replicate's:
In the code above, a request is made to Replicate. When Replicate has completed the prediction it will make a request to the URL we provide, which will complete the waitpoint and continue the run. While waiting you're not charged for compute time (on cloud).
Wait for run(s)
You can already wait for a subtask to complete using triggerAndWait(), like this:
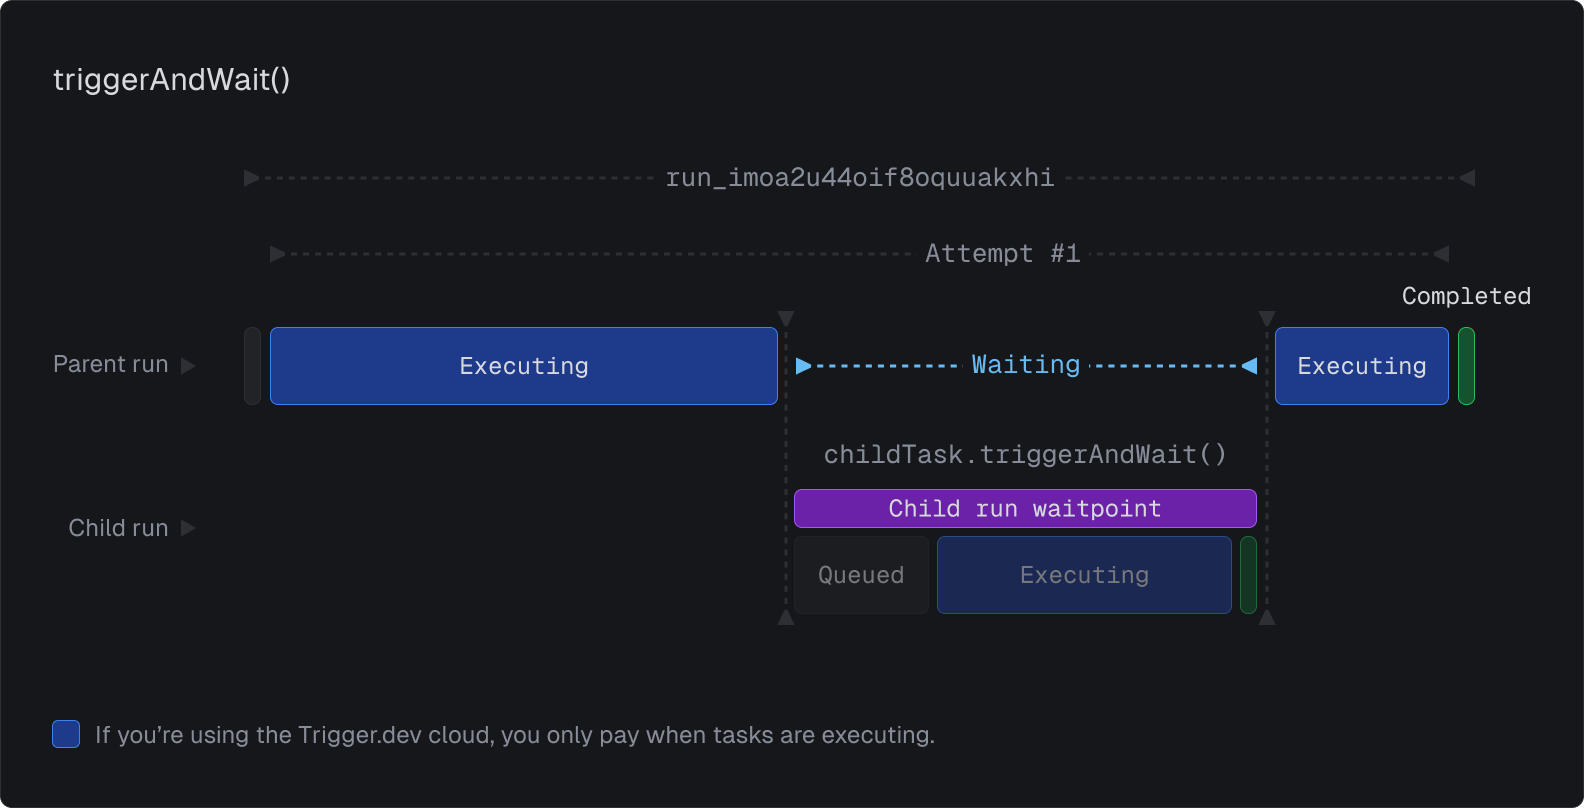
You can also wait for batches in a few different ways.
With the new run engine every run automatically has an associated waitpoint that is tied to its lifetime. This means you'll be able to wait for any runs that you have the ID for, even if they weren't triggered by the current run:
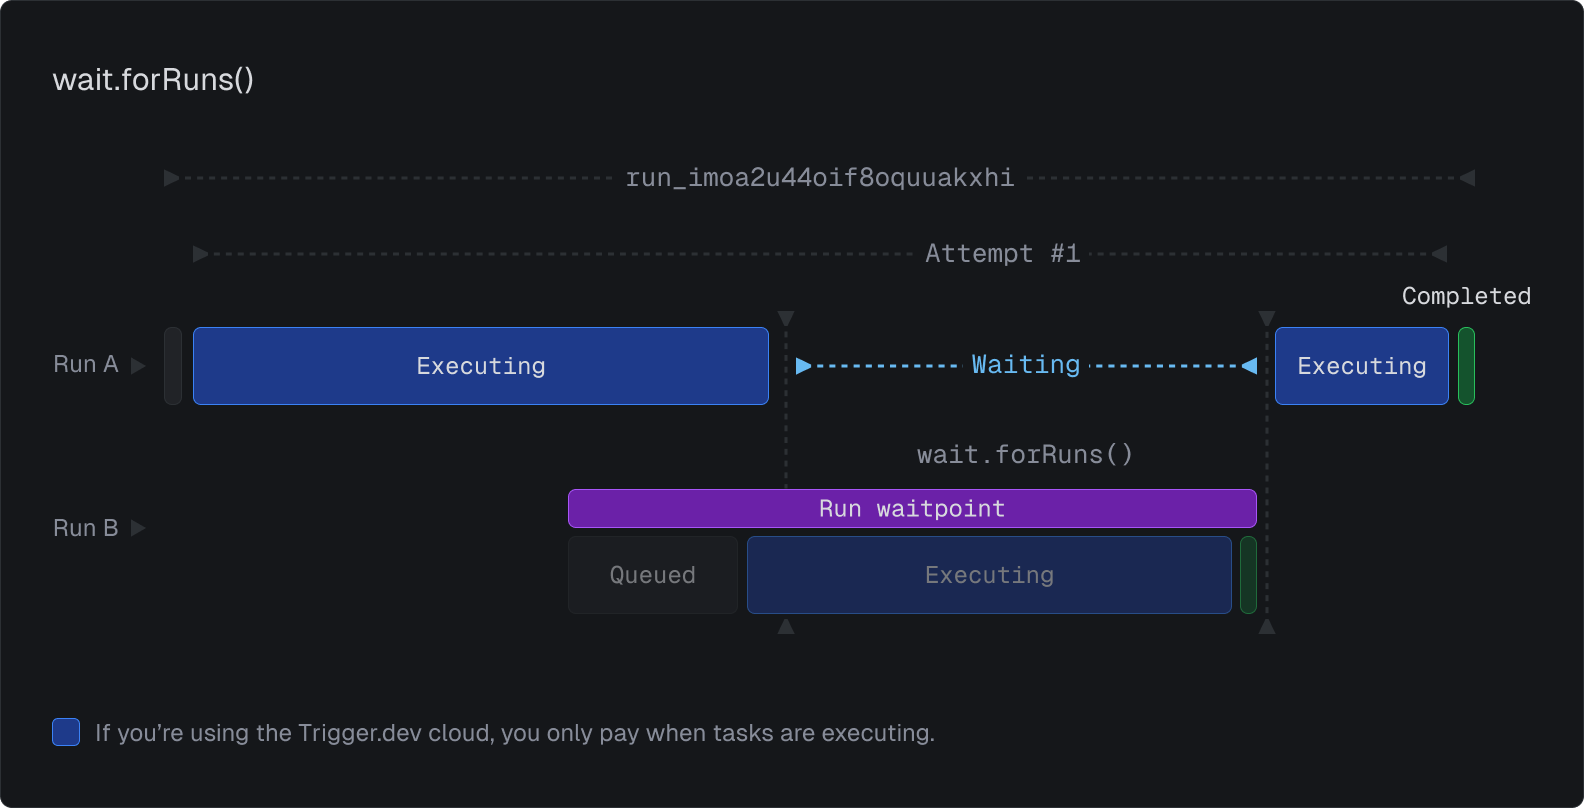
You can combine this with runs.list() and tags to do some pretty powerful things.
Manual waitpoint
The most powerful way to use waitpoints is to create and complete them manually. This allows you to pause execution of your tasks until you explicitly continue them.
In this example, we want to process a document if it is approved. In the backend before we trigger the task, we create a waitpoint:
In the task we wait for the approval, and then process the document:
When the approver makes a decision, we hit this API endpoint on the backend. We complete or fail the waitpoint, depending on their decision. Note that we can attach data to success and failures:
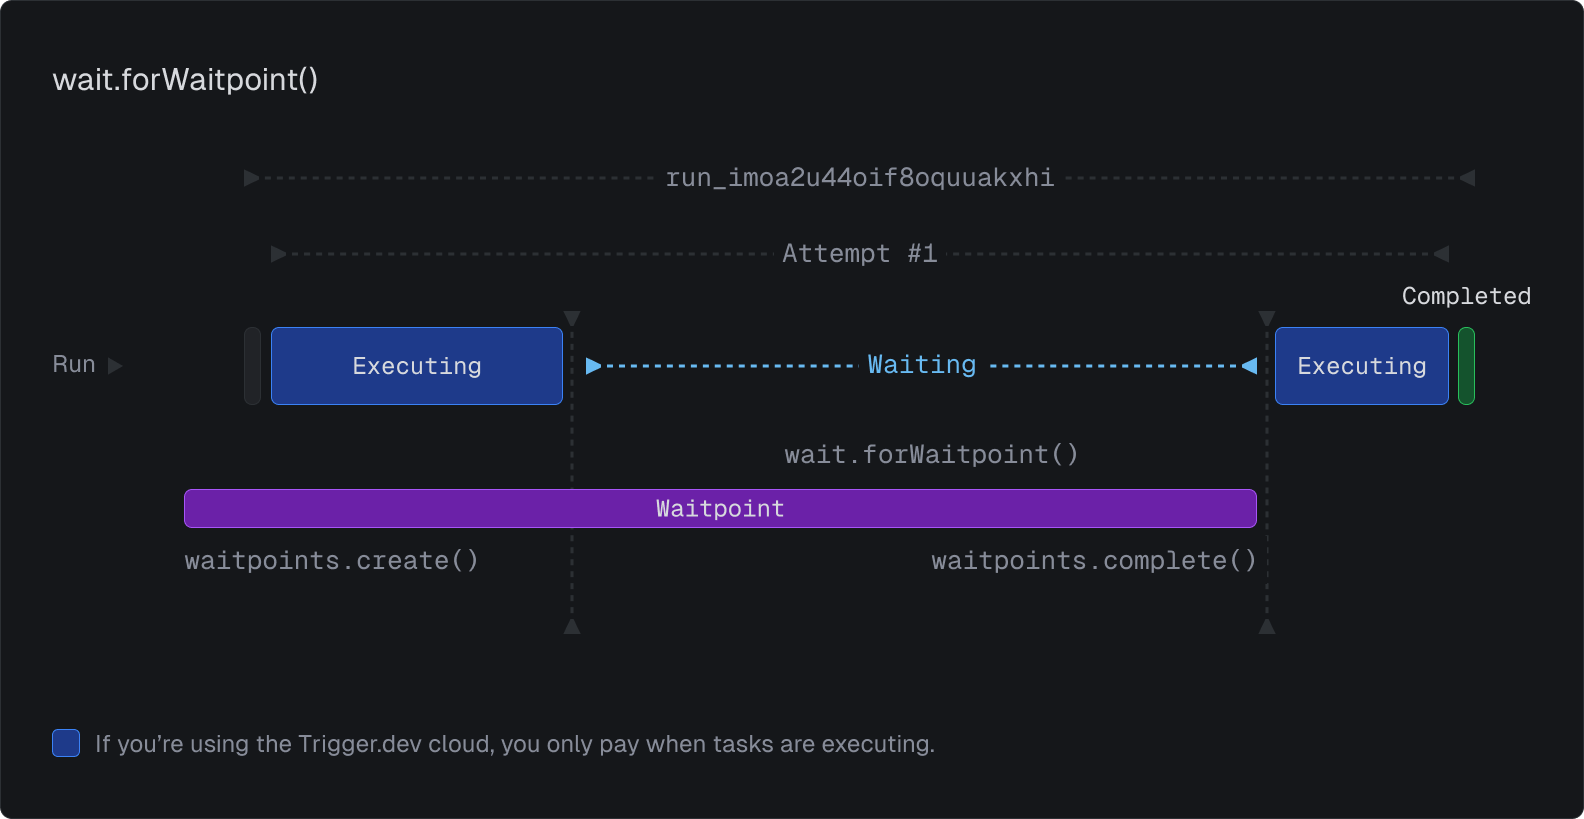
This allows you to build complex workflows that pause and resume based on external events. We will have additional SDK/API calls for you to manage waitpoints.
Get access to the Run Engine 2.0 alpha
The first 2.0 alpha release will be available to try soon. When the engine is stable and well tested in production we will switch it to being the default for all new deployments. I expect this be at some point in February but we will send updates as we progress.
Sign up to be part of the alpha and receive updates
Technical deepdive
OK now it's time for the nerdy stuff. There are some interesting technical changes in the new engine.
We're going to cover:
- Execution states, heartbeats and checkpoints.
- Our new Run Queue.
What exactly is the Run Engine?
The Run Engine is an internal package that has a class RunEngine that takes a run from triggering to completion. It is written in TypeScript and is executed using Node.js on long-running servers.
It uses Postgres for storing run state and the execution state. We use Redis for the Run Queue and now for internal job queuing as well.
Execution states, heartbeats and checkpoints
As a run executes it goes through a series of states. These are internal to the engine and are not exposed to the user.
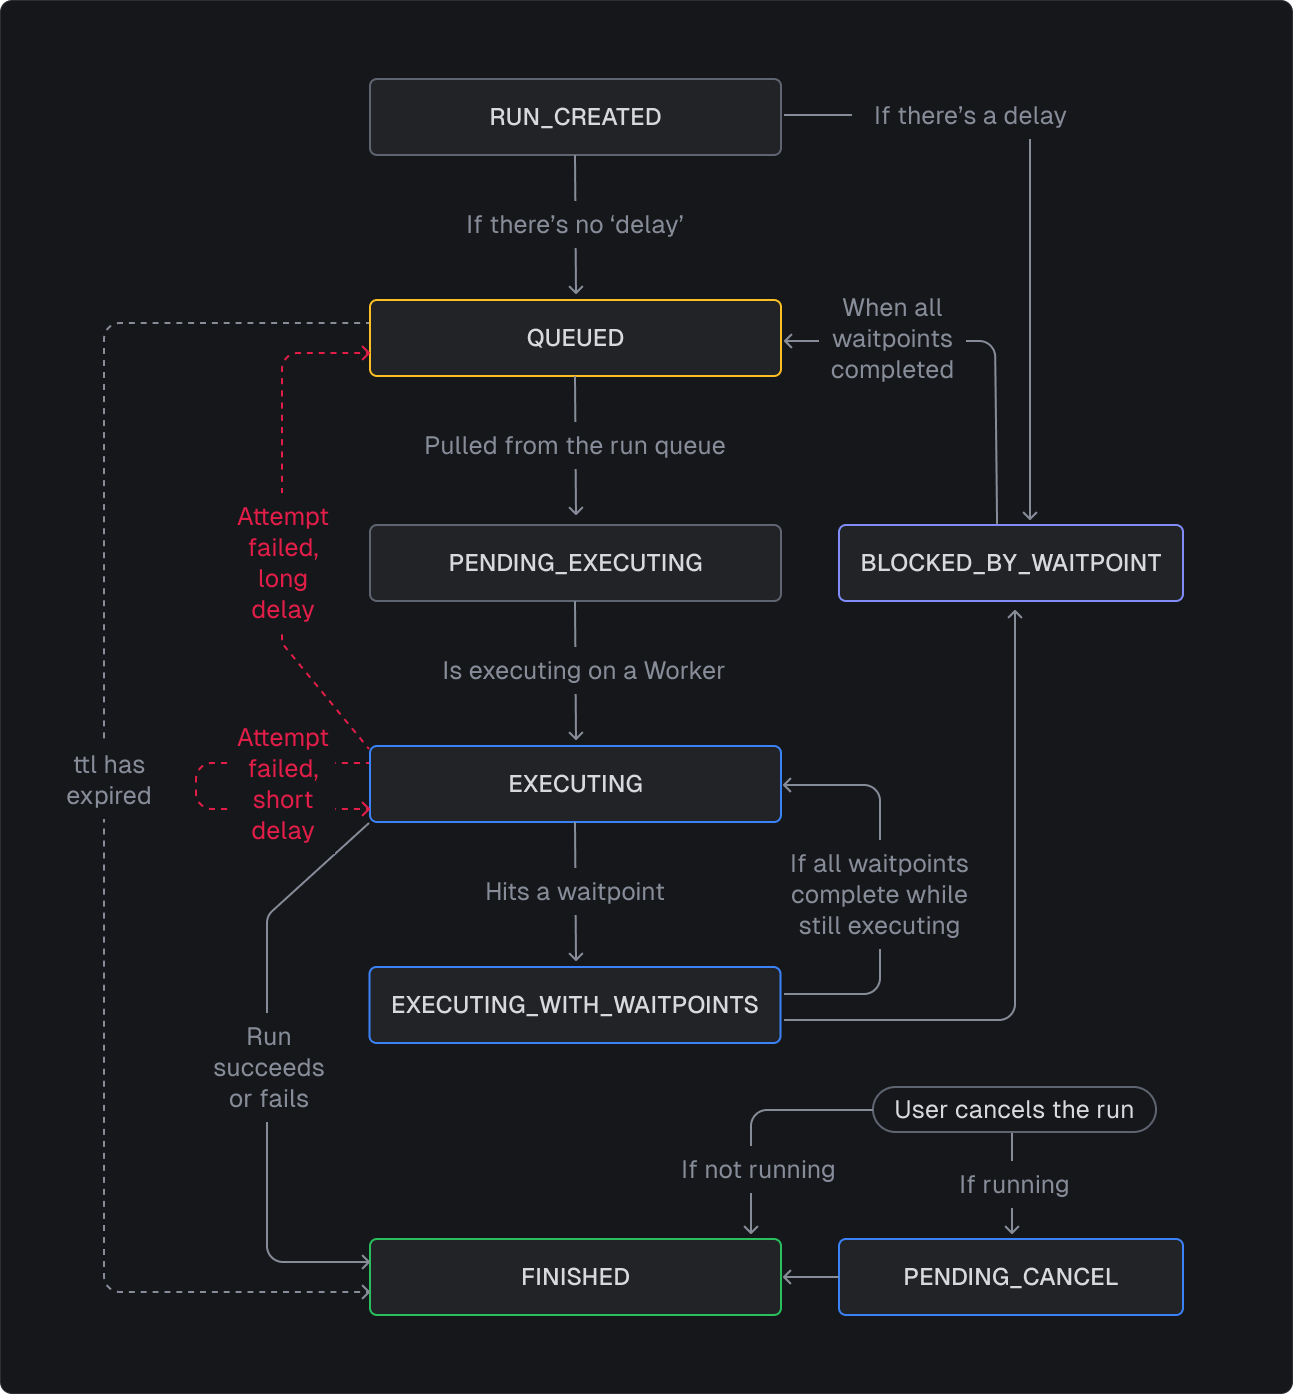
Everytime a run's execution state changes we create a new snapshot of that state in Postgres. This is append-only, we don't update the state. This means we have a full history for every run, which is useful for debugging and will be useful in future for replaying from specific checkpoints.
This is a simplified version of the Postgres table:
CREATE TABLE TaskRunExecutionSnapshot ( id VARCHAR(255) PRIMARY KEY, executionStatus TaskRunExecutionStatus NOT NULL, runId VARCHAR(255) NOT NULL, runStatus TaskRunStatus NOT NULL, attemptNumber INT, checkpointId VARCHAR(255), createdAt TIMESTAMP NOT NULL DEFAULT CURRENT_TIMESTAMP, FOREIGN KEY (runId) REFERENCES TaskRun(id), FOREIGN KEY (checkpointId) REFERENCES TaskRunCheckpoint(id), -- This index makes finding the latest snapshot for a run fast INDEX idx_runId_createdAt (runId, createdAt DESC));
Checkpoints and avoiding race conditions
A checkpoint is a snapshot of the CPU state, memory, and open file handles of a process. When you use our wait functions on the cloud platform, we use checkpoints to stop the machine and then restore it later. This means we don't waste CPU cycles and you don't pay for them.
Checkpoints are great but they introduce a distributed race condition. Let me explain why…
- You use
await myTask.triggerAndWait(data)in your task. - A new child run is created and blocks the parent with its waitpoint.
- The parent run is now in the
EXECUTING_WITH_WAITPOINTSstate. The machine is still running. - We create a checkpoint of the parent run, this is synchronous and takes ~500ms.
- The checkpoint gets pushed to Object Storage (R2/S3).
- An API call to the platform calls the
createCheckpointfunction below.
That's all fine, but what if the child run completes at the same time createCheckpoint is called? We don't want to associate the checkpoint with the run and we DEFINITELY do not want to shutdown the server that is once again executing the run.
This is why for many operations on a run we require a snapshot id. This means we can ignore operations on stale data, and avoid race conditions:
- We acquire a lock on the run. This uses Redlock, a distributed locking implementation that uses Redis. It will keep trying to acquire a lock until it succeeds, or the (5 second) timeout is reached. This means that only one lockable operation can be performed on a run at a time.
- We check the snapshot id for the checkpoint is the latest. If the run has moved on, we do nothing with the checkpoint.
Heartbeats
Heartbeats are used to detect stuck runs. The most common is when an executing run stops communicating with the platform, e.g. temporary network failure.
Each time the execution status of a run changes, we set a new heartbeat deadline associated with that new snapshot. If the heartbeat deadline is reached and the run hasn't moved on, the run is stale and we can take action depending on the state to recover it.
When a run is executing we send heartbeats out every 20 seconds, these extend the deadline, signalling that the run is still alive.
Heartbeats are tied to a snapshot, so if a run moves on to a new state an expired heartbeat will be ignored.
Updated Run Queue
The new version of the Run Queue is what makes warm starts, multi-region workers, and self-hosted workers possible. It also has faster dequeuing whilst still being a fair multi-tenant queue.
Pull-based
The most important change is that we've switched from push-based to pull-based. This means that connected workers ask the queue for runs, rather than the queue pushing runs to workers.
We have a few functions to pull items from the queue.
/* Select the fairest runs from the specified masterQueue. */async function dequeueFromMasterQueue(masterQueue: string, maxRunCount: number): Promise<DequeuedMessage[]> { //..}/* Select runs for a specific environment, e.g. user X's DEV environment. */async function dequeueFromEnvironment(environmentId: string, maxRunCount: number): Promise<DequeuedMessage[]> { //..}/* Select runs for a specific version, e.g. deployment 20241204.1 for project Y. */async function dequeueFromVersion(versionId: string, maxRunCount: number): Promise<DequeuedMessage[]> { //..}
Warm starts
When a run finishes executing we will attempt to get another run from the same deployment. To do this the worker makes a call to dequeueFromVersion with the relevant version from the run that just finished. A version is tied to a Docker image, so if there is a run we can start it straight away inside the existing container.
Multi-region workers and self-hosted workers
We now have the concept of multiple master queues. Each region will have its own master queue, e.g. "us-east-1", "eu-central-1". Workers will be aware of their region, so they can pull runs from the correct master queue.
const handle = await tasks.trigger<typeof importCSV>("import-csv", data, { //this will use the "eu-central-1" master queue worker: "eu-central-1",});
Self-hosted workers work in the same way. When you add a self-hosted worker group in the dashboard, we will create a new master queue for it that is namespaced under your project.
Faster dequeuing and fairness
We've been using Redis for a while for our Run Queue. In the latest version we allow dequeuing multiple runs at once, which is much faster.
Creating a First-In First-Out (FIFO) queue is easy, making it fair is much harder. It's really important that a queue is fair.
Fairness is critical even in a single-tenant environment, like if you rolled your own queue or used AWS SQS. It's very easy to have a task that dominates the queue, starving other tasks. You can use "priority" queues but normally this still results in some tasks being starved.
What you really want is multiple queues, one for each task (or in our case you can also define your own, even for each of your customers). Then you want to select the fairest queue to select a run from.
There is no correct way to select the fairest queue. For now we keep a score updated for each queue by combining the age of messages in the queue, the size of the queue, and the queue's available capacity. We use a moving window so new queues get considered every time dequeue is called and use some random weighting for selection.
The queue selection process is the most performance intensive part of the Run Queue. Everytime the dequeue function is called we need to select a fair queue and then dequeue a run. In the new Run Queue we do the same process but instead of selecting a single queue and run, we select multiple queues and cycle through them grabbing runs until we have enough. This is much faster and still fair.
Conclusion
The new Run Engine allows us to do warm starts, multi-region workers, and self-hosted workers. It also lays the groundwork for many other highly requested features.
We're excited to get this into your hands and hear your feedback. Sign up for early access, and come chat with us on Discord.
