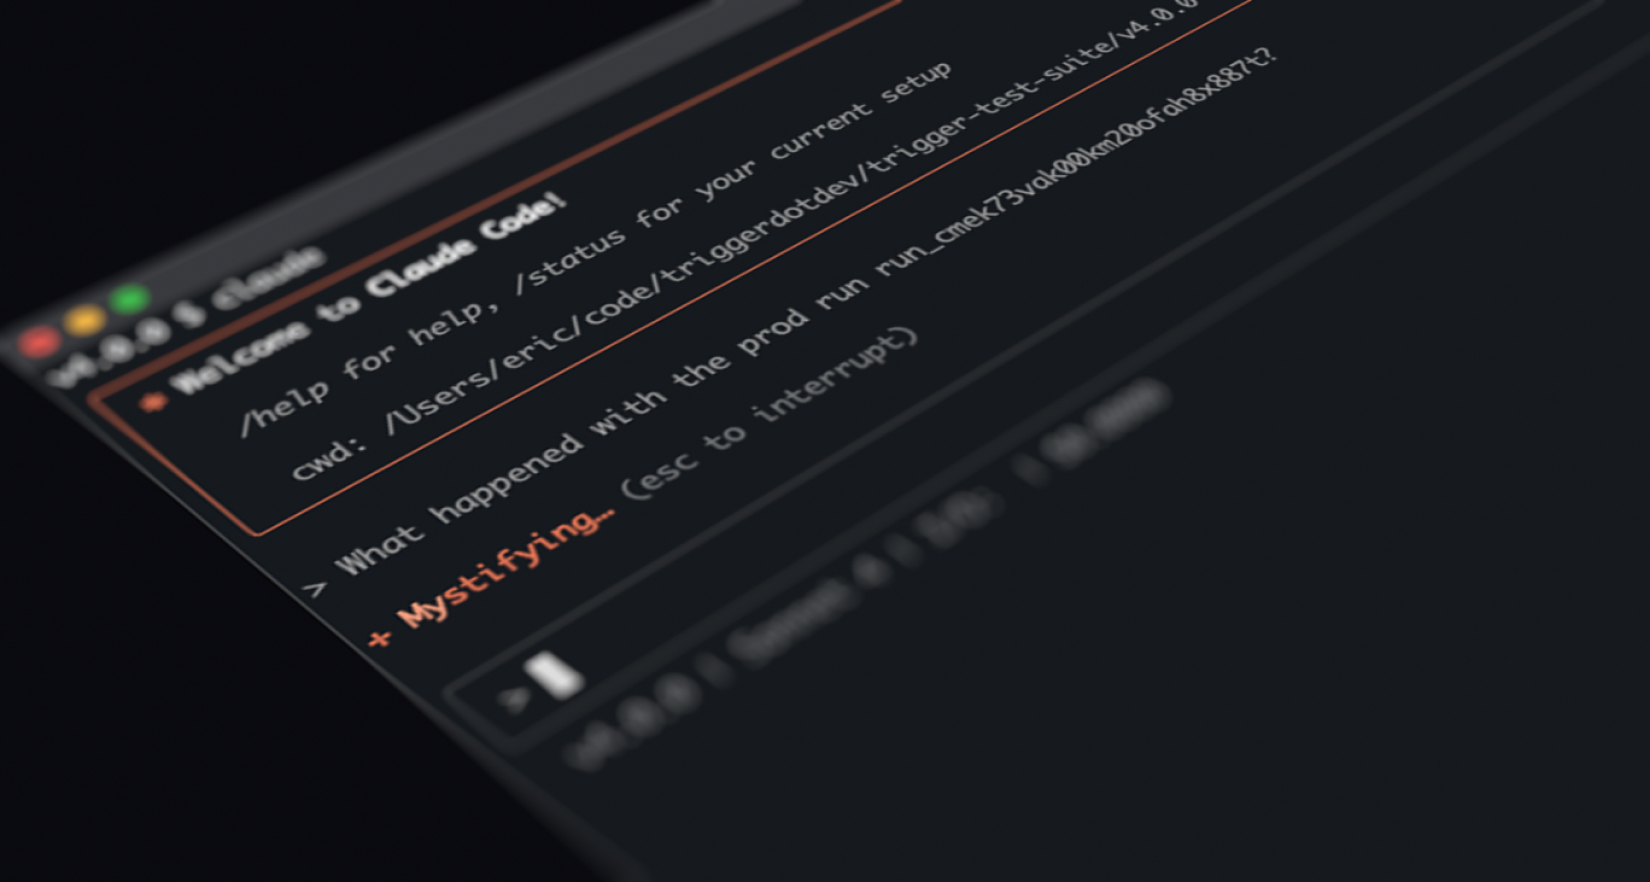
Today v4 comes out of beta and is Generally Available: this release represents our most significant performance and developer experience upgrade yet, built on our new Run Engine.
You can now build AI agents that are faster to start, are more reliable, and are pausable with human-in-the-loop workflows.
“Trigger made it easy to build agents which run our entire ad creation pipeline, generating thousands of custom video ads and static assets at scale.”
If you've been waiting for the stable release, now's the time to upgrade. For most projects, migration takes less than 5 minutes with minimal breaking changes.
Dramatically faster execution with warm starts
The biggest change you'll notice is speed. When a v4 run finishes, the machine stays running for a while. If there's another run for that version, we execute it on the same warm machine instead of booting a new one.
This dramatically cuts start times – most warm starts start in 100-300ms compared to several seconds for cold starts.
Process keep-alive
You can also opt-in to re-use the process when doing a warm start, saving on the time to import your code:
import { defineConfig } from "@trigger.dev/sdk";export default defineConfig({ project: "<project ref>", // This is false by default processKeepAlive: true, maxDuration: 60,});
Just make sure you're careful with any global state in your code, as it will be shared between runs.
Future speed improvements
We're not stopping here. We've started work on switching the Cloud to MicroVMs which give lightning fast cold start times, making all executions faster.
Advanced workflow control with waitpoints
V4 introduces "Waitpoints" – a powerful primitive that can block runs until conditions are met. A single waitpoint can block multiple runs, and a single run can be blocked by multiple waitpoints.
Human-in-the-loop with waitpoint tokens
Waitpoint tokens pause execution until you complete the token or it times out. Perfect for approval workflows, human validation, or AI agents that need human oversight:
// Create a token with an optional timeoutconst approvalToken = await wait.createToken({ timeout: "1d" });// In your task, wait for human approvalconst result = await wait.forToken<ApprovalPayload>(approvalToken);if (result.ok && result.output.approved) { await proceedWithOperation();} else { throw new Error("Operation not approved");}// Complete the token from your backend/UIawait wait.completeToken(approvalToken, { approved: true, reason: "Looks good to me",});
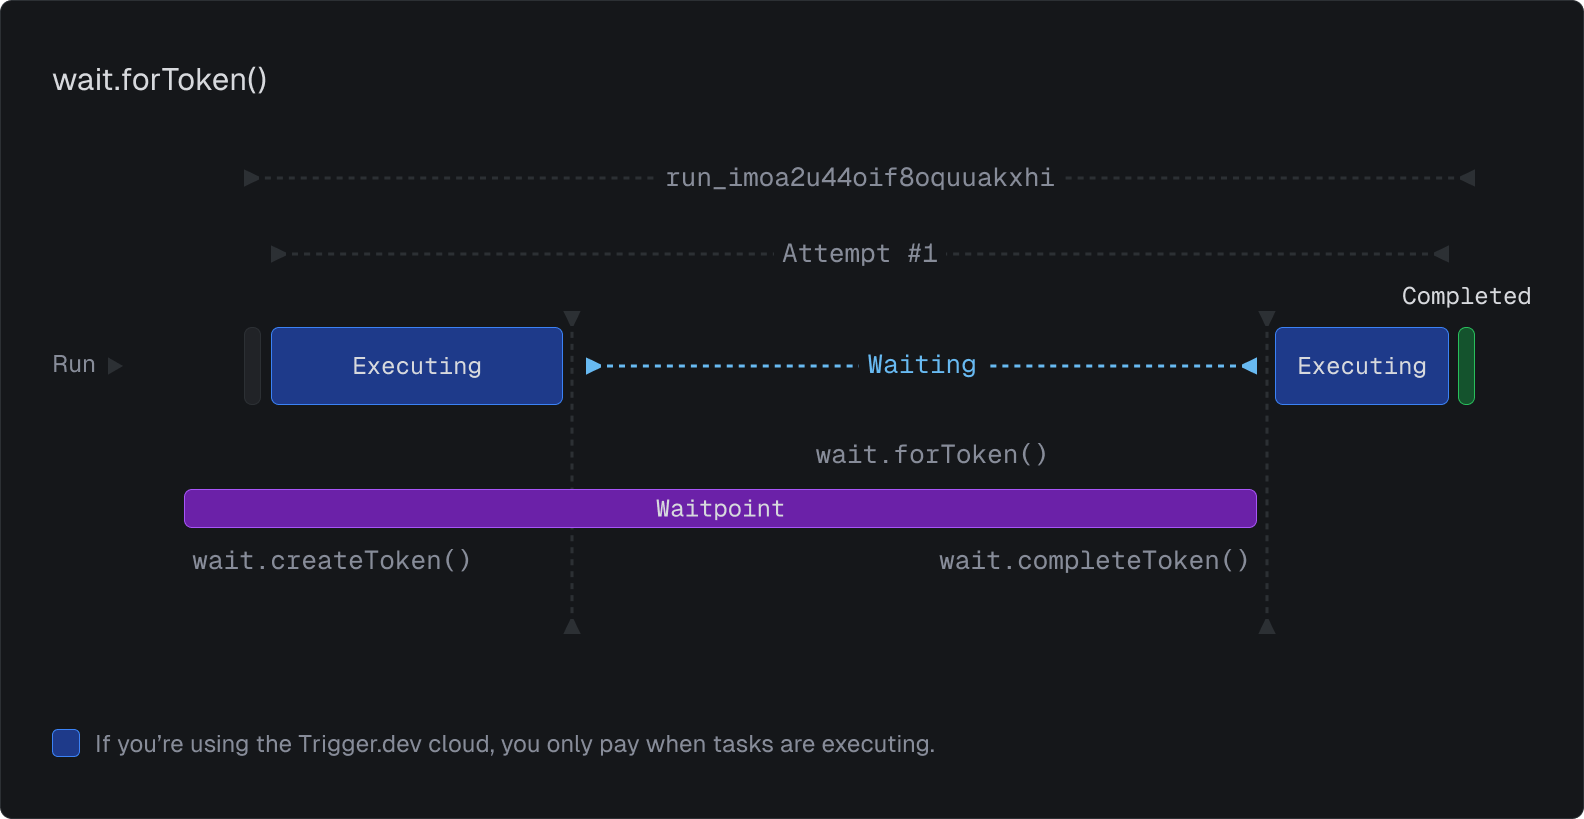
You can manually complete or timeout waitpoints directly from the dashboard during testing.
HTTP callbacks
When you create a Waitpoint token, we return a callback URL that you can use to complete the waitpoint. This is really useful when you want to hand some work off to a third party service.
Let's see this in action with a practical example. Here we'll use Replicate to generate an image for us in the background:
import { task, wait } from "@trigger.dev/sdk";const replicate = new Replicate({ auth: process.env.REPLICATE_API_KEY,});export const generateImage = task({ id: "generate-image", run: async () => { // You can create this token from your backend or inside a task const token = await wait.createToken({ timeout: "10m", }); await replicate.predictions.create({ version: "27b93a2413e7f36cd83da926f3656280b2931564ff050bf9575f1fdf9bcd7478", input: { prompt: "A painting of a cat by Andy Warhol", }, // pass the token url to Replicate's webhook, so they can "callback" // 👇 webhook: token.url, webhook_events_filter: ["completed"], }); const result = await wait.forToken<Prediction>(token).unwrap(); // unwrap() throws a timeout error or returns the result 👆 return result; },});
When Replicate has finished processing the image it will make an HTTP POST request to the URL we gave it. That will complete the Waitpoint and the JSON body is set as the output of the Waitpoint. The run is continued with the output of the Waitpoint.
On the Cloud product we pause the run when you call wait.forToken() (so you stop being charged) and then continue the run when the HTTP callback comes in.
Idempotency for reliable operations
All trigger and wait operations now support idempotency keys, letting you cache results and avoid duplicate work:
// This runs at most once every 5 minutes per userconst result = await childTask.triggerAndWait( { userId: user.id }, { idempotencyKey: user.id, idempotencyKeyTTL: "5m", });// Skip waits on retry using run ID as the keyawait wait.for({ seconds: 30, idempotencyKey: ctx.run.id, idempotencyKeyTTL: "1h",});
You can also skip time-based waits manually in the dashboard when testing.
Run prioritization and queue management
Priority-based execution
Set run priority to ensure critical work starts sooner. Priority is a time offset in seconds that determines queue order:
// This run will start before runs triggered 10 seconds ago (with no priority)await myTask.trigger(payload, { priority: 10 });
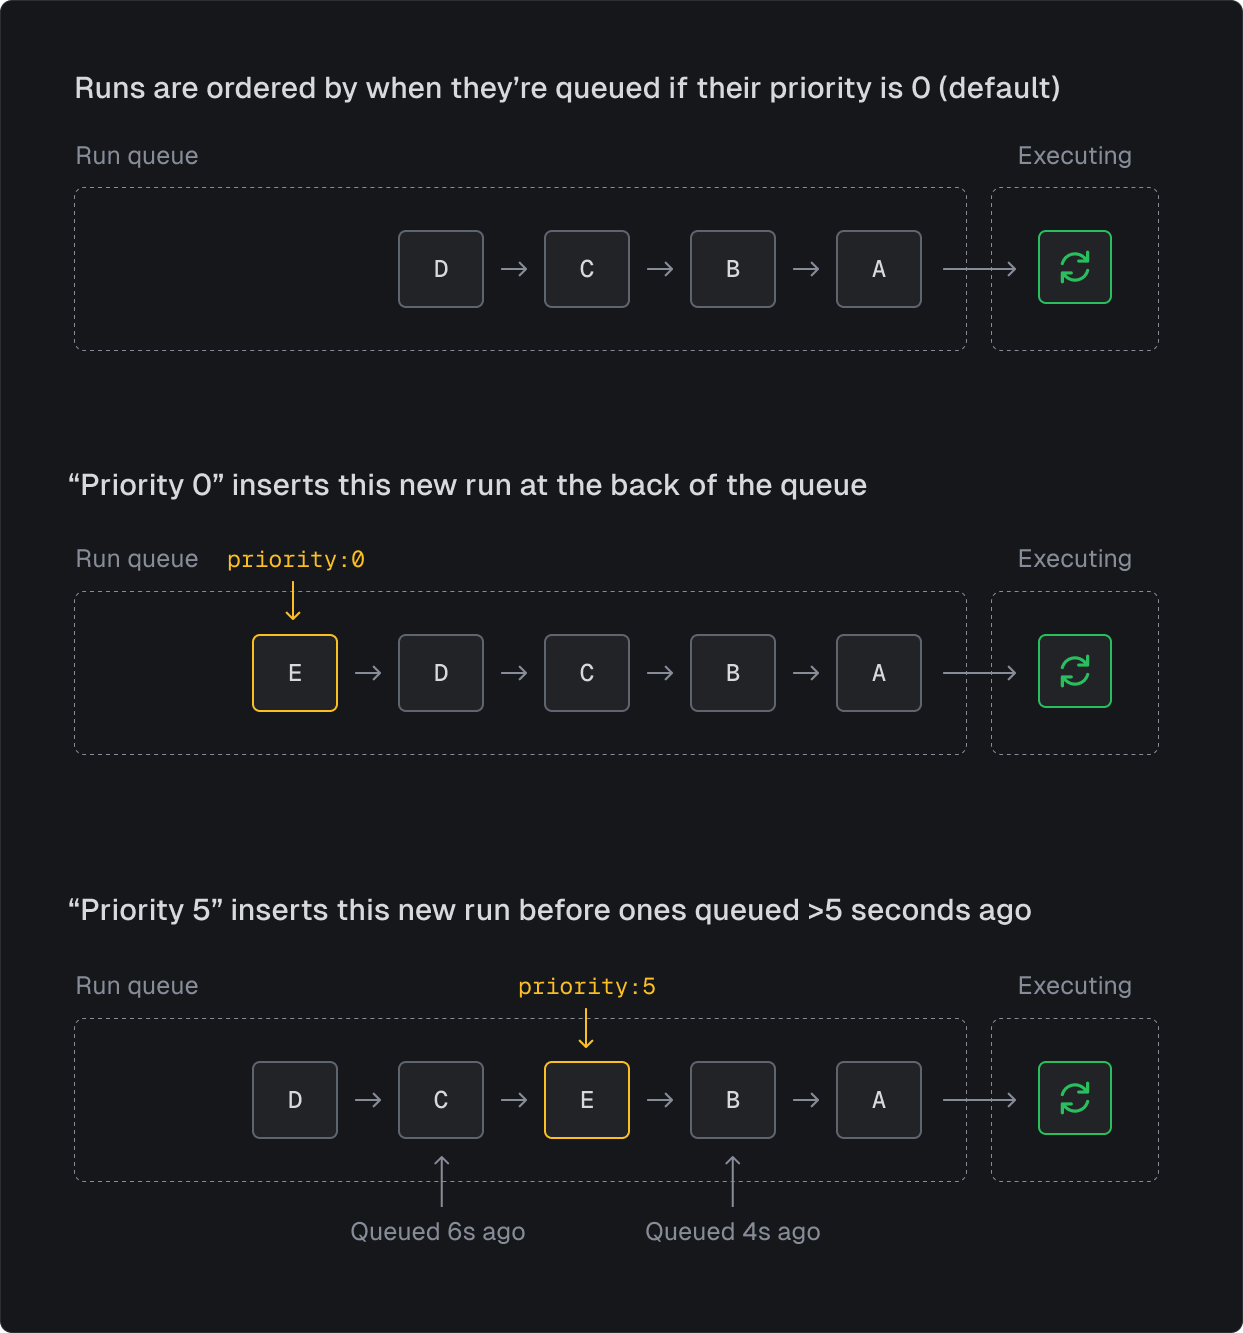
Priority being relative to the queued time means you can avoid the "starvation" problem. Starvation is when lower priority runs will never be executed if you have a steady stream of medium/high priority runs. This is a significant problem in production use cases for many queue systems, that effectively makes priority useless.
If you want to achieve absolute priority you can do that by using a large number for high priority runs – there's the flexibility to do both.
“Upgrading to v4 gave us an instant performance boost thanks to Warm Starts. The new run prioritization feature has made our onboarding experience significantly better, we can now prioritize user workloads to deliver the best first impression.”
Advanced queue controls
You can now pause entire environments or individual queues for emergency stops, and get detailed queue statistics:
// Pause/resume queues programmaticallyawait queues.pause(ctx.queue.id);await queues.resume({ type: "task", name: "my-task-id" });// Get queue statsconst queue = await queues.retrieve(ctx.queue.id);console.log(queue.stats);
Enhanced developer experience
Dashboard redesigned around environments
We've completely redesigned the dashboard to make environments a first-class concept. Navigation is faster and less confusing because most pages are now scoped to the environment you're in.
Key improvements include:
- Environment-scoped pages for better performance and clarity
- Improved project and organization switcher
- Real-time connection status for Dev environment
- Custom organization icons
- New dedicated Queues page
- Waitpoint tokens management page
Powerful middleware and lifecycle hooks
The new middleware system wraps around all lifecycle hooks and supports shared state with locals. Perfect for database connections that need to disconnect during waits:
import { locals, tasks } from "@trigger.dev/sdk";const DbLocal = locals.create<PrismaClient>("db");export function getDb() { return locals.getOrThrow(DbLocal);}// Middleware runs around everythingtasks.middleware("db", async ({ next }) => { const db = locals.set(DbLocal, new PrismaClient()); await db.$connect(); await next(); await db.$disconnect();});// Handle waits properlytasks.onWait("db", async () => { const db = getDb(); await db.$disconnect(); // Free the connection});tasks.onResume("db", async () => { const db = getDb(); await db.$connect(); // Reconnect});
Global lifecycle hooks
You can create an init.ts file at your trigger directory root for automatic loading during task execution. Great for registering global hooks or initializing shared resources:
AI tool integration
You can convert a schemaTask into a tool that the AI SDK can use:
import { ai } from "@trigger.dev/sdk/ai";import { generateText } from "ai";const myToolTask = schemaTask({ id: "my-tool-task", schema: z.object({ input: z.string().describe("The input to the tool"), }), run: async ({ input }) => { // Your tool logic return { result: processInput(input) }; },});// Converts a task into an AI tools for the AI SDKconst myTool = ai.tool(myToolTask);export const aiTask = schemaTask({ id: "ai-task", schema: z.object({ prompt: z.string() }), run: async ({ prompt }) => { // AI SDK function, passing in the tool we created above const { text } = await generateText({ prompt, model: openai("gpt-4o"), tools: { myTool }, }); return text; },});
OpenTelemetry exporters and external trace correlation
Now you can export your logs and traces to external tools that support OpenTelemetry.
import { defineConfig } from "@trigger.dev/sdk";import { OTLPLogExporter } from "@opentelemetry/exporter-logs-otlp-http";import { OTLPTraceExporter } from "@opentelemetry/exporter-trace-otlp-http";export default defineConfig({ project: process.env.TRIGGER_PROJECT_REF, dirs: ["./src/trigger"], telemetry: { logExporters: [ new OTLPLogExporter({ url: "https://api.axiom.co/v1/logs", headers: { Authorization: `Bearer ${process.env.AXIOM_TOKEN}`, "X-Axiom-Dataset": "test", }, }), ], exporters: [ new OTLPTraceExporter({ url: "https://api.axiom.co/v1/traces", headers: { Authorization: `Bearer ${process.env.AXIOM_TOKEN}`, "X-Axiom-Dataset": "test", }, }), ], }, maxDuration: 3600,});
This is what an exported trace looks like in Axiom:
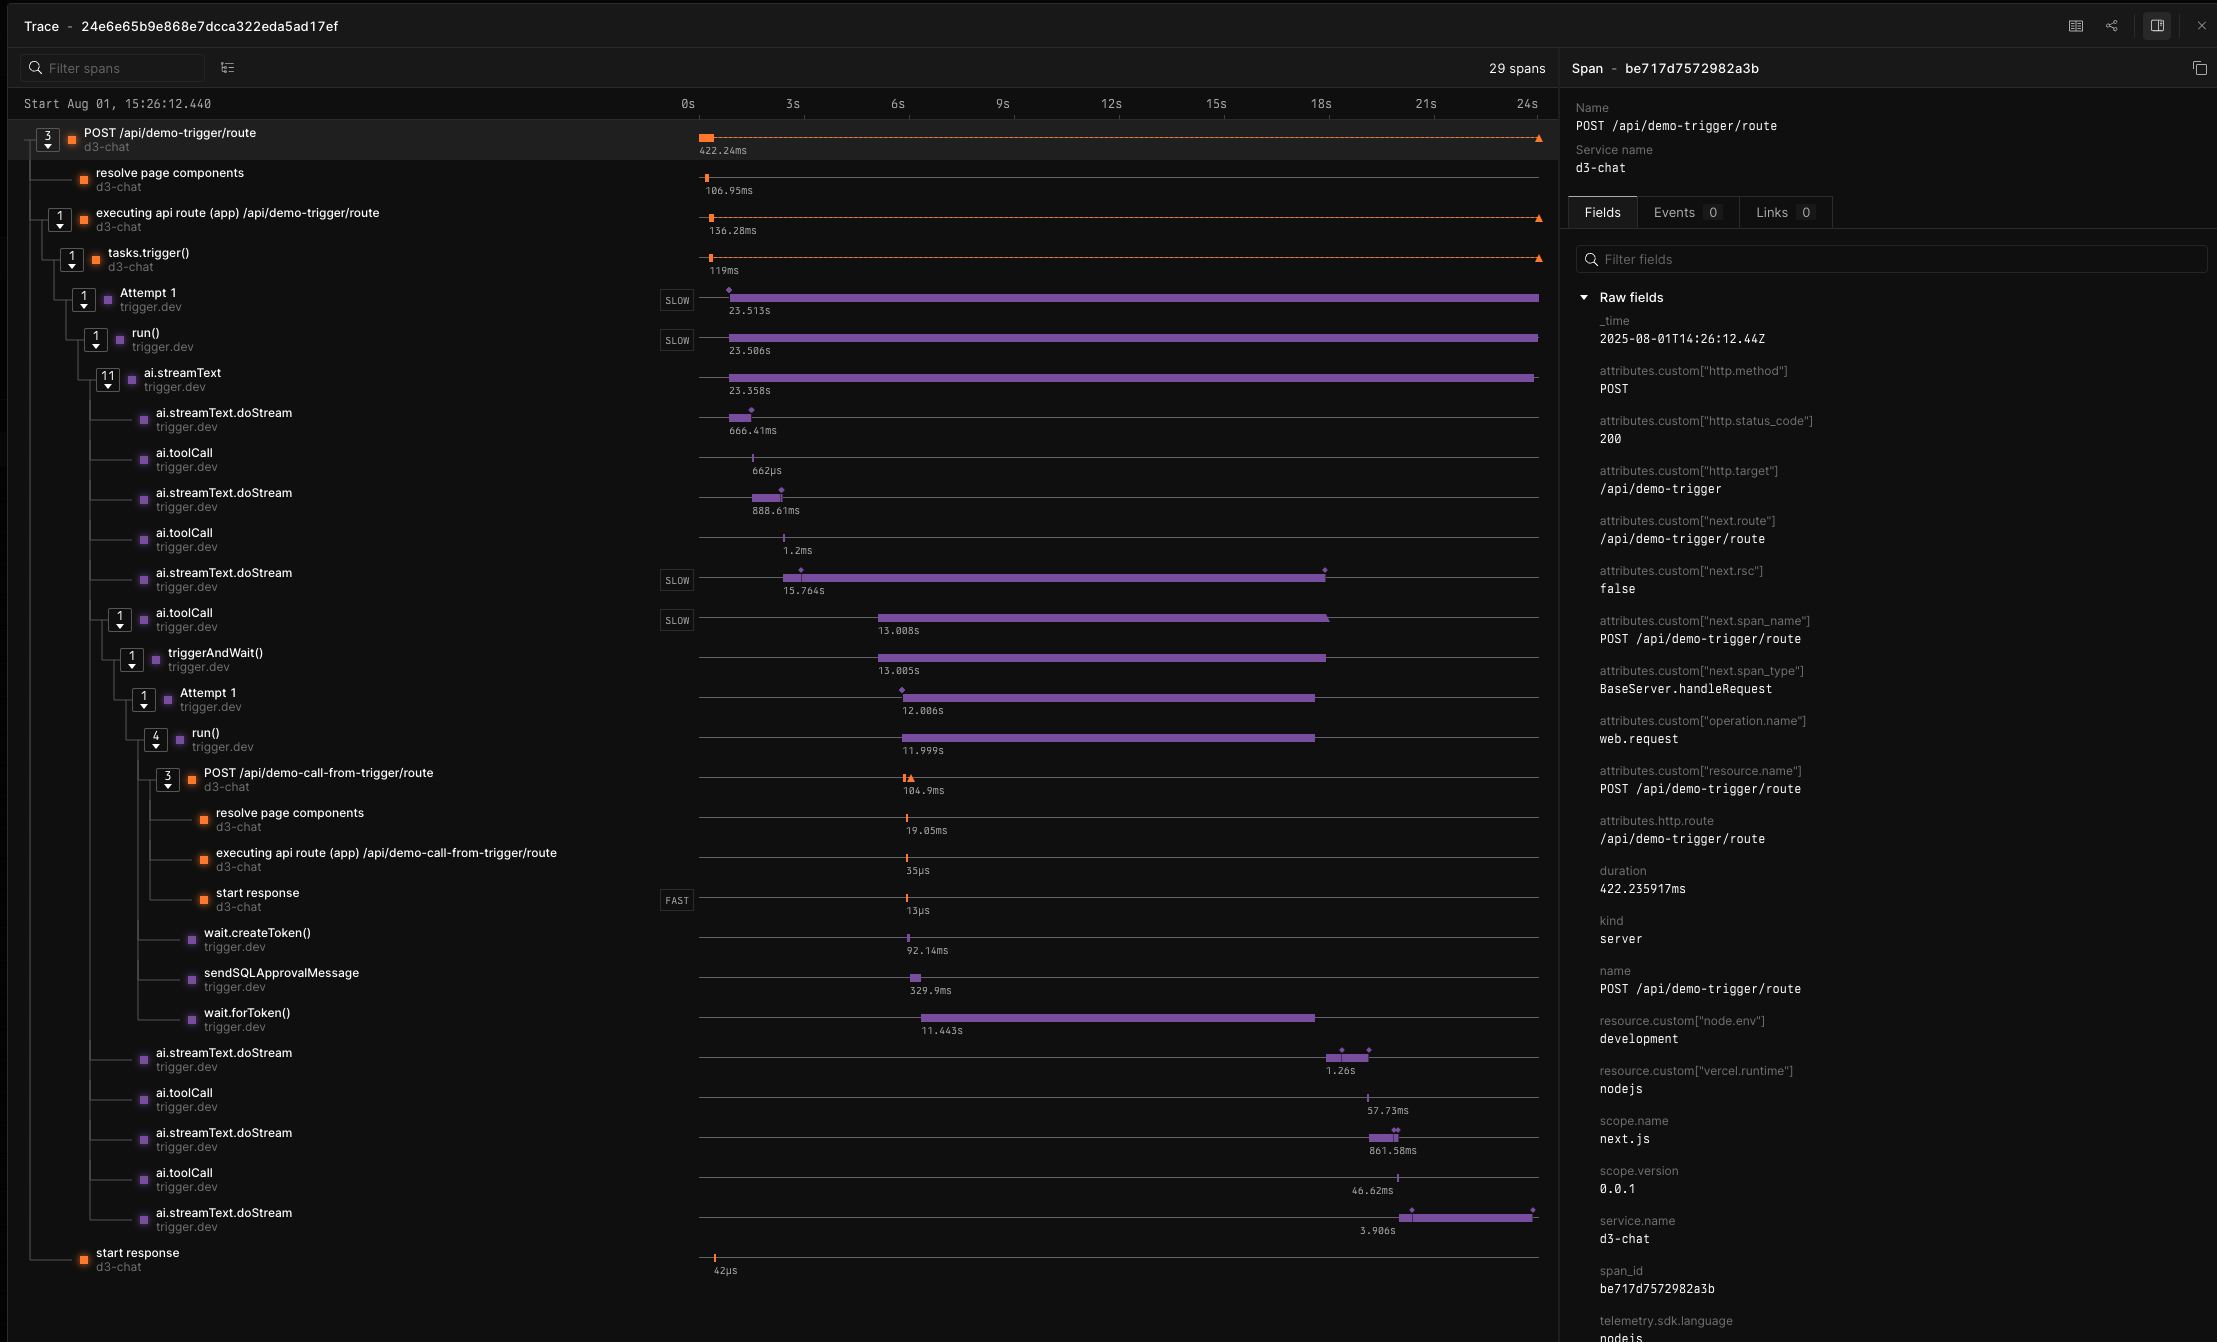
You can see the full flow:
- Triggering from your backend
- The Trigger.dev task executing.
- Calls to APIs.
- Calling from the task out to your backend.
- Back to the task and the run finishing up.
When you call out from a task and want to propagate the trace context to your external service, you can use the otel.withExternalTrace function:
// Inside a taskreturn await otel.withExternalTrace(async () => { const headersObject = {}; // Now context.active() refers to your external trace context propagation.inject(context.active(), headersObject); const result = await fetch( "http://localhost:3000/api/demo-call-from-trigger", { headers: new Headers(headersObject), method: "POST", body: JSON.stringify({ message: "Hello from Trigger.dev", }), } ); return result.json();});
Bun and Node 22 runtimes
We now support:
node(Node.js 21.7.3)node-22(Node.js 22.16.0)bun(Bun 1.2.18)
The Bun version is a big one for us – for the longest time we were stuck on a very old version because of IPC and compatibility issues with CRIU.
Self-hosting improvements
V4 makes self-hosting Trigger.dev significantly easier with major improvements to both Docker and Kubernetes deployments. Whether you need strict compliance, air-gapped environments, or deep infrastructure integration, the self-hosting experience is now much more approachable.
Docker: Streamlined from the ground up
The Docker setup has been completely redesigned for simplicity:
- No more custom scripts – Just simple Docker Compose commands to get running
- Built-in services – Integrated registry and object storage, so you don't need S3 or GCS unless you want them
- Better documentation – Clearer environment variables and setup guides
- Horizontal scaling – Add more worker containers as your workload grows
Kubernetes: Now officially supported
V4 introduces our first official Kubernetes support with a production-ready Helm chart:
- Official Helm chart – Sensible defaults eliminate custom manifest writing
- Integrated stack – Postgres, Redis, and object storage included out of the box
- Kubernetes-native scaling – Leverage standard Kubernetes scaling capabilities
- Enterprise-ready – Perfect for teams already running Kubernetes infrastructure
What's different from Cloud
Self-hosted v4 includes all core Trigger.dev functionality, but some Cloud-exclusive features aren't available:
| Feature | Cloud | Self-hosted |
|---|---|---|
| Core task execution | ✅ | ✅ |
| Waitpoints & priority | ✅ | ✅ |
| Dashboard & monitoring | ✅ | ✅ |
| Warm starts | ✅ | ❌ |
| Auto-scaling | ✅ | ❌ |
| Checkpoints | ✅ | ❌ |
| Dedicated support | ✅ | Enterprise only |
The trade-off is operational responsibility – you handle updates, scaling, and infrastructure management. But you get complete control over your deployment and data.
Getting started
- Docker users: Follow our Docker self-hosting guide
- Kubernetes users: Check out the Kubernetes deployment guide
- Need help? Join our active self-hosting Discord community
Breaking changes and migration
V4 includes some breaking changes, but most are straightforward to address. It typically takes less than 5 minutes to migrate.
We recommend reading the breaking changes guide to get started.
Custom queue definitions
Each task has a default queue, but if you want to share a queue between tasks you can define one. In v4 we require these to be defined in your code before deployment. In v3 you could create them dynamically when triggering and it caused a lot of confusing issues when manipulating concurrency limits.
In v4, custom queues (with their concurrency limit) must be defined upfront:
Then when triggering:
Lifecycle hook signatures
All hook parameters are now in a single object:
// v3onStart: (payload, { ctx }) => {};// v4onStart: ({ payload, ctx }) => {};
How to migrate to v4
- Run the upgrade command:
npx trigger.dev@latest update. - Agree to update packages: Say yes to the prompt.
- Test locally: Run
trigger devand fix any breaking changes - Deploy to staging: Test in a non-production environment
- Update your backend: Deploy with the v4 package
- Deploy tasks: Push your tasks to production
Read the full upgrade guide to get started.
Between steps 5 and 6, existing runs continue on v3 while new runs use v4. Be aware you may temporarily have up to double the concurrency as both engines run in parallel.
Get started today
V4 is ready for production workloads. The performance improvements alone make it worthwhile, and the new developer experience features will make building AI agents and background jobs more enjoyable.
Read the full upgrade guide to get started, or check out our human-in-the-loop workflow example to see some of the new features in action.