> ## Documentation Index
> Fetch the complete documentation index at: https://trigger.dev/docs/llms.txt
> Use this file to discover all available pages before exploring further.
# Setting up PrivateLink in the AWS Console
> Step-by-step guide for exposing a resource from your AWS account to Trigger.dev via PrivateLink.
This guide walks through setting up the AWS side of a private connection: a Network Load Balancer (NLB), a target group pointing at the resource you want to expose, and a VPC Endpoint Service that authorizes Trigger.dev to consume it.
Prefer Terraform? Open the "Add connection" page in the Trigger.dev dashboard and use the
Terraform wizard to generate a ready-to-apply script. The wizard creates everything described
below and pre-fills our AWS account ID for you.
## Prerequisites
Before you start you'll need:
* An **AWS account** with permission to create VPC, EC2, and ELB resources
* A **resource** in a VPC subnet that you want to expose (RDS instance, ElastiCache cluster, internal API, etc.)
* The **Trigger.dev AWS account ID** — find this on the "Add connection" page in your Trigger.dev dashboard, in the "I have my details" or "Step-by-step guide" cards
* A **VPC** that contains the resource, with at least one private subnet per Availability Zone you want to serve from
PrivateLink connections are zonal. If your resource lives in a single AZ, your connection will
only be available from that AZ. For higher availability, ensure target groups can route to
multiple AZs.
## Step 1: Create a target group pointing at your resource
The target group is how the NLB will know where to forward traffic. AWS requires a target group when creating a load balancer, so we'll set this up first.
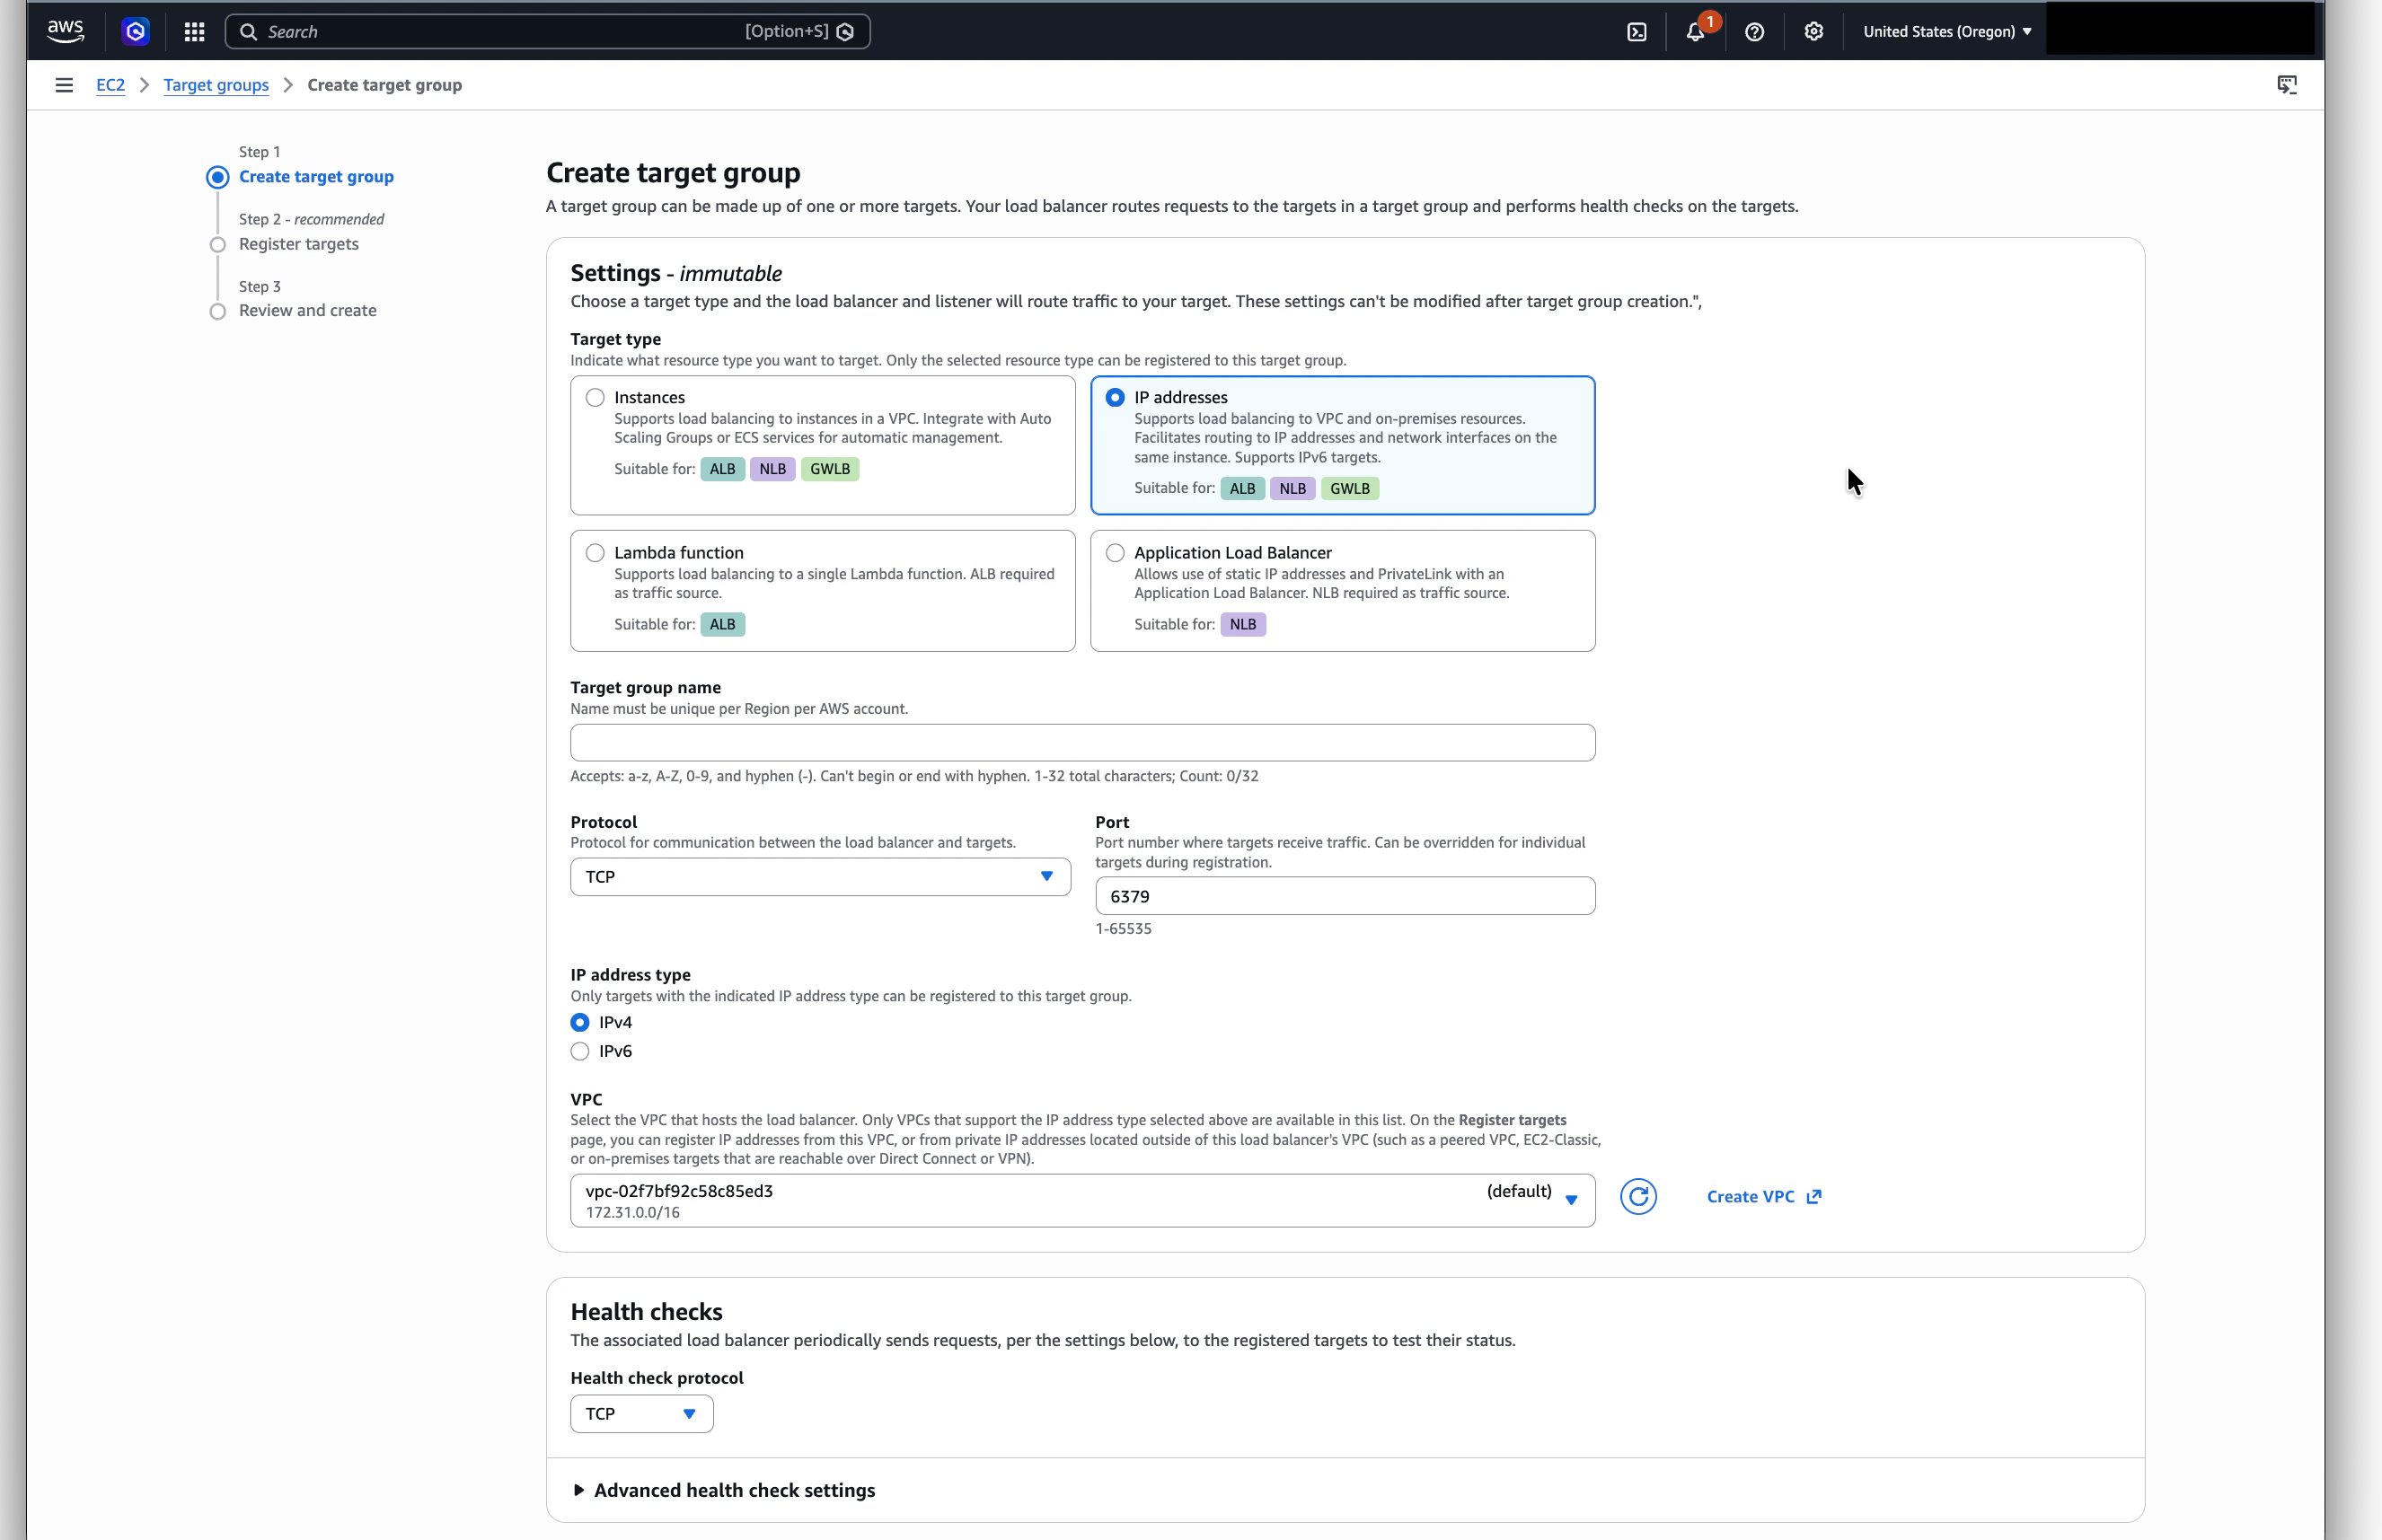
Go to **EC2 → Target Groups → Create target group**.
* **IP addresses** for RDS, ElastiCache, or any resource you can reach by IP
* **Instances** for EC2 instances you own
* **Application Load Balancer** if your resource sits behind an ALB
For most database use cases, **IP addresses** is correct. NLBs don't support Lambda targets
directly — if you need to expose a Lambda, put it behind an ALB and use the ALB target type.
On the **Specify group details** page (the first of two steps in AWS's target-group form), set:
* **Name**: e.g. `trigger-postgres-tg`
* **Protocol**: TCP
* **Port**: the port your resource listens on (5432 for Postgres, 6379 for Redis, 3306 for MySQL, etc.)
* **VPC**: the VPC where your resource lives (this must match the VPC you'll use for the NLB)
* **Health check protocol**: TCP
Click **Next** to move to the second step (registering targets).
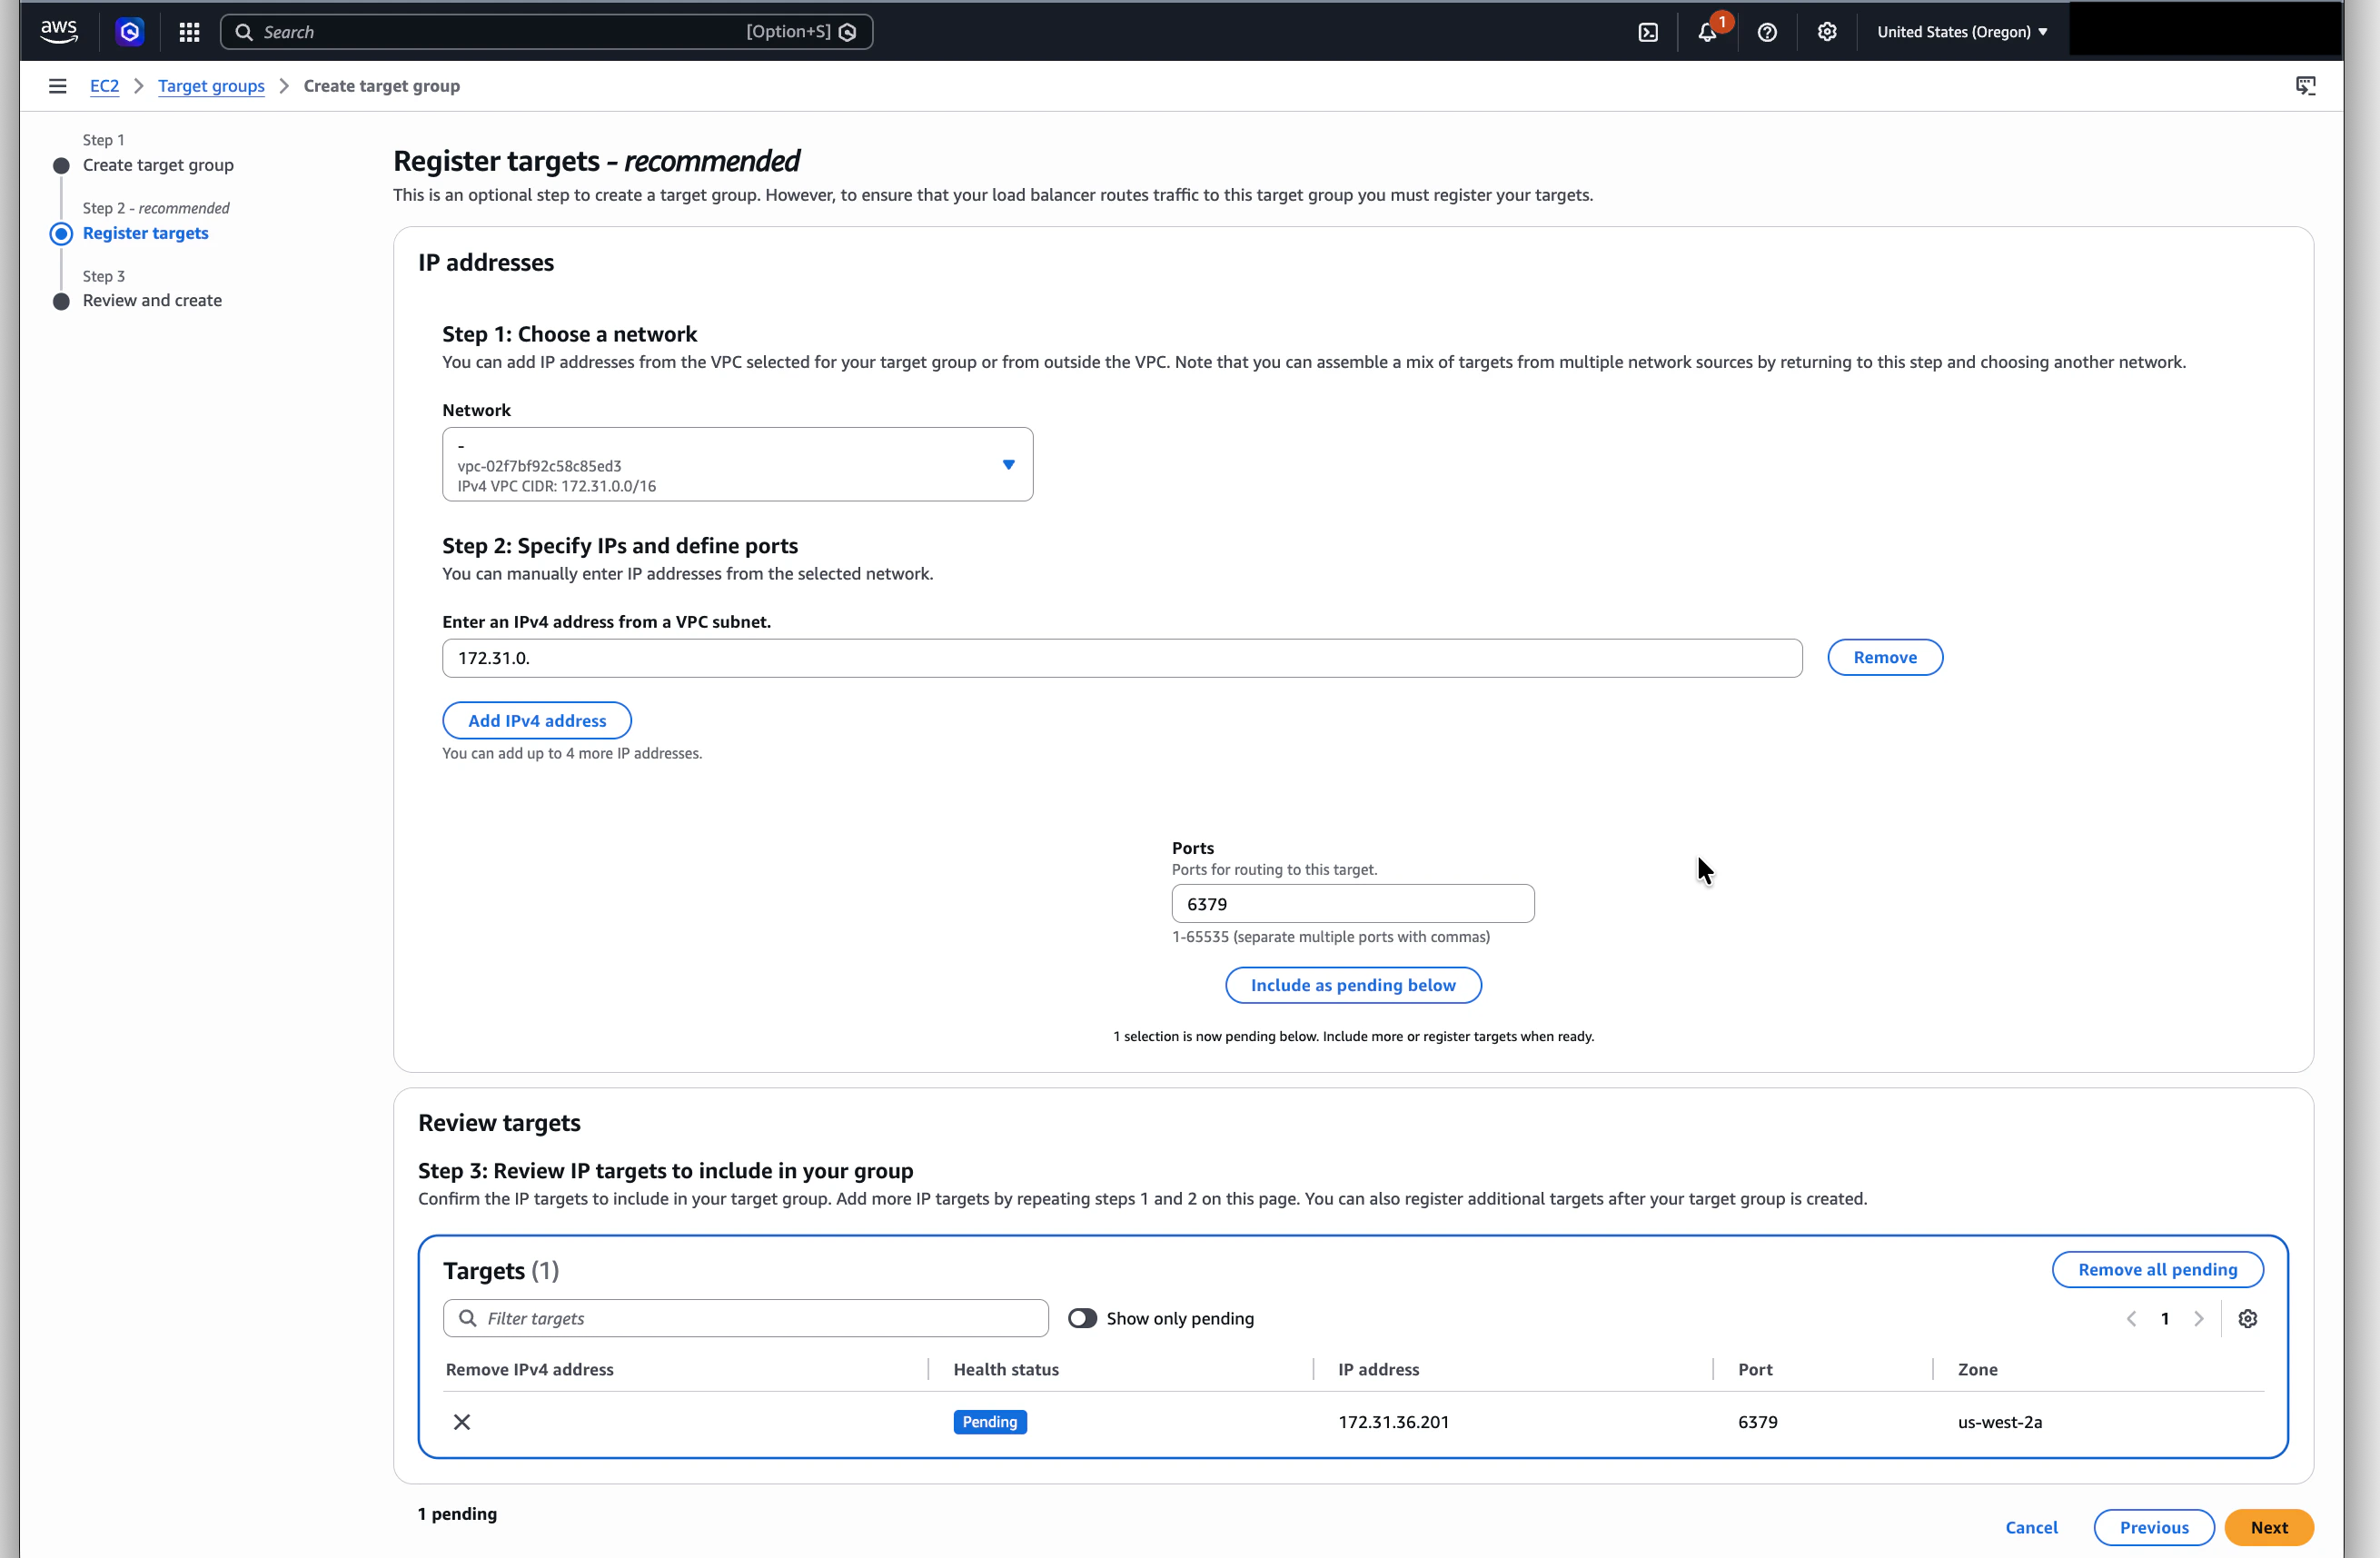
 On the **Register targets** page — the second step of the IP target-group flow — paste the
private IPs of your resource and set the port to the same value you picked above. Click
**Include as pending below**, then **Create target group**.
On the **Register targets** page — the second step of the IP target-group flow — paste the
private IPs of your resource and set the port to the same value you picked above. Click
**Include as pending below**, then **Create target group**.
 Both ElastiCache and RDS expose a DNS endpoint, not an IP, on their console pages. Find the
private IP behind the endpoint via the EC2 console:
1. Open **EC2 → Network & Security → Network Interfaces**.
2. In the search bar, filter by **Description** with `ElastiCache` (or `RDSNetworkInterface`
for RDS). Optionally narrow further by **VPC ID** if you have several clusters.
3. Read the **Primary private IPv4 address** column — that's the IP to register here. For
multi-node clusters or read replicas, each node has its own ENI and IP.
You can also reach the same list from **VPC → Subnets → \ → Network
Interfaces tab**, which scopes the list to a single subnet.
RDS and ElastiCache endpoints' IP addresses can change after failover or maintenance. For long-lived
connections, consider running a small Lambda or sidecar that periodically resolves the DNS name and
updates the target group, or use a [DNS-resolved](https://aws.amazon.com/blogs/networking-and-content-delivery/hostname-as-target-for-network-load-balancers/)
target if your setup supports it.
## Step 2: Create an internal Network Load Balancer
The NLB is what PrivateLink exposes to Trigger.dev. It must be **internal** (not internet-facing).
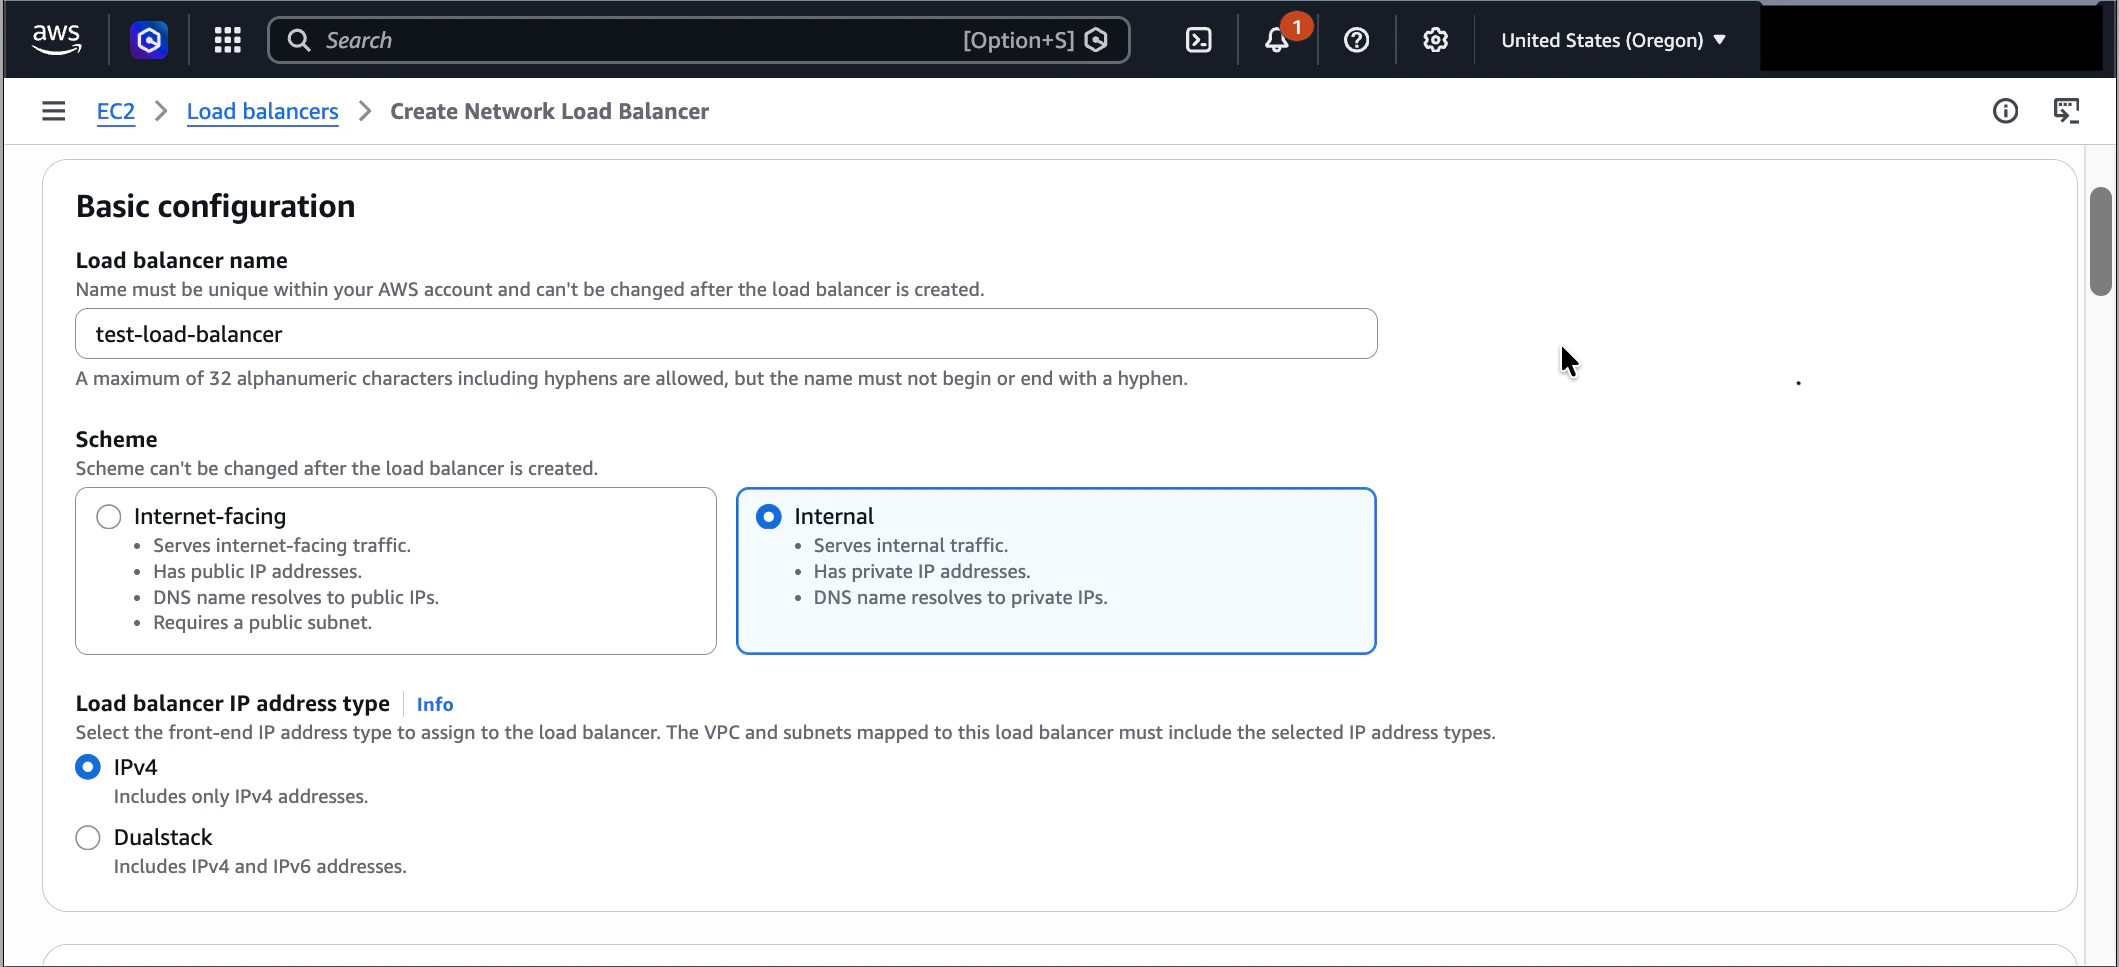
Go to **EC2 → Load Balancers → Create load balancer** and choose **Network Load Balancer**.
* **Name**: something descriptive, e.g. `trigger-postgres-nlb`
* **Scheme**: **Internal**
* **IP address type**: IPv4
Both ElastiCache and RDS expose a DNS endpoint, not an IP, on their console pages. Find the
private IP behind the endpoint via the EC2 console:
1. Open **EC2 → Network & Security → Network Interfaces**.
2. In the search bar, filter by **Description** with `ElastiCache` (or `RDSNetworkInterface`
for RDS). Optionally narrow further by **VPC ID** if you have several clusters.
3. Read the **Primary private IPv4 address** column — that's the IP to register here. For
multi-node clusters or read replicas, each node has its own ENI and IP.
You can also reach the same list from **VPC → Subnets → \ → Network
Interfaces tab**, which scopes the list to a single subnet.
RDS and ElastiCache endpoints' IP addresses can change after failover or maintenance. For long-lived
connections, consider running a small Lambda or sidecar that periodically resolves the DNS name and
updates the target group, or use a [DNS-resolved](https://aws.amazon.com/blogs/networking-and-content-delivery/hostname-as-target-for-network-load-balancers/)
target if your setup supports it.
## Step 2: Create an internal Network Load Balancer
The NLB is what PrivateLink exposes to Trigger.dev. It must be **internal** (not internet-facing).
Go to **EC2 → Load Balancers → Create load balancer** and choose **Network Load Balancer**.
* **Name**: something descriptive, e.g. `trigger-postgres-nlb`
* **Scheme**: **Internal**
* **IP address type**: IPv4
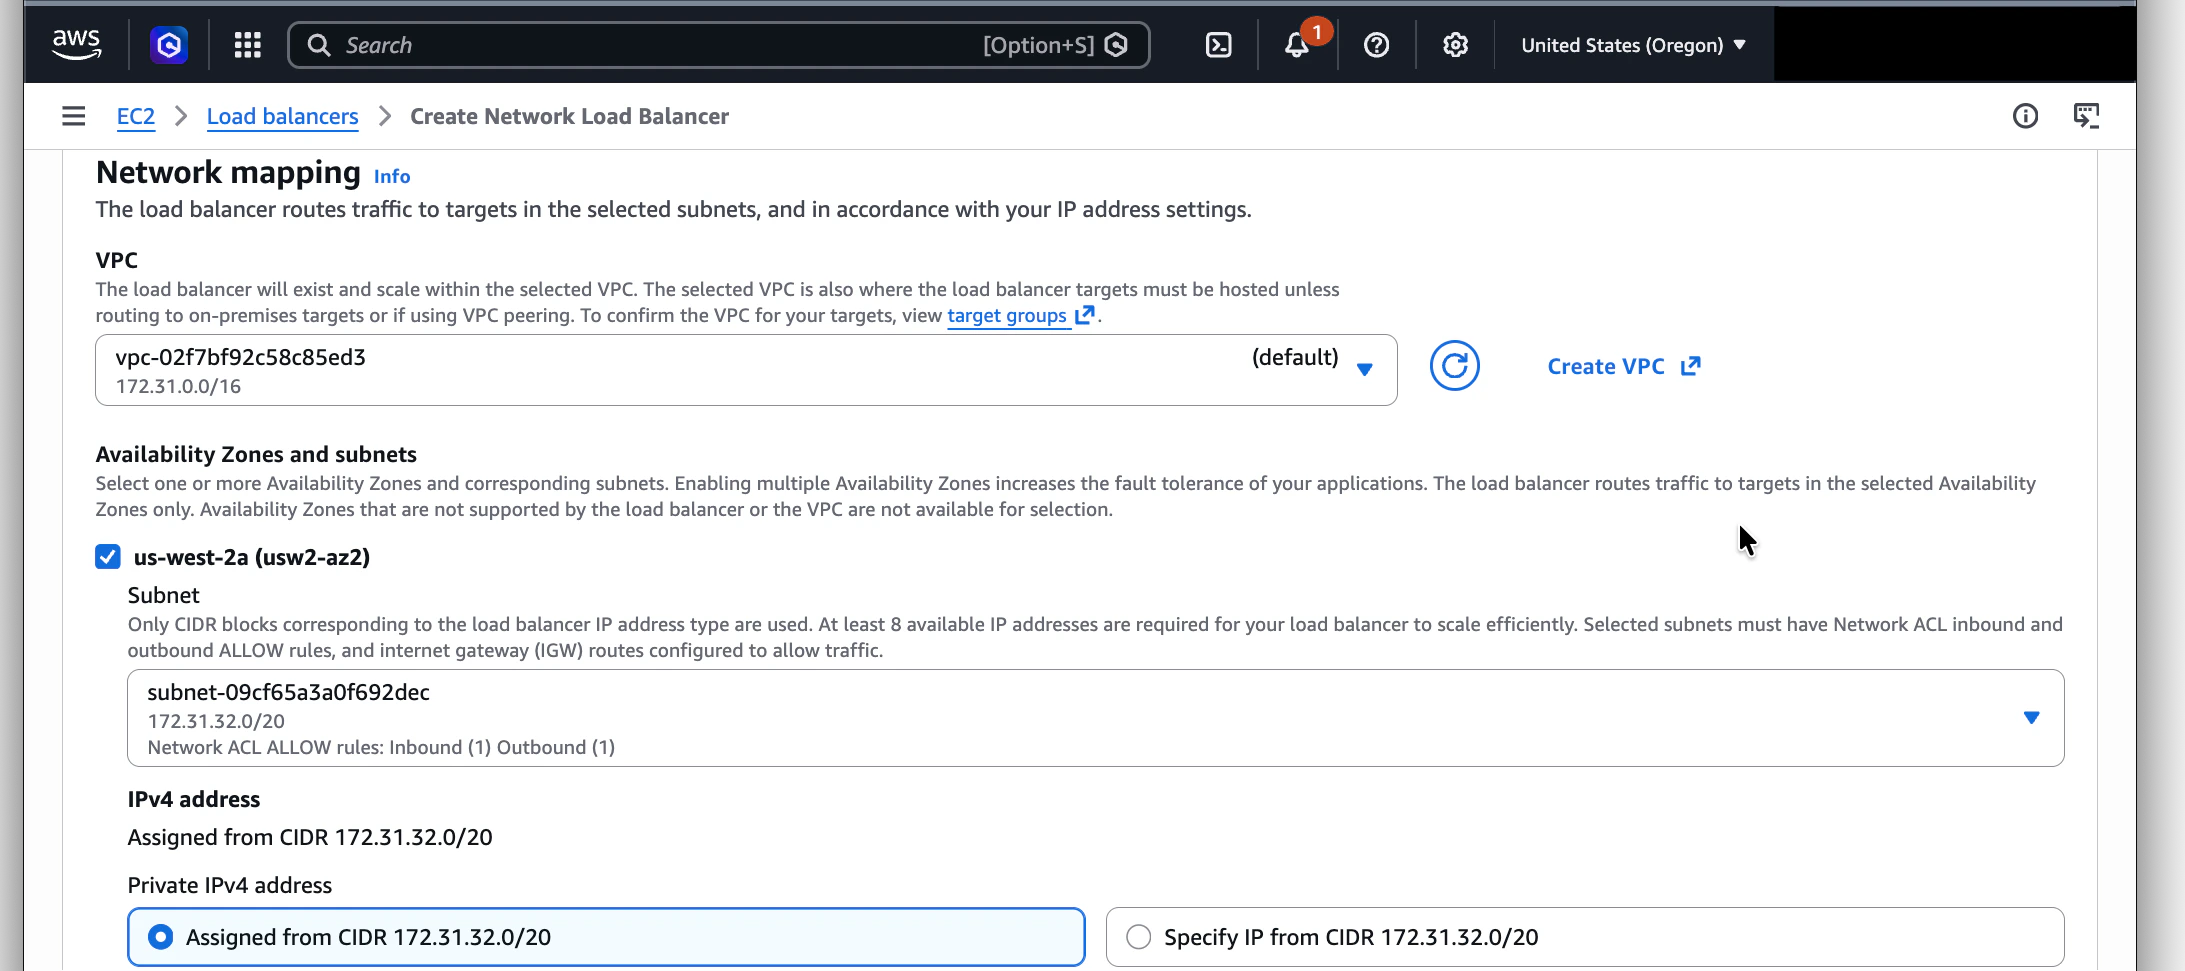
 Pick the same VPC as your target group. Select one private subnet per AZ that should serve traffic.
Each subnet you select adds an availability zone to the endpoint.
Pick the same VPC as your target group. Select one private subnet per AZ that should serve traffic.
Each subnet you select adds an availability zone to the endpoint.
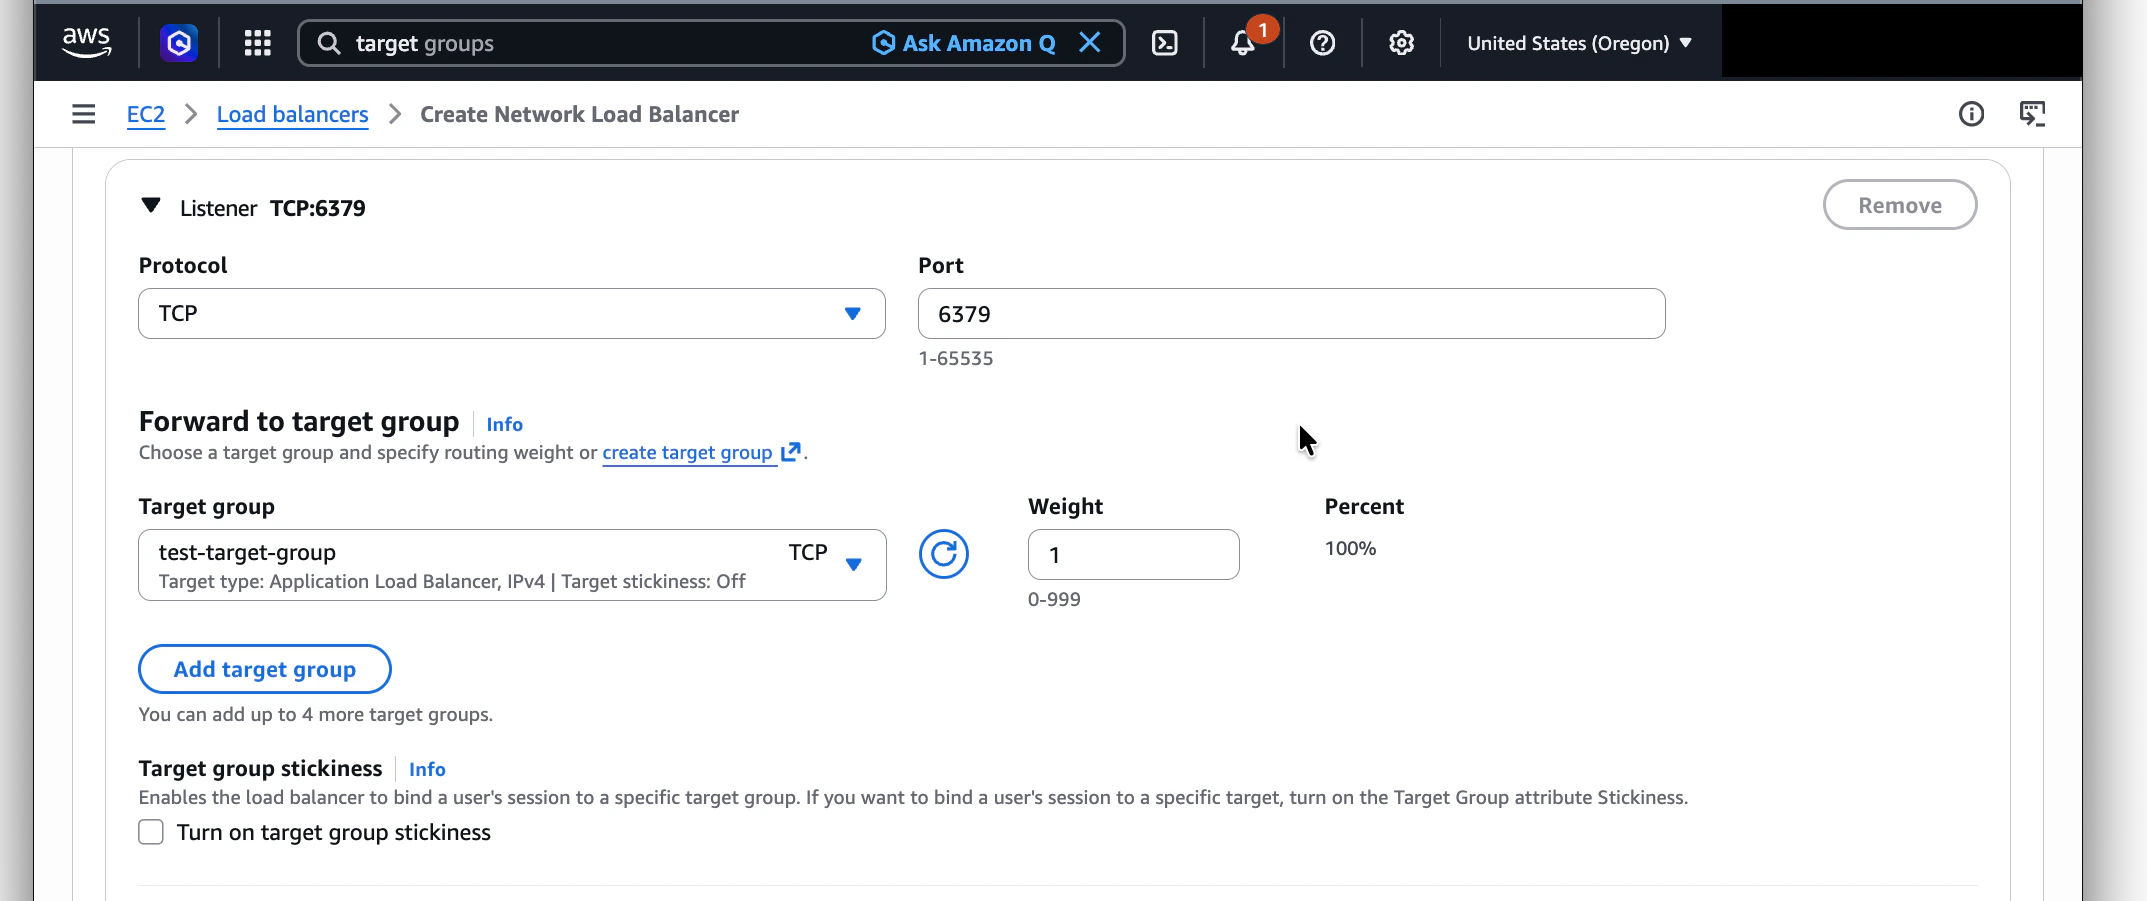
 Under **Listeners and routing**, configure:
* **Protocol**: TCP
* **Port**: same as your target group port (5432 for Postgres, 6379 for Redis, etc.)
* **Default action**: forward to the target group you created in Step 1
Under **Listeners and routing**, configure:
* **Protocol**: TCP
* **Port**: same as your target group port (5432 for Postgres, 6379 for Redis, etc.)
* **Default action**: forward to the target group you created in Step 1
 Click **Create load balancer**. Provisioning takes 1–2 minutes — wait until the NLB's **State**
column shows **Active** before moving on. The endpoint service in the next step won't list the
NLB until it's fully active.
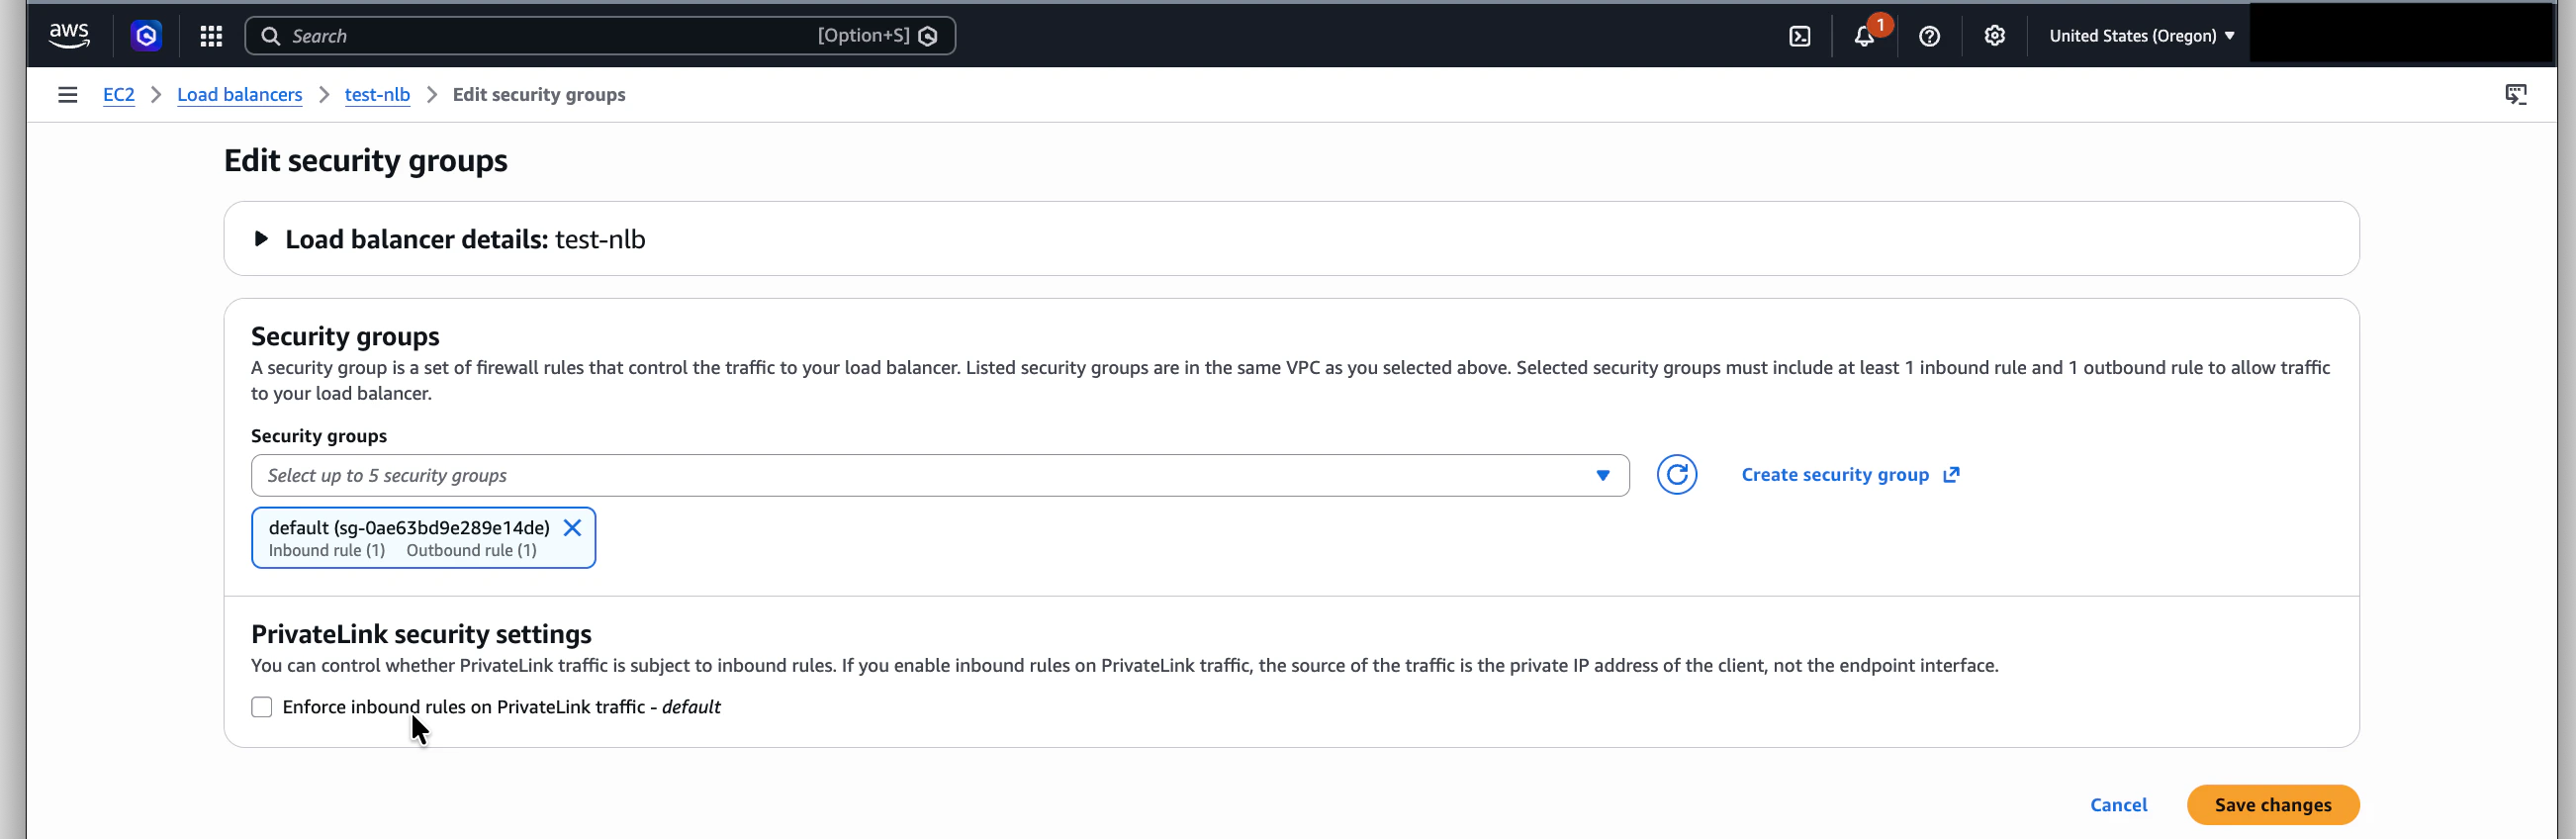
Once the NLB is **Active**, open it and go to its **Security** tab, then click **Edit**. If a
security group is attached, AWS enables **Enforce inbound rules on PrivateLink traffic** by
default — leaving it on can cause traffic from the Trigger.dev VPC Endpoint to be silently
dropped before reaching your listener. Uncheck **Enforce inbound rules on PrivateLink traffic**
and save.
Click **Create load balancer**. Provisioning takes 1–2 minutes — wait until the NLB's **State**
column shows **Active** before moving on. The endpoint service in the next step won't list the
NLB until it's fully active.
Once the NLB is **Active**, open it and go to its **Security** tab, then click **Edit**. If a
security group is attached, AWS enables **Enforce inbound rules on PrivateLink traffic** by
default — leaving it on can cause traffic from the Trigger.dev VPC Endpoint to be silently
dropped before reaching your listener. Uncheck **Enforce inbound rules on PrivateLink traffic**
and save.
 Test connectivity from a bastion host or another instance in the same VPC before continuing —
e.g. `psql -h -p 5432 -U user -d db`. If the NLB can't reach your resource, the
PrivateLink connection won't either.
## Step 3: Create a VPC Endpoint Service
This is the resource that PrivateLink consumers connect to.
Confirm the NLB from Step 2 is in the **Active** state before starting this step. It won't appear
in the **Available load balancers** dropdown until it has finished provisioning.
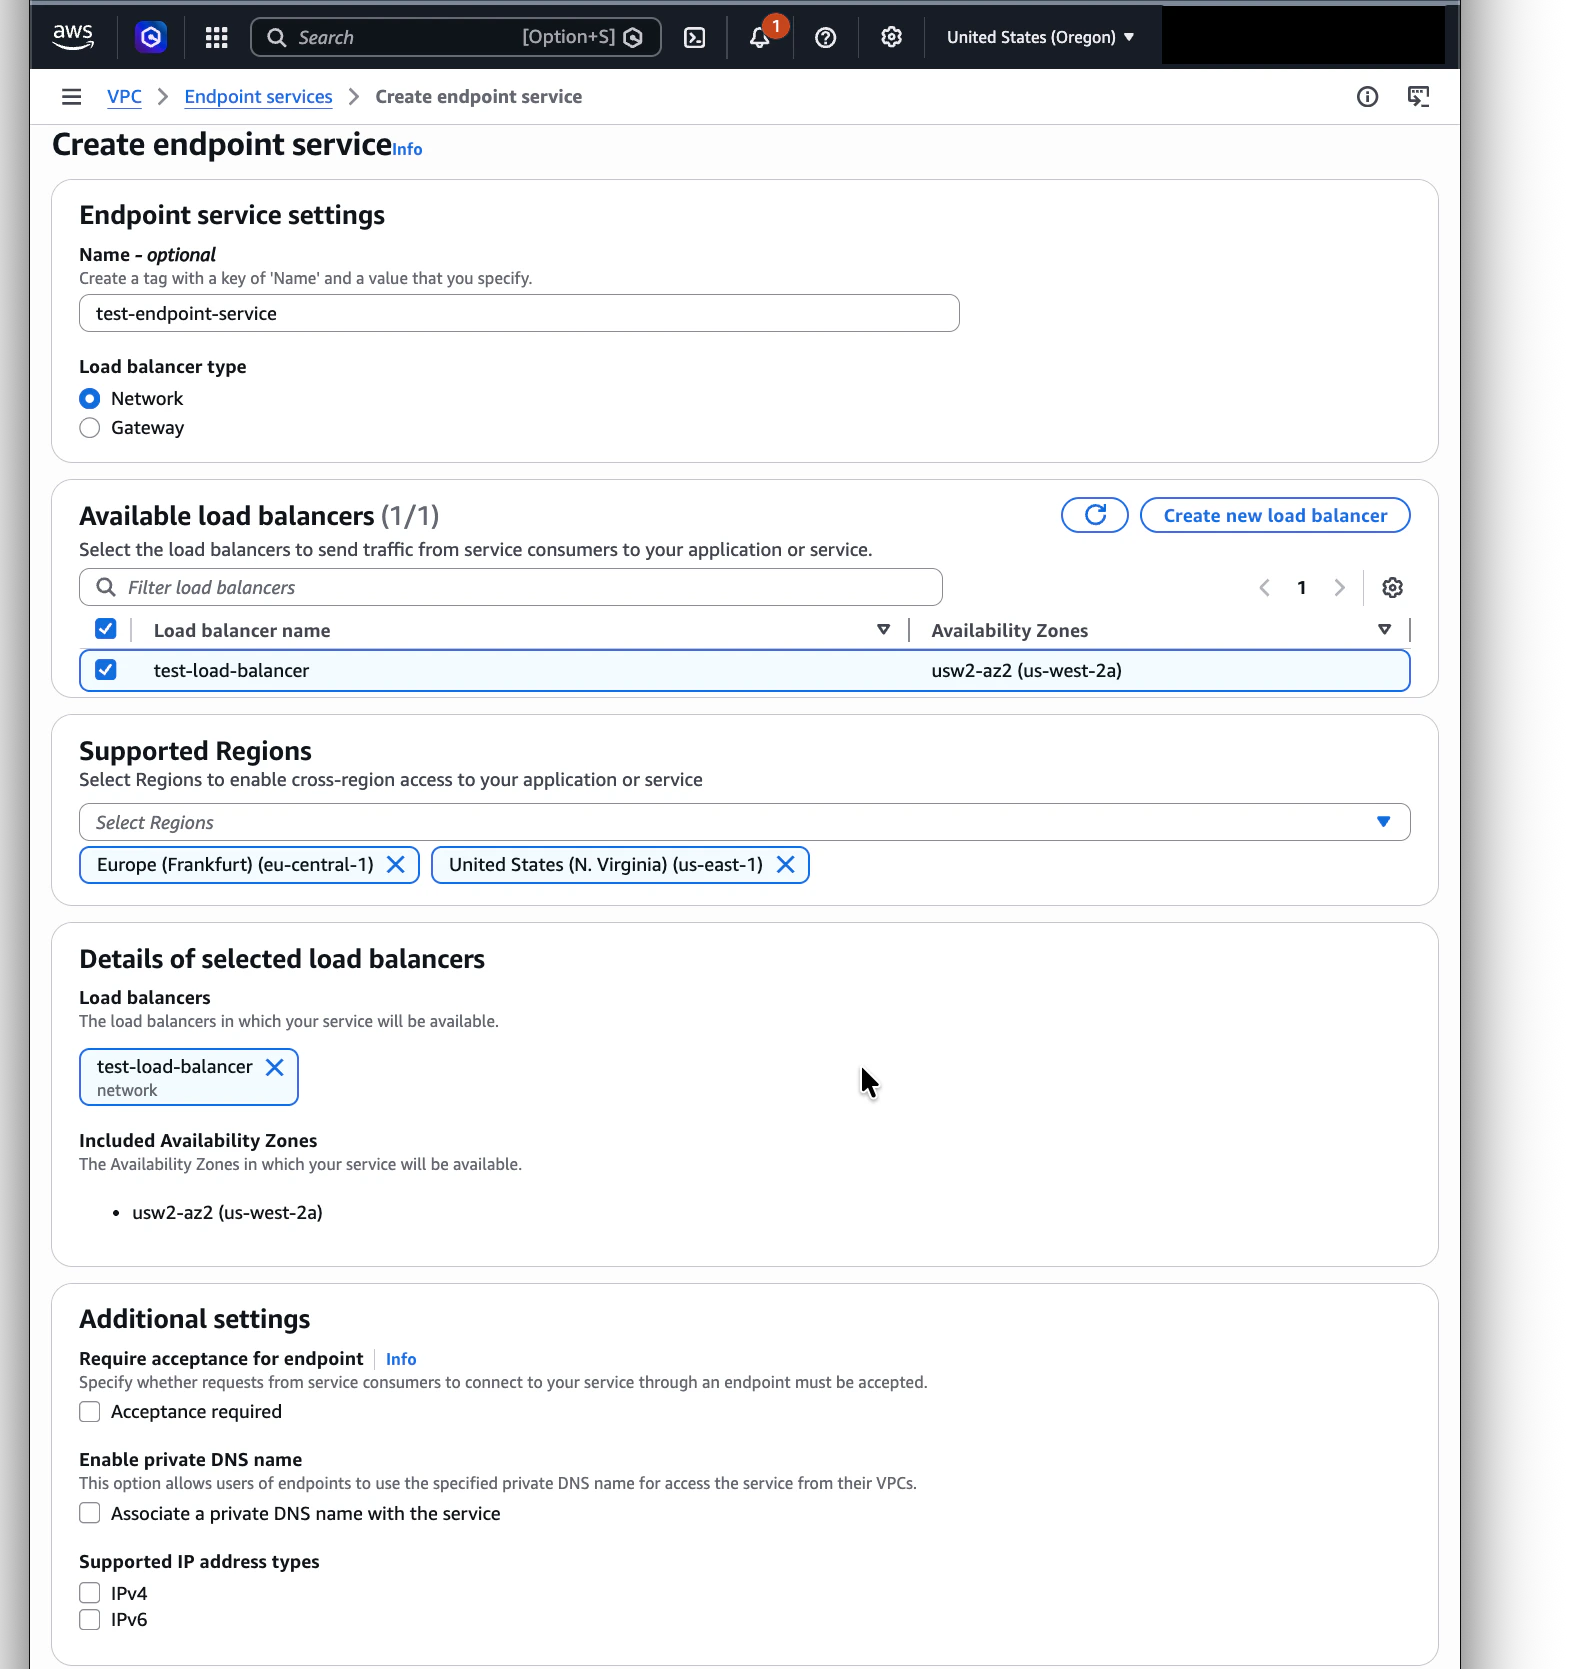
Go to **VPC → Endpoint services → Create endpoint service**.
* **Name**: optional, but useful for identification, e.g. `trigger-postgres-endpoint`
* **Load balancer type**: Network
* **Available load balancers**: select the NLB you created
* **Require acceptance for endpoint**: **No** (recommended)
Test connectivity from a bastion host or another instance in the same VPC before continuing —
e.g. `psql -h -p 5432 -U user -d db`. If the NLB can't reach your resource, the
PrivateLink connection won't either.
## Step 3: Create a VPC Endpoint Service
This is the resource that PrivateLink consumers connect to.
Confirm the NLB from Step 2 is in the **Active** state before starting this step. It won't appear
in the **Available load balancers** dropdown until it has finished provisioning.
Go to **VPC → Endpoint services → Create endpoint service**.
* **Name**: optional, but useful for identification, e.g. `trigger-postgres-endpoint`
* **Load balancer type**: Network
* **Available load balancers**: select the NLB you created
* **Require acceptance for endpoint**: **No** (recommended)
 If you set "Require acceptance" to **Yes**, every connection request from Trigger.dev will
sit in a pending state until you manually approve it. Setting it to **No** lets connections
come up automatically once the principal is allow-listed.
Leave the "Private DNS name" option disabled. Trigger.dev tasks dial the endpoint by its
private IP, so private DNS isn't needed.
If your Trigger.dev tasks run in a **different AWS region** from your endpoint service, expand
the **Supported Regions** section and add the region(s) where Trigger.dev should be allowed to
create the VPC Endpoint from (for example, add `eu-central-1` if your service is in
`us-east-1` but tasks run in `eu-central-1`).
If your tasks and resource are in the same region, you can skip this — same-region access is
enabled by default.
Cross-region PrivateLink adds AWS data-transfer cost and \~10–30ms of latency depending on the
region pair. Prefer same-region when possible.
Click **Create**. The service is created immediately — you'll come back to copy its **Service
name** once you've authorized Trigger.dev in the next step.
## Step 4: Authorize the Trigger.dev AWS account
By default, no one can connect to your endpoint service. You need to explicitly allow Trigger.dev's AWS account.
Go to **VPC → Endpoint services**, select the service you just created.
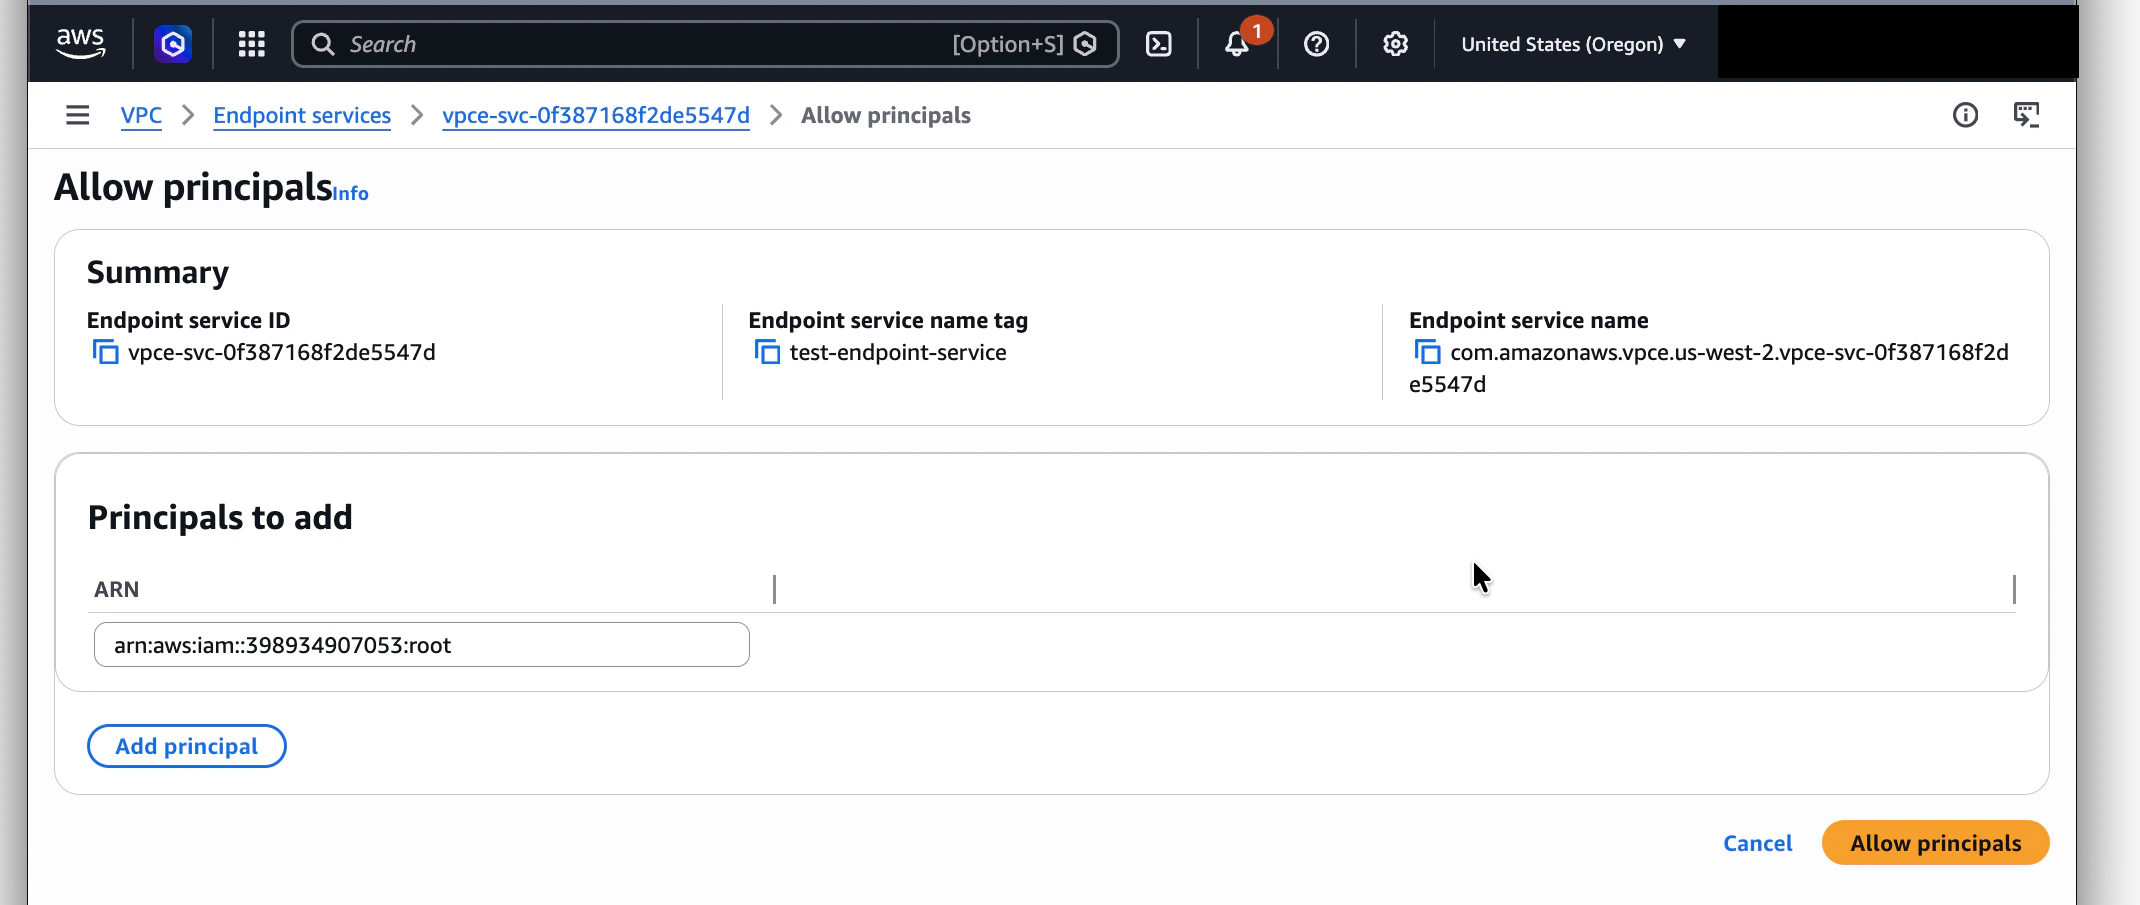
Click the **Allow principals** tab, then **Allow principals**.
Paste the principal ARN in this format, replacing `` with the Trigger.dev AWS
account ID shown in your dashboard:
```text theme={"theme":"css-variables"}
arn:aws:iam:::root
```
If you set "Require acceptance" to **Yes**, every connection request from Trigger.dev will
sit in a pending state until you manually approve it. Setting it to **No** lets connections
come up automatically once the principal is allow-listed.
Leave the "Private DNS name" option disabled. Trigger.dev tasks dial the endpoint by its
private IP, so private DNS isn't needed.
If your Trigger.dev tasks run in a **different AWS region** from your endpoint service, expand
the **Supported Regions** section and add the region(s) where Trigger.dev should be allowed to
create the VPC Endpoint from (for example, add `eu-central-1` if your service is in
`us-east-1` but tasks run in `eu-central-1`).
If your tasks and resource are in the same region, you can skip this — same-region access is
enabled by default.
Cross-region PrivateLink adds AWS data-transfer cost and \~10–30ms of latency depending on the
region pair. Prefer same-region when possible.
Click **Create**. The service is created immediately — you'll come back to copy its **Service
name** once you've authorized Trigger.dev in the next step.
## Step 4: Authorize the Trigger.dev AWS account
By default, no one can connect to your endpoint service. You need to explicitly allow Trigger.dev's AWS account.
Go to **VPC → Endpoint services**, select the service you just created.
Click the **Allow principals** tab, then **Allow principals**.
Paste the principal ARN in this format, replacing `` with the Trigger.dev AWS
account ID shown in your dashboard:
```text theme={"theme":"css-variables"}
arn:aws:iam:::root
```
 You will find the correct AWS account ID in the **Add connection** page of the Trigger.dev
dashboard. Do not assume an account ID — it differs between Trigger.dev environments.
The principal is now authorized to create a VPC Endpoint targeting your service.
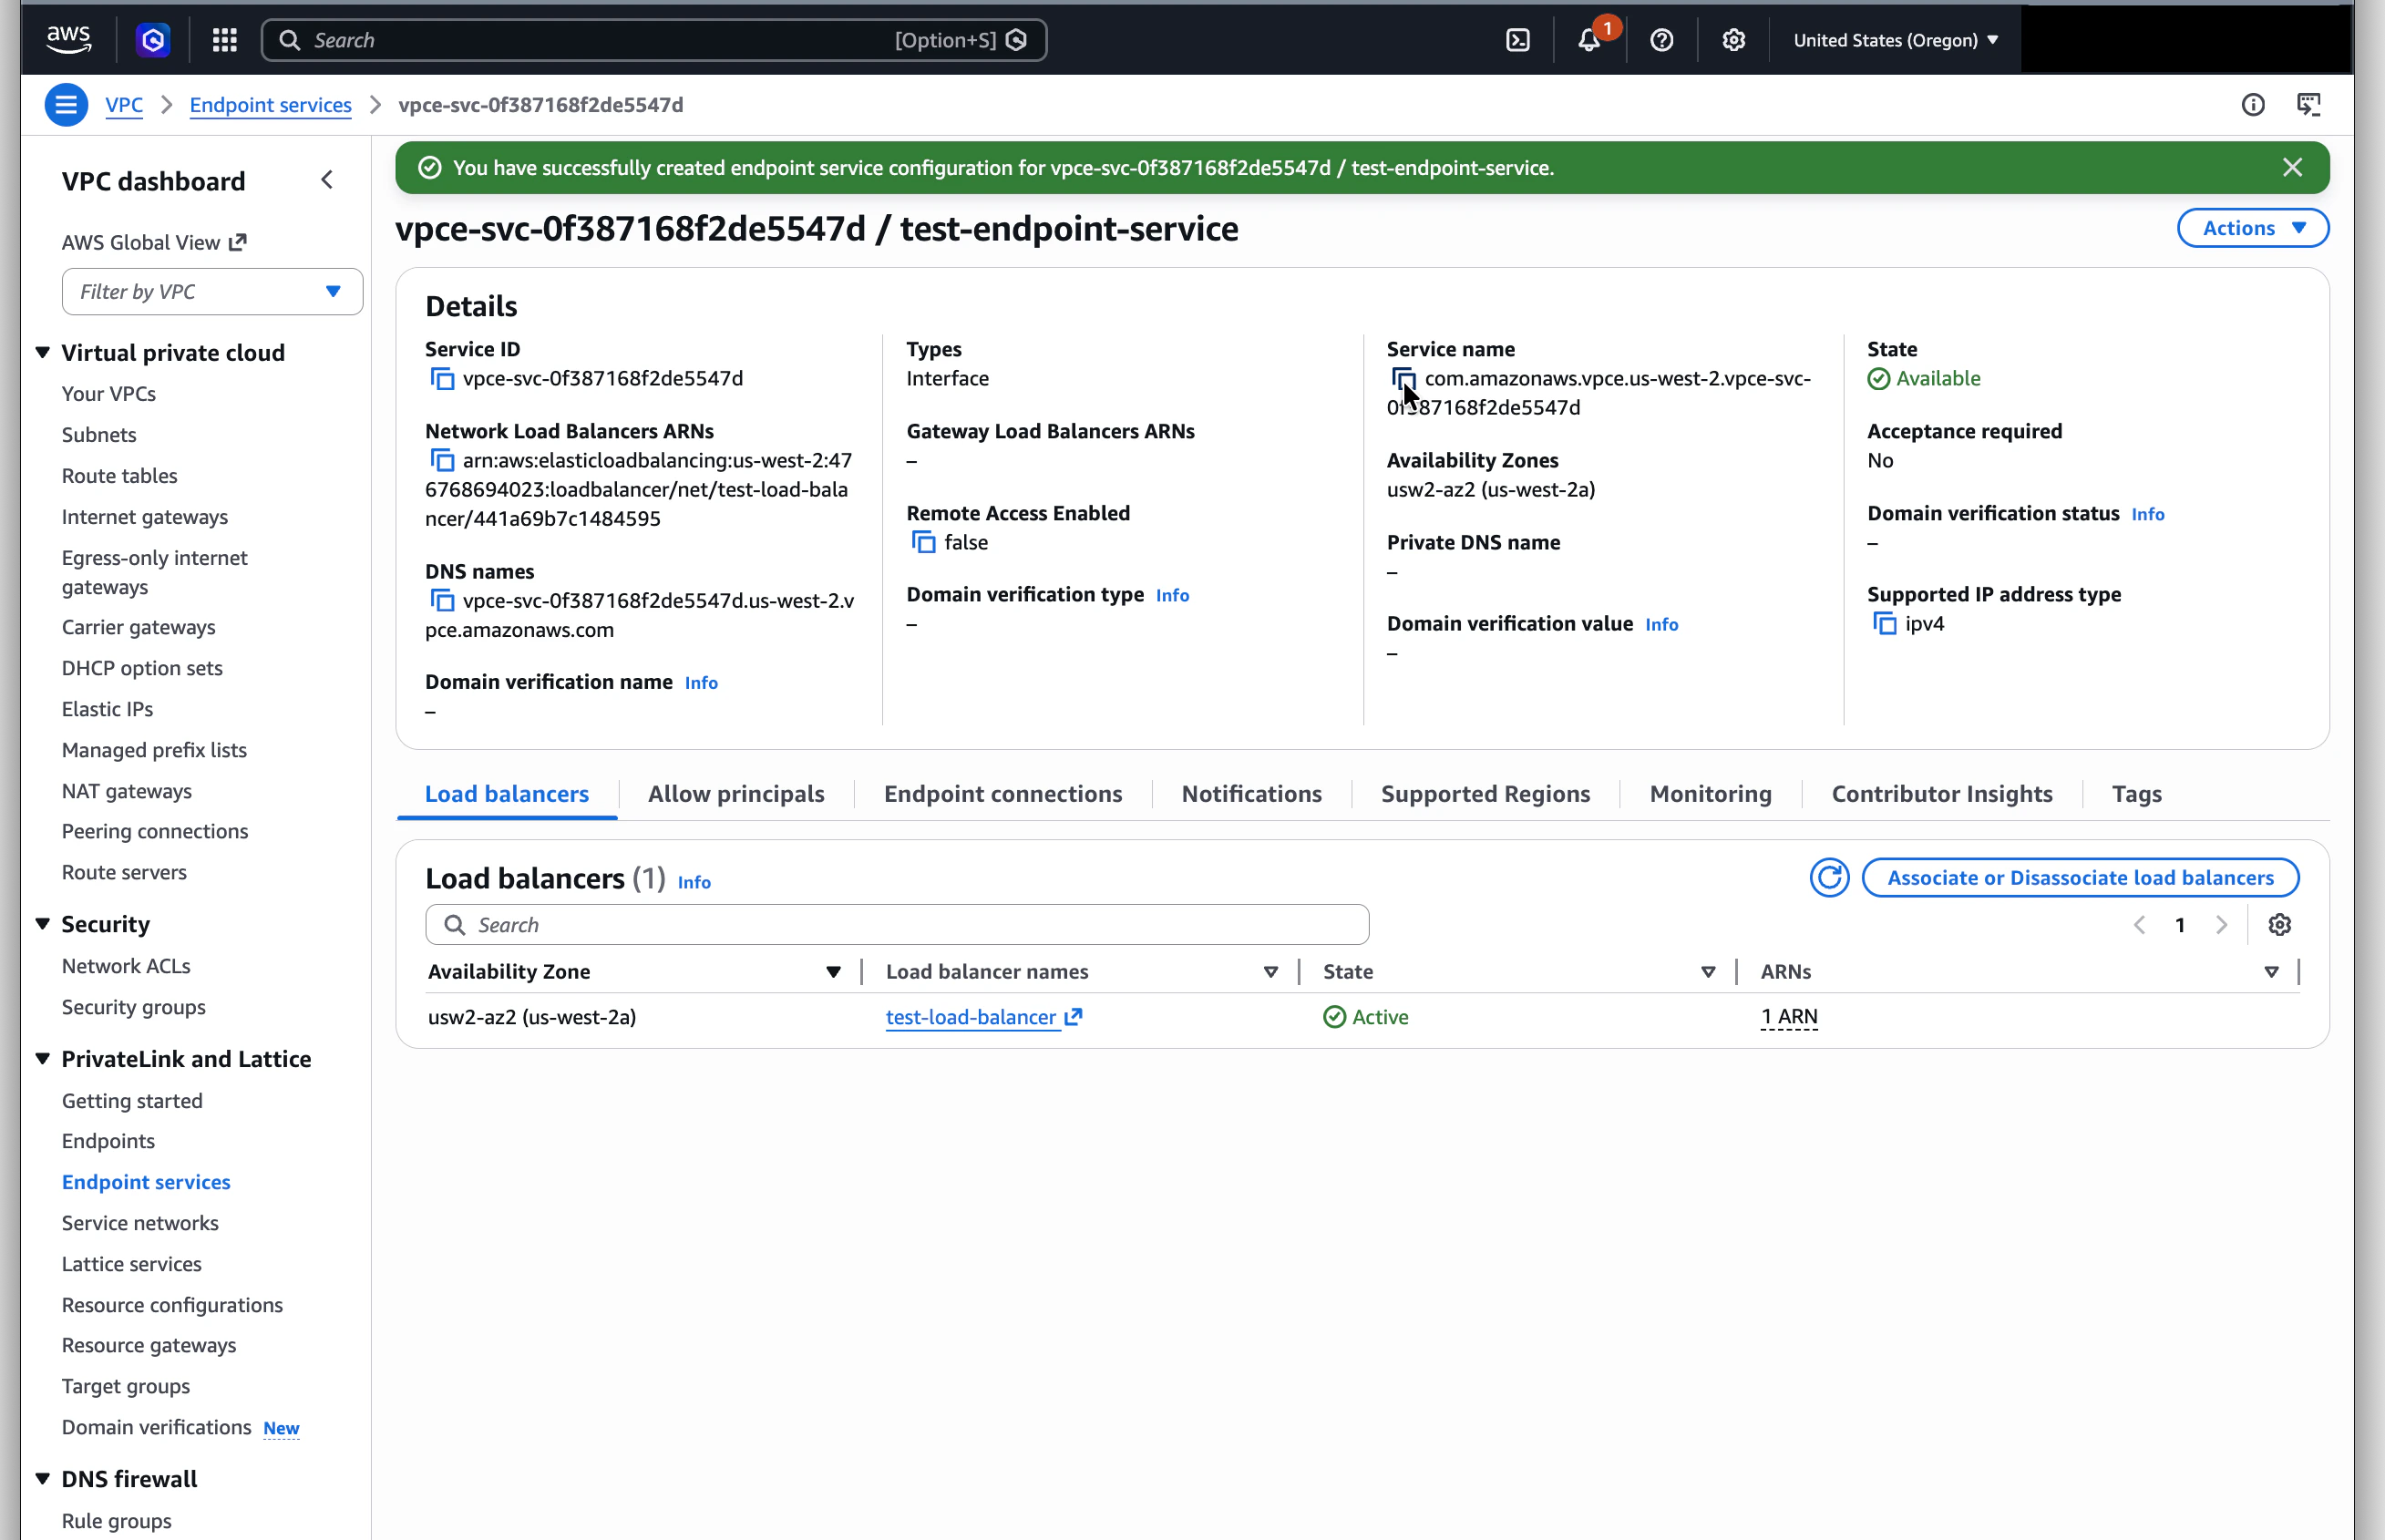
On the endpoint service detail page, copy the **Service name** value — it looks like
`com.amazonaws.vpce.us-east-1.vpce-svc-0123abcd...`. You'll paste this into the Trigger.dev
dashboard in the next step.
You will find the correct AWS account ID in the **Add connection** page of the Trigger.dev
dashboard. Do not assume an account ID — it differs between Trigger.dev environments.
The principal is now authorized to create a VPC Endpoint targeting your service.
On the endpoint service detail page, copy the **Service name** value — it looks like
`com.amazonaws.vpce.us-east-1.vpce-svc-0123abcd...`. You'll paste this into the Trigger.dev
dashboard in the next step.
 ## Step 5: Add the connection in Trigger.dev
In Trigger.dev, go to **Organization Settings → Private Connections** and click **Add
connection**.
Then fill in:
* **Friendly name**: a short, human-readable label for this connection.
* **VPC Endpoint Service name**: paste the `com.amazonaws.vpce..vpce-svc-...` value from Step 4.
* **Target region**: the AWS region your endpoint service lives in.
Submit the form. The connection's status moves through **Pending → Provisioning → Active**.
Provisioning typically takes 30–90 seconds.
Once **Active**, the dashboard shows the assigned private IP. Plug it into the
connection-string environment variable your task already uses (for example, `DATABASE_URL` set
on the **Environment Variables** page) and your tasks will reach the resource over
PrivateLink.
## Troubleshooting
See the dedicated [Troubleshooting](/private-networking/troubleshooting) page for common problems
such as the "Private link not found" wizard error. A few quick checks specific to this setup flow:
* Confirm Trigger.dev's AWS account ID is in your endpoint service's **Allow principals** list.
* Confirm the endpoint service is **Available** in the AWS console.
* Confirm "Require acceptance" is set to **No** on the endpoint service. If it's set to **Yes**,
the request is sitting in your pending queue and you must approve it manually.
* Confirm the NLB has a target registered and the target's health check is passing.
* Confirm the listener port matches the port your task code is dialing.
* Confirm the security group on your resource allows inbound traffic from the NLB or the VPC's
private IP range.
* If the NLB itself has a security group attached, turn off **Enforce inbound rules on
PrivateLink traffic** on the load balancer. See [the troubleshooting
page](/private-networking/troubleshooting#connection-is-active-but-the-assigned-ip-is-not-reachable-from-tasks)
for details.
* Try connecting from inside the VPC first (e.g., a bastion host) to rule out resource-side
issues.
* Cross-region connections add \~10–30ms RTT depending on the regions involved. If your tasks run
in a different region than your resource, expect higher latency.
* The NLB and target group's health checks influence connection setup time. Tighter health check
intervals reduce failover time after a backend goes unhealthy.
Delete the connection from **Organization Settings → Private Connections** in the Trigger.dev
dashboard. We'll tear down our VPC Endpoint and remove the network policy automatically. You can
then delete your VPC Endpoint Service, NLB, and target group on the AWS side.
## Step 5: Add the connection in Trigger.dev
In Trigger.dev, go to **Organization Settings → Private Connections** and click **Add
connection**.
Then fill in:
* **Friendly name**: a short, human-readable label for this connection.
* **VPC Endpoint Service name**: paste the `com.amazonaws.vpce..vpce-svc-...` value from Step 4.
* **Target region**: the AWS region your endpoint service lives in.
Submit the form. The connection's status moves through **Pending → Provisioning → Active**.
Provisioning typically takes 30–90 seconds.
Once **Active**, the dashboard shows the assigned private IP. Plug it into the
connection-string environment variable your task already uses (for example, `DATABASE_URL` set
on the **Environment Variables** page) and your tasks will reach the resource over
PrivateLink.
## Troubleshooting
See the dedicated [Troubleshooting](/private-networking/troubleshooting) page for common problems
such as the "Private link not found" wizard error. A few quick checks specific to this setup flow:
* Confirm Trigger.dev's AWS account ID is in your endpoint service's **Allow principals** list.
* Confirm the endpoint service is **Available** in the AWS console.
* Confirm "Require acceptance" is set to **No** on the endpoint service. If it's set to **Yes**,
the request is sitting in your pending queue and you must approve it manually.
* Confirm the NLB has a target registered and the target's health check is passing.
* Confirm the listener port matches the port your task code is dialing.
* Confirm the security group on your resource allows inbound traffic from the NLB or the VPC's
private IP range.
* If the NLB itself has a security group attached, turn off **Enforce inbound rules on
PrivateLink traffic** on the load balancer. See [the troubleshooting
page](/private-networking/troubleshooting#connection-is-active-but-the-assigned-ip-is-not-reachable-from-tasks)
for details.
* Try connecting from inside the VPC first (e.g., a bastion host) to rule out resource-side
issues.
* Cross-region connections add \~10–30ms RTT depending on the regions involved. If your tasks run
in a different region than your resource, expect higher latency.
* The NLB and target group's health checks influence connection setup time. Tighter health check
intervals reduce failover time after a backend goes unhealthy.
Delete the connection from **Organization Settings → Private Connections** in the Trigger.dev
dashboard. We'll tear down our VPC Endpoint and remove the network policy automatically. You can
then delete your VPC Endpoint Service, NLB, and target group on the AWS side.