> ## Documentation Index
> Fetch the complete documentation index at: https://trigger.dev/docs/llms.txt
> Use this file to discover all available pages before exploring further.
# Triggering tasks from Supabase edge functions
> This guide will show you how to trigger a task from a Supabase edge function, and then view the run in our dashboard.
## Overview
Supabase edge functions allow you to trigger tasks either when an event is sent from a third party (e.g. when a new Stripe payment is processed, when a new user signs up to a service, etc), or when there are any changes or updates to your Supabase database.
This guide shows you how to set up and deploy a simple Supabase edge function example that triggers a task when an edge function URL is accessed.
## Prerequisites
* Ensure you have the [Supabase CLI](https://supabase.com/docs/guides/cli/getting-started) installed
* Since Supabase CLI version 1.123.4, you must have [Docker Desktop installed](https://supabase.com/docs/guides/functions/deploy#deploy-your-edge-functions) to deploy Edge Functions
* Ensure TypeScript is installed
* [Create a Trigger.dev account](https://cloud.trigger.dev)
* Create a new Trigger.dev project
## GitHub repo
Click here to view the full code for this project in our examples repository on GitHub. You can
fork it and use it as a starting point for your own project.
## Initial setup
If you already have a Supabase project on your local machine you can skip this step.
You can create a new project by running the following command in your terminal using the Supabase CLI:
```bash theme={"theme":"css-variables"}
supabase init
```
If you are using VS Code, ensure to answer 'y' when asked to generate VS Code settings for Deno,
and install any recommended extensions.
If your project does not already have `package.json` file (e.g. if you are using Deno), create it manually in your project's root folder.
If your project has a `package.json` file you can skip this step.
This is required for the Trigger.dev SDK to work correctly.
```ts package.json theme={"theme":"css-variables"}
{
"devDependencies": {
"typescript": "^5.6.2"
}
}
```
Update your Typescript version to the latest version available.
The easiest way to get started is to use the CLI. It will add Trigger.dev to your existing project, create a `/trigger` folder and give you an example task.
Run this command in the root of your project to get started:
```bash npm theme={"theme":"css-variables"}
npx trigger.dev@latest init
```
```bash pnpm theme={"theme":"css-variables"}
pnpm dlx trigger.dev@latest init
```
```bash yarn theme={"theme":"css-variables"}
yarn dlx trigger.dev@latest init
```
It will do a few things:
Our [Trigger.dev MCP server](/mcp-introduction) gives your AI assistant direct access to Trigger.dev tools; search docs, trigger tasks, deploy projects, and monitor runs. We recommend installing it for the best developer experience.
1. Ask if you want to install the [Trigger.dev MCP server](/mcp-introduction) for your AI assistant.
2. Log you into the CLI if you're not already logged in.
3. Ask you to select your project.
4. Install the required SDK packages.
5. Ask where you'd like to create the `/trigger` directory and create it with an example task.
6. Create a `trigger.config.ts` file in the root of your project.
Install the "Hello World" example task when prompted. We'll use this task to test the setup.
The CLI `dev` command runs a server for your tasks. It watches for changes in your `/trigger` directory and communicates with the Trigger.dev platform to register your tasks, perform runs, and send data back and forth.
It can also update your `@trigger.dev/*` packages to prevent version mismatches and failed deploys. You will always be prompted first.
```bash npm theme={"theme":"css-variables"}
npx trigger.dev@latest dev
```
```bash pnpm theme={"theme":"css-variables"}
pnpm dlx trigger.dev@latest dev
```
```bash yarn theme={"theme":"css-variables"}
yarn dlx trigger.dev@latest dev
```
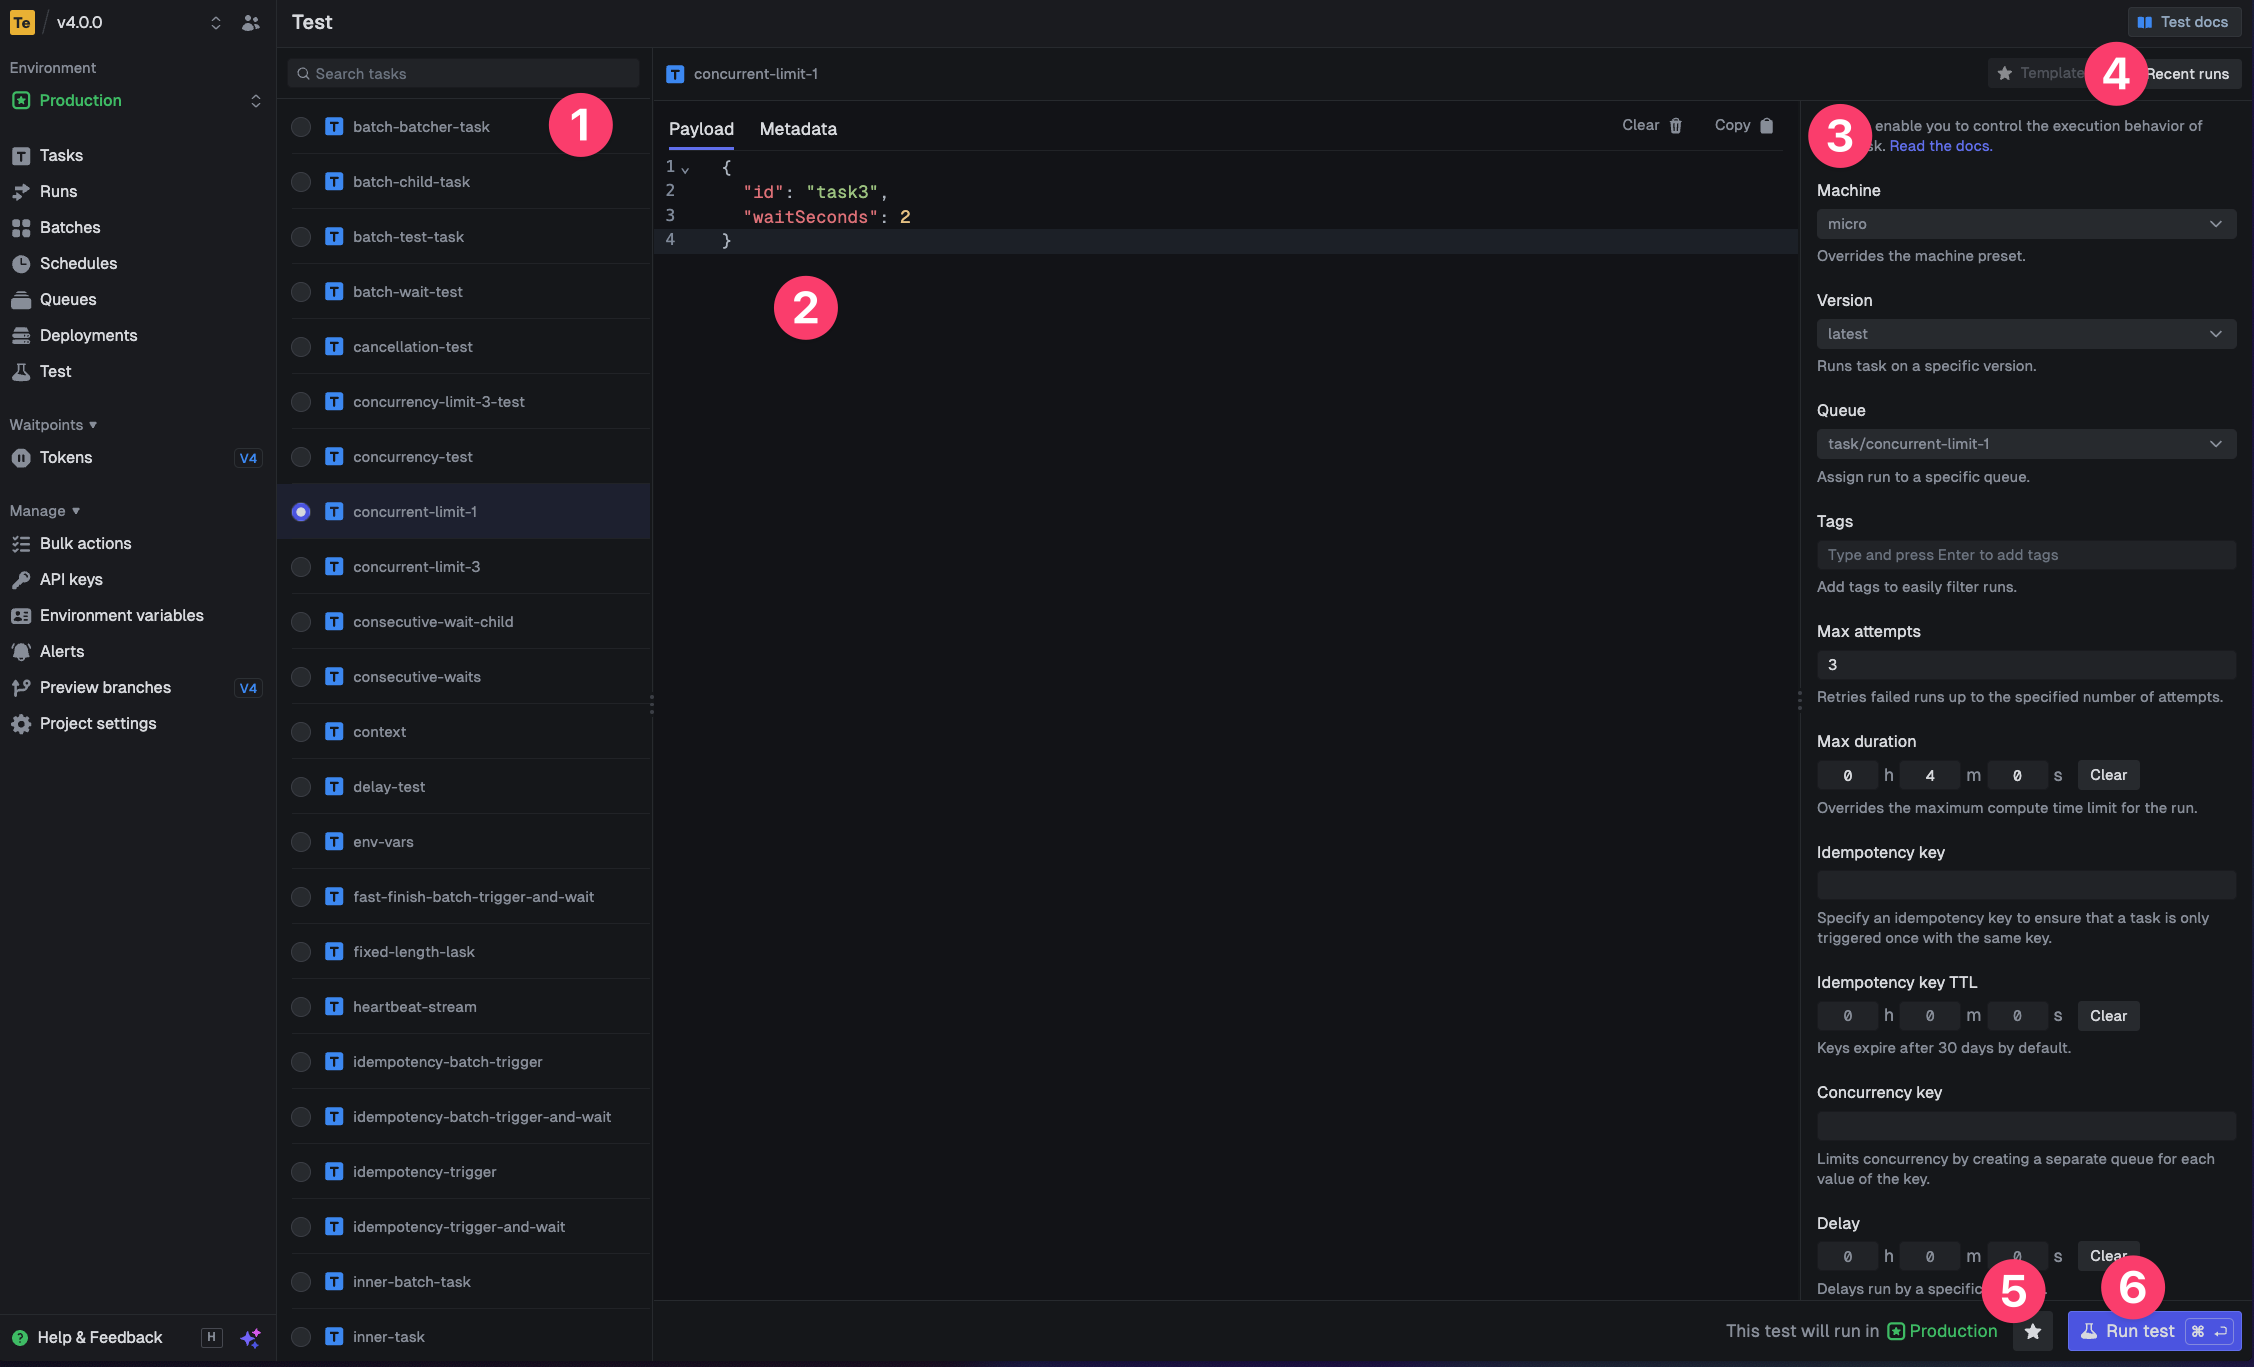
The CLI `dev` command spits out various useful URLs. Right now we want to visit the Test page.
You should see our Example task in the list , select it. Most tasks have a "payload" which you enter in the JSON editor , but our example task doesn't need any input.
You can configure options on the run , view recent payloads , and create run templates .
Press the "Run test" button .
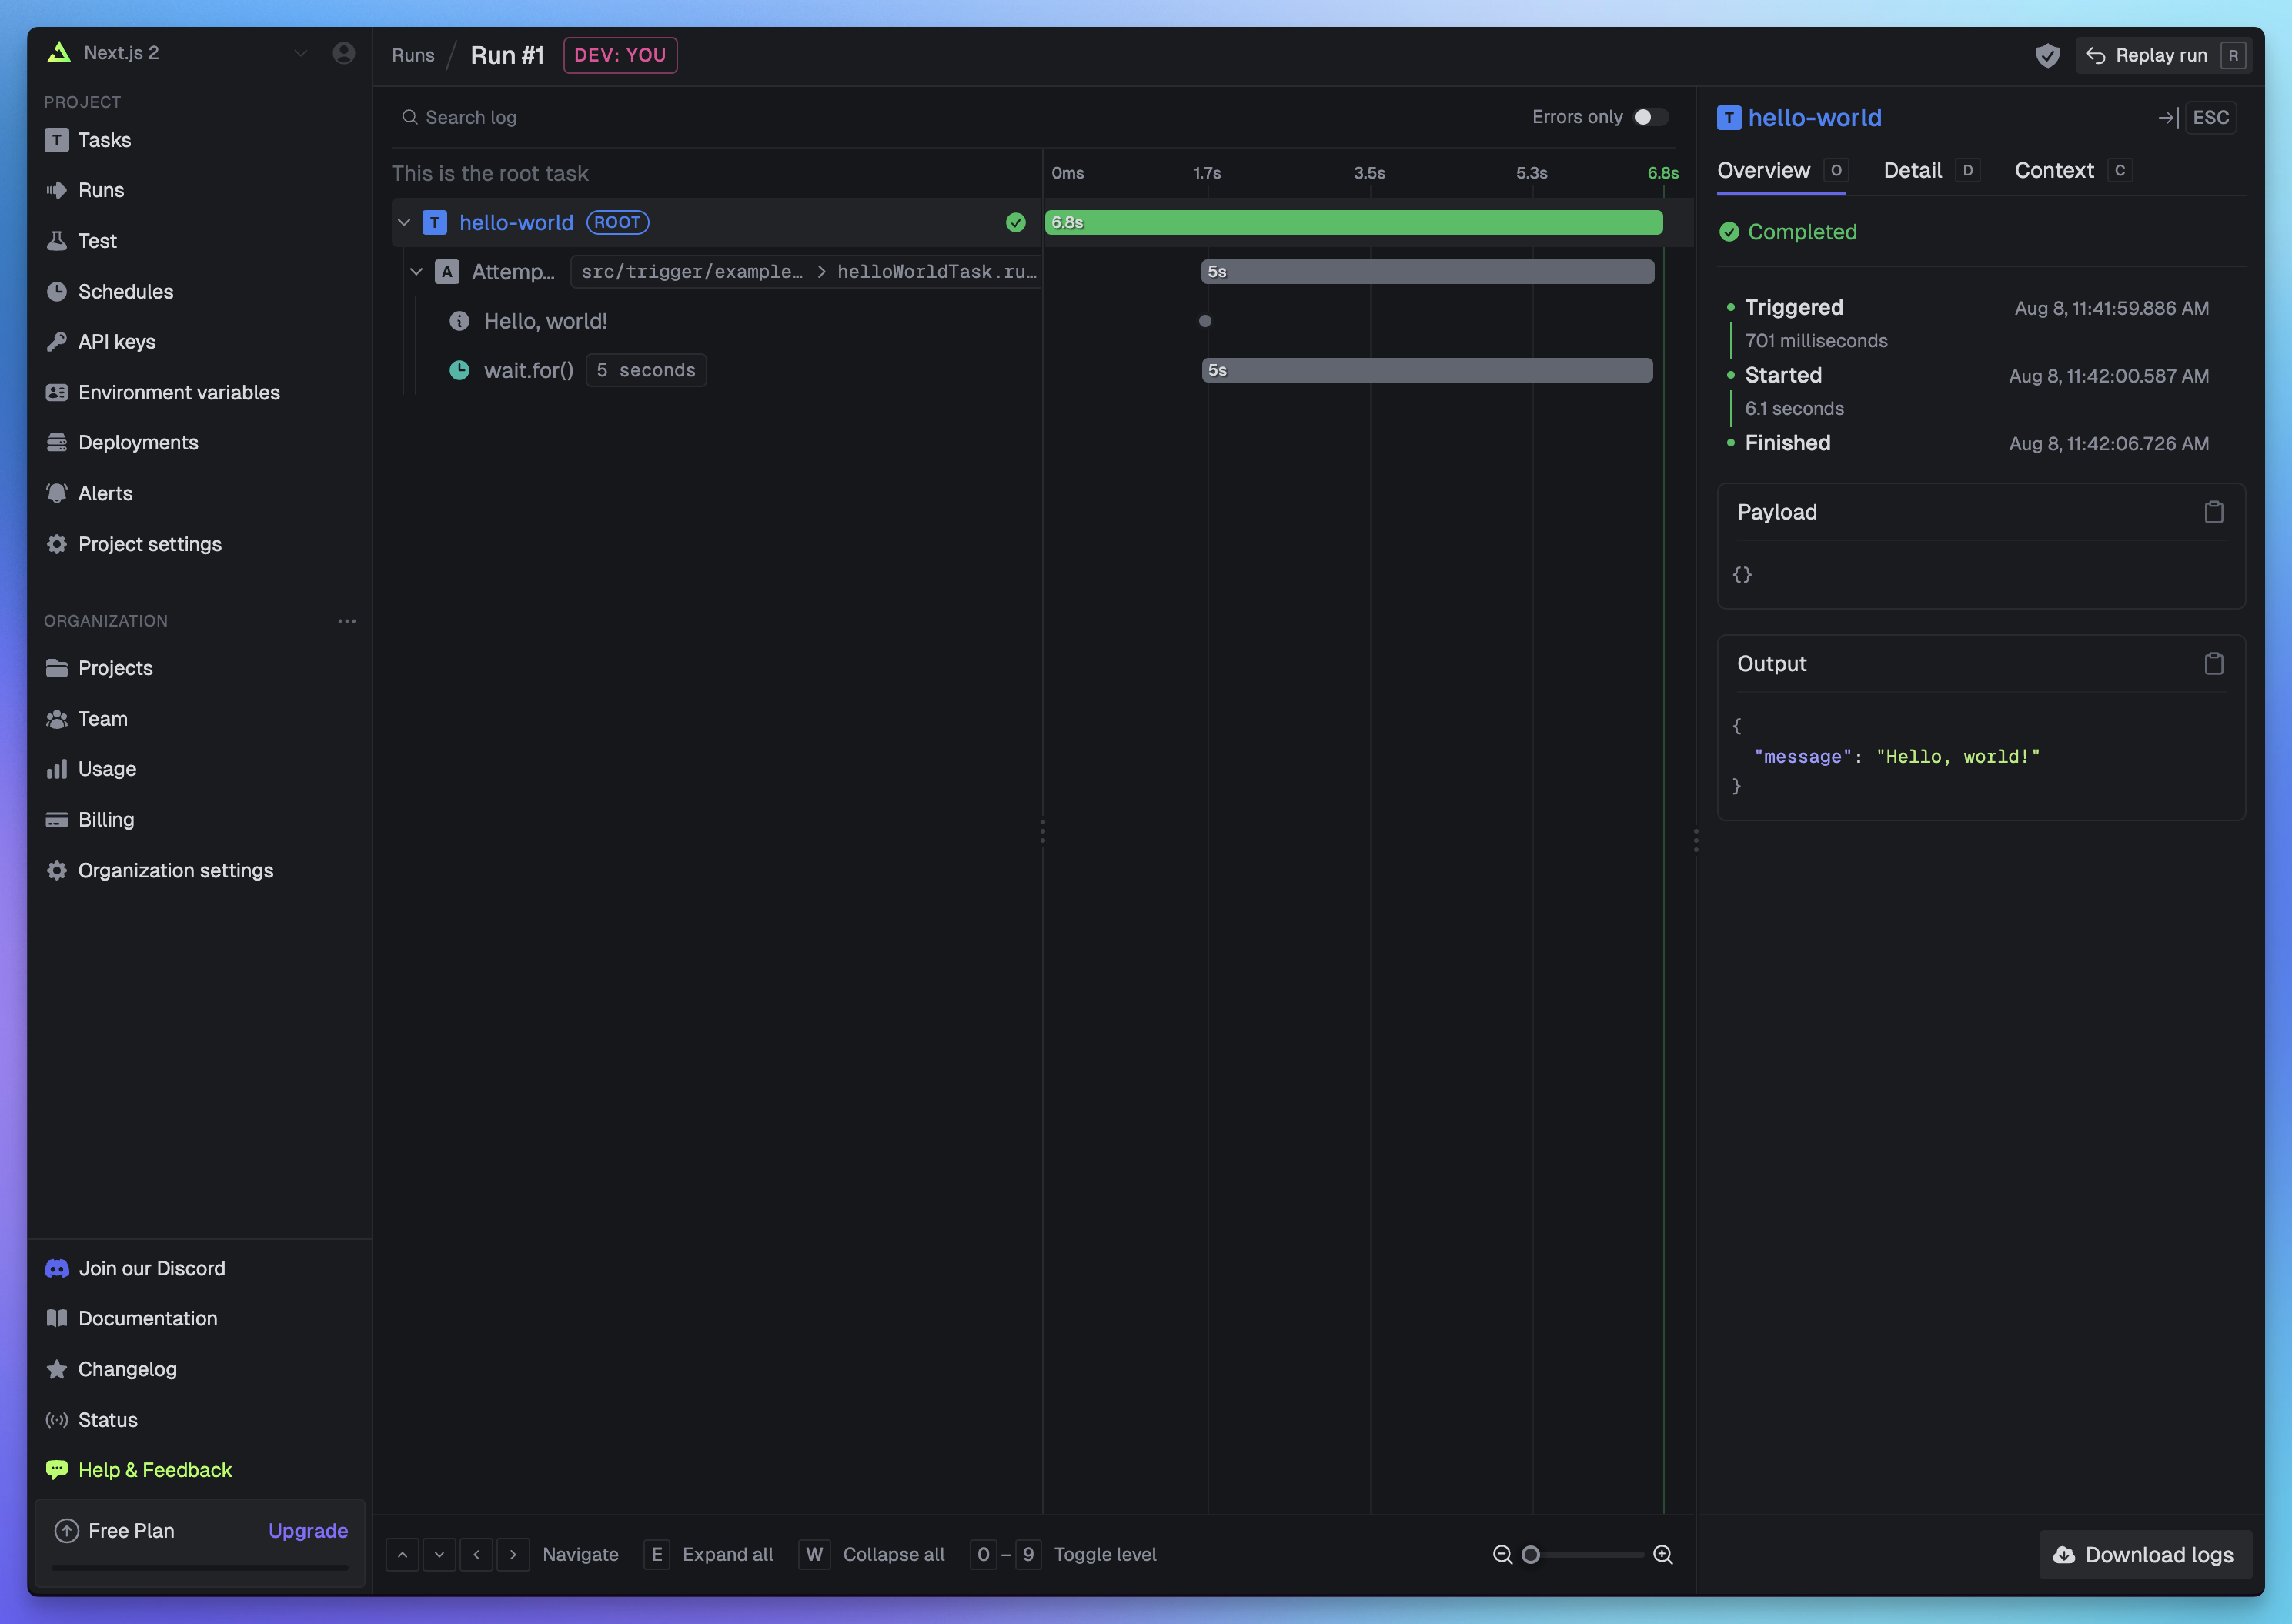
 Congratulations, you should see the run page which will live reload showing you the current state of the run.
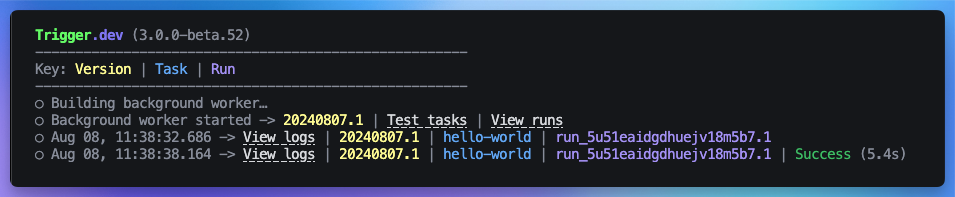
 If you go back to your terminal you'll see that the dev command also shows the task status and links to the run log.
 ## Create a new Supabase edge function and deploy it
We'll call this example `edge-function-trigger`.
In your project, run the following command in the terminal using the Supabase CLI:
```bash theme={"theme":"css-variables"}
supabase functions new edge-function-trigger
```
Replace the placeholder code in your `edge-function-trigger/index.ts` file with the following:
```ts functions/edge-function-trigger/index.ts theme={"theme":"css-variables"}
// Setup type definitions for built-in Supabase Runtime APIs
import "jsr:@supabase/functions-js/edge-runtime.d.ts";
// Import the Trigger.dev SDK - replace "" with the version of the SDK you are using, e.g. "3.0.0". You can find this in your package.json file.
import { tasks } from "npm:@trigger.dev/sdk@3.0.0";
// Import your task type from your /trigger folder
import type { helloWorldTask } from "../../../src/trigger/example.ts";
// 👆 **type-only** import
Deno.serve(async () => {
await tasks.trigger(
// Your task id
"hello-world",
// Your task payload
"Hello from a Supabase Edge Function!"
);
return new Response("OK");
});
```
You can only import the `type` from the task.
Tasks in the `trigger` folder use Node, so they must stay in there or they will not run,
especially if you are using a different runtime like Deno. Also do not add "`npm:`" to imports
inside your task files, for the same reason.
You can now deploy your edge function with the following command in your terminal:
```bash theme={"theme":"css-variables"}
supabase functions deploy edge-function-trigger --no-verify-jwt
```
`--no-verify-jwt` removes the JSON Web Tokens requirement from the authorization header. By
default this should be on, but it is not strictly required for this hello world example.
To learn more about how to properly configure Supabase auth for Trigger.dev tasks, please refer to
our [Supabase Authentication guide](/guides/frameworks/supabase-authentication). It demonstrates
how to use JWT authentication for user-specific operations or your service role key for
admin-level access.
Follow the CLI instructions and once complete you should now see your new edge function deployment in your Supabase edge functions dashboard.
There will be a link to the dashboard in your terminal output, or you can find it at this URL:
`https://supabase.com/dashboard/project//functions`
Replace `your-project-id` with your actual project ID.
## Set your Trigger.dev prod secret key in the Supabase dashboard
To trigger a task from your edge function, you need to set your Trigger.dev secret key in the Supabase dashboard.
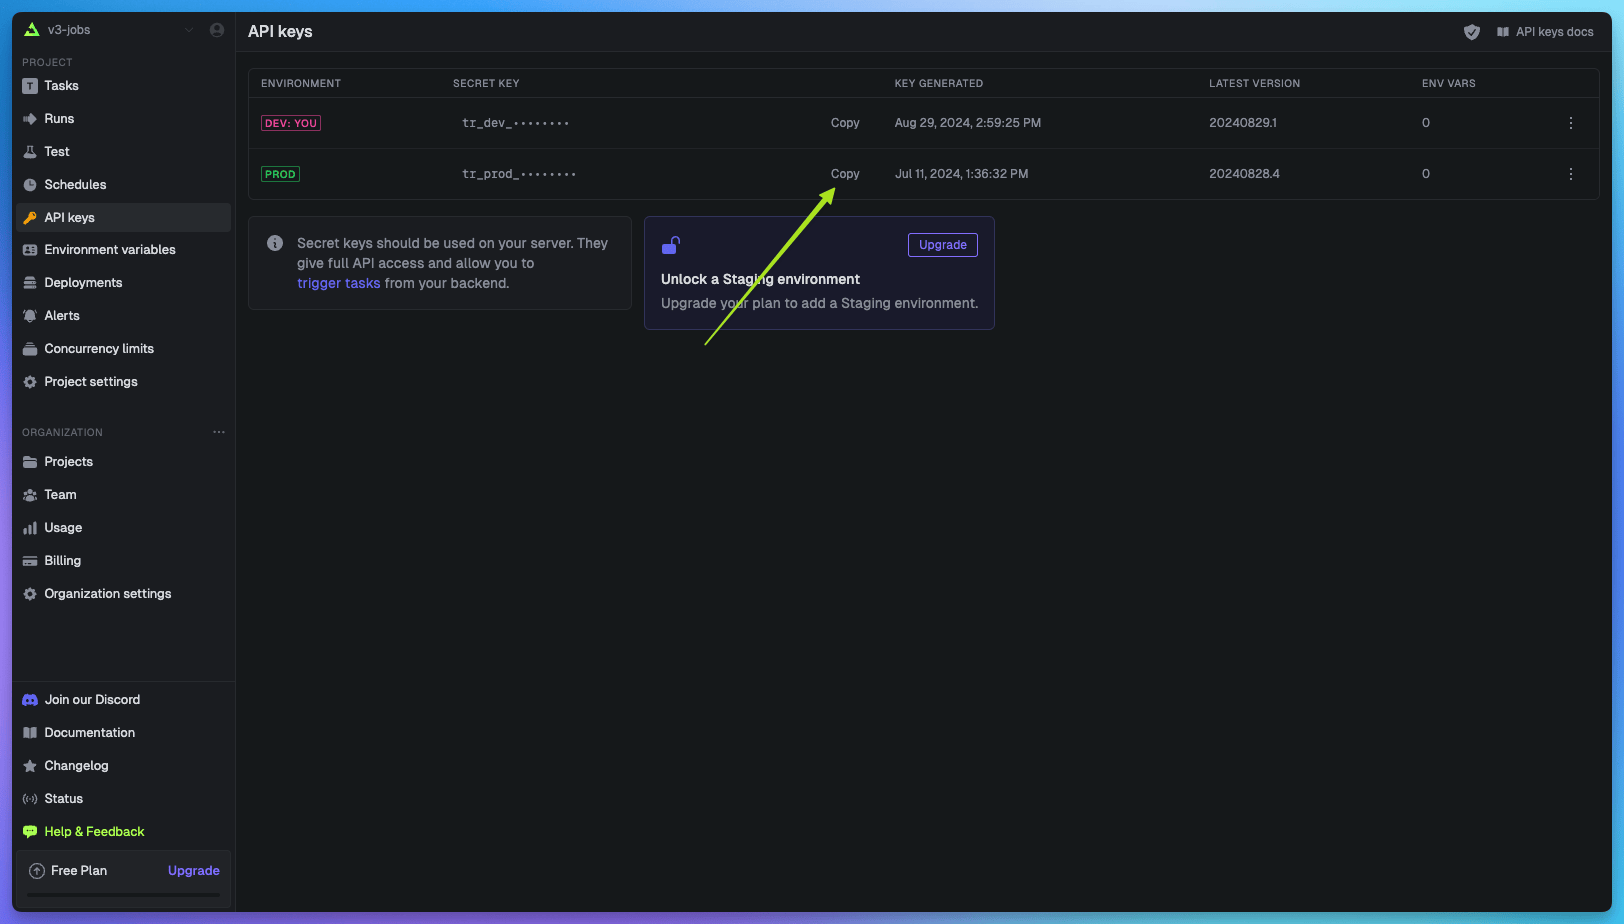
To do this, first go to your Trigger.dev [project dashboard](https://cloud.trigger.dev) and copy the `prod` secret key from the API keys page.
## Create a new Supabase edge function and deploy it
We'll call this example `edge-function-trigger`.
In your project, run the following command in the terminal using the Supabase CLI:
```bash theme={"theme":"css-variables"}
supabase functions new edge-function-trigger
```
Replace the placeholder code in your `edge-function-trigger/index.ts` file with the following:
```ts functions/edge-function-trigger/index.ts theme={"theme":"css-variables"}
// Setup type definitions for built-in Supabase Runtime APIs
import "jsr:@supabase/functions-js/edge-runtime.d.ts";
// Import the Trigger.dev SDK - replace "" with the version of the SDK you are using, e.g. "3.0.0". You can find this in your package.json file.
import { tasks } from "npm:@trigger.dev/sdk@3.0.0";
// Import your task type from your /trigger folder
import type { helloWorldTask } from "../../../src/trigger/example.ts";
// 👆 **type-only** import
Deno.serve(async () => {
await tasks.trigger(
// Your task id
"hello-world",
// Your task payload
"Hello from a Supabase Edge Function!"
);
return new Response("OK");
});
```
You can only import the `type` from the task.
Tasks in the `trigger` folder use Node, so they must stay in there or they will not run,
especially if you are using a different runtime like Deno. Also do not add "`npm:`" to imports
inside your task files, for the same reason.
You can now deploy your edge function with the following command in your terminal:
```bash theme={"theme":"css-variables"}
supabase functions deploy edge-function-trigger --no-verify-jwt
```
`--no-verify-jwt` removes the JSON Web Tokens requirement from the authorization header. By
default this should be on, but it is not strictly required for this hello world example.
To learn more about how to properly configure Supabase auth for Trigger.dev tasks, please refer to
our [Supabase Authentication guide](/guides/frameworks/supabase-authentication). It demonstrates
how to use JWT authentication for user-specific operations or your service role key for
admin-level access.
Follow the CLI instructions and once complete you should now see your new edge function deployment in your Supabase edge functions dashboard.
There will be a link to the dashboard in your terminal output, or you can find it at this URL:
`https://supabase.com/dashboard/project//functions`
Replace `your-project-id` with your actual project ID.
## Set your Trigger.dev prod secret key in the Supabase dashboard
To trigger a task from your edge function, you need to set your Trigger.dev secret key in the Supabase dashboard.
To do this, first go to your Trigger.dev [project dashboard](https://cloud.trigger.dev) and copy the `prod` secret key from the API keys page.
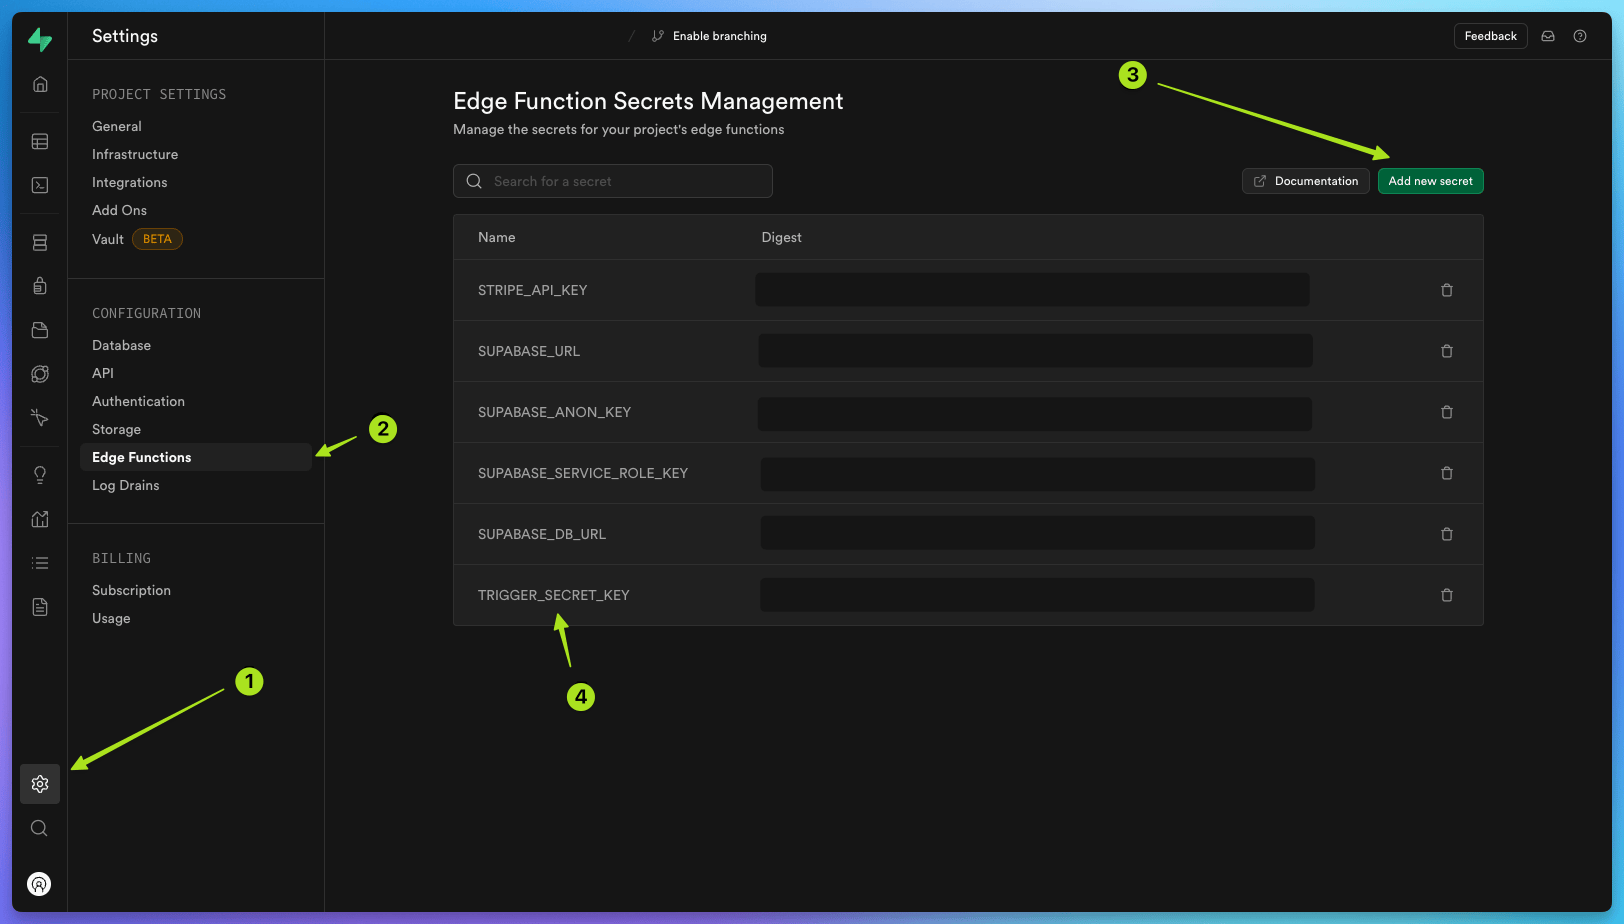
 Then, in [Supabase](https://supabase.com/dashboard/projects), select your project, navigate to 'Project settings' , click 'Edge functions' in the configurations menu, and then click the 'Add new secret' button.
Add `TRIGGER_SECRET_KEY` with the pasted value of your Trigger.dev `prod` secret key.
Then, in [Supabase](https://supabase.com/dashboard/projects), select your project, navigate to 'Project settings' , click 'Edge functions' in the configurations menu, and then click the 'Add new secret' button.
Add `TRIGGER_SECRET_KEY` with the pasted value of your Trigger.dev `prod` secret key.
 ## Deploy your task and trigger it from your edge function
Next, deploy your `hello-world` task to [Trigger.dev cloud](https://cloud.trigger.dev).
```bash npm theme={"theme":"css-variables"}
npx trigger.dev@latest deploy
```
```bash pnpm theme={"theme":"css-variables"}
pnpm dlx trigger.dev@latest deploy
```
```bash yarn theme={"theme":"css-variables"}
yarn dlx trigger.dev@latest deploy
```
To do this all you need to do is simply open the `edge-function-trigger` URL.
`https://supabase.com/dashboard/project//functions`
Replace `your-project-id` with your actual project ID.
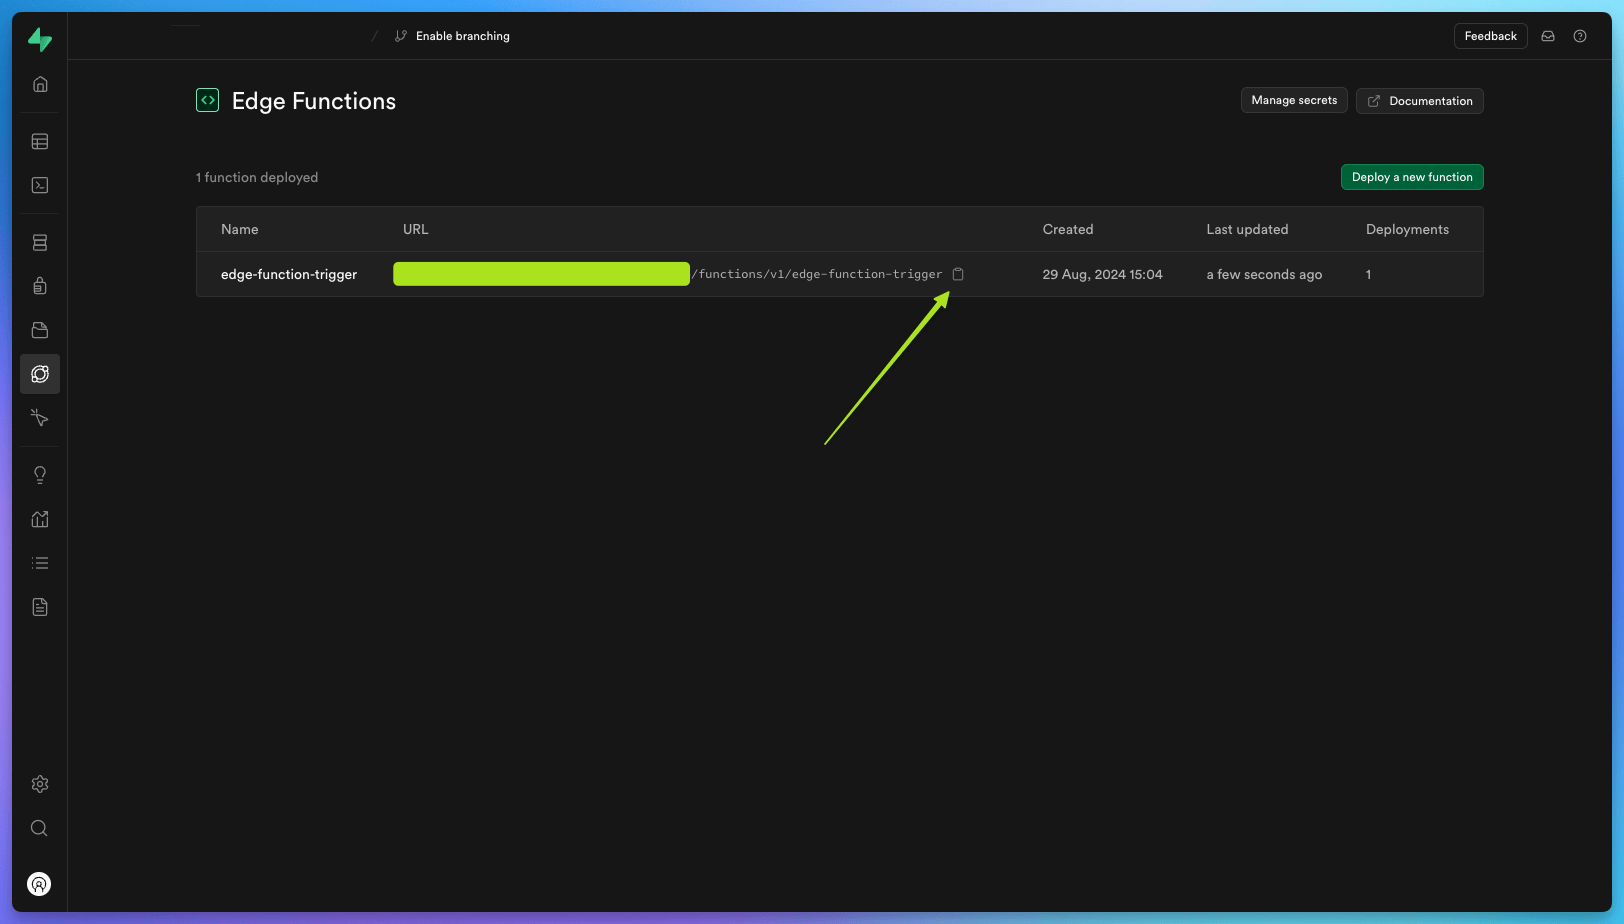
In your Supabase project, go to your Edge function dashboard, find `edge-function-trigger`, copy the URL, and paste it into a new window in your browser.
Once loaded you should see ‘OK’ on the new screen.
## Deploy your task and trigger it from your edge function
Next, deploy your `hello-world` task to [Trigger.dev cloud](https://cloud.trigger.dev).
```bash npm theme={"theme":"css-variables"}
npx trigger.dev@latest deploy
```
```bash pnpm theme={"theme":"css-variables"}
pnpm dlx trigger.dev@latest deploy
```
```bash yarn theme={"theme":"css-variables"}
yarn dlx trigger.dev@latest deploy
```
To do this all you need to do is simply open the `edge-function-trigger` URL.
`https://supabase.com/dashboard/project//functions`
Replace `your-project-id` with your actual project ID.
In your Supabase project, go to your Edge function dashboard, find `edge-function-trigger`, copy the URL, and paste it into a new window in your browser.
Once loaded you should see ‘OK’ on the new screen.
 The task will be triggered when your edge function URL is accessed.
Check your [cloud.trigger.dev](http://cloud.trigger.dev) dashboard and you should see a succesful `hello-world` task.
**Congratulations, you have run a simple Hello World task from a Supabase edge function!**
### If you see a runtime error when calling tasks.trigger()
If you see `TypeError: Cannot read properties of undefined (reading 'toString')` when calling `tasks.trigger()` from your edge function, the SDK is hitting a dependency that expects Node-style APIs not available in the Supabase Edge (Deno) runtime. Use the [Tasks API](/management/tasks/trigger) with `fetch` instead of the SDK—that avoids loading the SDK in Deno:
```ts theme={"theme":"css-variables"}
const response = await fetch(
`https://api.trigger.dev/api/v1/tasks/your-task-id/trigger`,
{
method: "POST",
headers: {
Authorization: `Bearer ${Deno.env.get("TRIGGER_SECRET_KEY")}`,
"Content-Type": "application/json",
},
body: JSON.stringify({ payload: { your: "payload" } }),
}
);
```
See [Trigger task via API](/management/tasks/trigger) for full request/response details and optional fields (e.g. `delay`, `idempotencyKey`).
## Learn more about Supabase and Trigger.dev
### Full walkthrough guides from development to deployment
Learn how to trigger a task from a Supabase edge function when a URL is visited.
Learn how to trigger a task from a Supabase edge function when an event occurs in your database.
Learn how to authenticate Supabase tasks using JWTs for Row Level Security (RLS) or service role
keys for admin access.
### Task examples with code you can copy and paste
Run basic CRUD operations on a table in a Supabase database using Trigger.dev.
Download a video from a URL and upload it to Supabase Storage using S3.
The task will be triggered when your edge function URL is accessed.
Check your [cloud.trigger.dev](http://cloud.trigger.dev) dashboard and you should see a succesful `hello-world` task.
**Congratulations, you have run a simple Hello World task from a Supabase edge function!**
### If you see a runtime error when calling tasks.trigger()
If you see `TypeError: Cannot read properties of undefined (reading 'toString')` when calling `tasks.trigger()` from your edge function, the SDK is hitting a dependency that expects Node-style APIs not available in the Supabase Edge (Deno) runtime. Use the [Tasks API](/management/tasks/trigger) with `fetch` instead of the SDK—that avoids loading the SDK in Deno:
```ts theme={"theme":"css-variables"}
const response = await fetch(
`https://api.trigger.dev/api/v1/tasks/your-task-id/trigger`,
{
method: "POST",
headers: {
Authorization: `Bearer ${Deno.env.get("TRIGGER_SECRET_KEY")}`,
"Content-Type": "application/json",
},
body: JSON.stringify({ payload: { your: "payload" } }),
}
);
```
See [Trigger task via API](/management/tasks/trigger) for full request/response details and optional fields (e.g. `delay`, `idempotencyKey`).
## Learn more about Supabase and Trigger.dev
### Full walkthrough guides from development to deployment
Learn how to trigger a task from a Supabase edge function when a URL is visited.
Learn how to trigger a task from a Supabase edge function when an event occurs in your database.
Learn how to authenticate Supabase tasks using JWTs for Row Level Security (RLS) or service role
keys for admin access.
### Task examples with code you can copy and paste
Run basic CRUD operations on a table in a Supabase database using Trigger.dev.
Download a video from a URL and upload it to Supabase Storage using S3.