> ## Documentation Index
> Fetch the complete documentation index at: https://trigger.dev/docs/llms.txt
> Use this file to discover all available pages before exploring further.
# Prisma setup guide
> This guide will show you how to set up Prisma with Trigger.dev
## Overview
This guide will show you how to set up [Prisma](https://www.prisma.io/) with Trigger.dev, test and view an example task run.
## Prerequisites
* An existing Node.js project with a `package.json` file
* Ensure TypeScript is installed
* A [PostgreSQL](https://www.postgresql.org/) database server running locally, or accessible via a connection string
* Prisma ORM [installed and initialized](https://www.prisma.io/docs/getting-started/quickstart) in your project
* A `DATABASE_URL` environment variable set in your `.env` file, pointing to your PostgreSQL database (e.g. `postgresql://user:password@localhost:5432/dbname`)
## Initial setup (optional)
Follow these steps if you don't already have Trigger.dev set up in your project.
The easiest way to get started is to use the CLI. It will add Trigger.dev to your existing project, create a `/trigger` folder and give you an example task.
Run this command in the root of your project to get started:
```bash npm theme={"theme":"css-variables"}
npx trigger.dev@latest init
```
```bash pnpm theme={"theme":"css-variables"}
pnpm dlx trigger.dev@latest init
```
```bash yarn theme={"theme":"css-variables"}
yarn dlx trigger.dev@latest init
```
It will do a few things:
Our [Trigger.dev MCP server](/mcp-introduction) gives your AI assistant direct access to Trigger.dev tools; search docs, trigger tasks, deploy projects, and monitor runs. We recommend installing it for the best developer experience.
1. Ask if you want to install the [Trigger.dev MCP server](/mcp-introduction) for your AI assistant.
2. Log you into the CLI if you're not already logged in.
3. Ask you to select your project.
4. Install the required SDK packages.
5. Ask where you'd like to create the `/trigger` directory and create it with an example task.
6. Create a `trigger.config.ts` file in the root of your project.
Install the "Hello World" example task when prompted. We'll use this task to test the setup.
The CLI `dev` command runs a server for your tasks. It watches for changes in your `/trigger` directory and communicates with the Trigger.dev platform to register your tasks, perform runs, and send data back and forth.
It can also update your `@trigger.dev/*` packages to prevent version mismatches and failed deploys. You will always be prompted first.
```bash npm theme={"theme":"css-variables"}
npx trigger.dev@latest dev
```
```bash pnpm theme={"theme":"css-variables"}
pnpm dlx trigger.dev@latest dev
```
```bash yarn theme={"theme":"css-variables"}
yarn dlx trigger.dev@latest dev
```
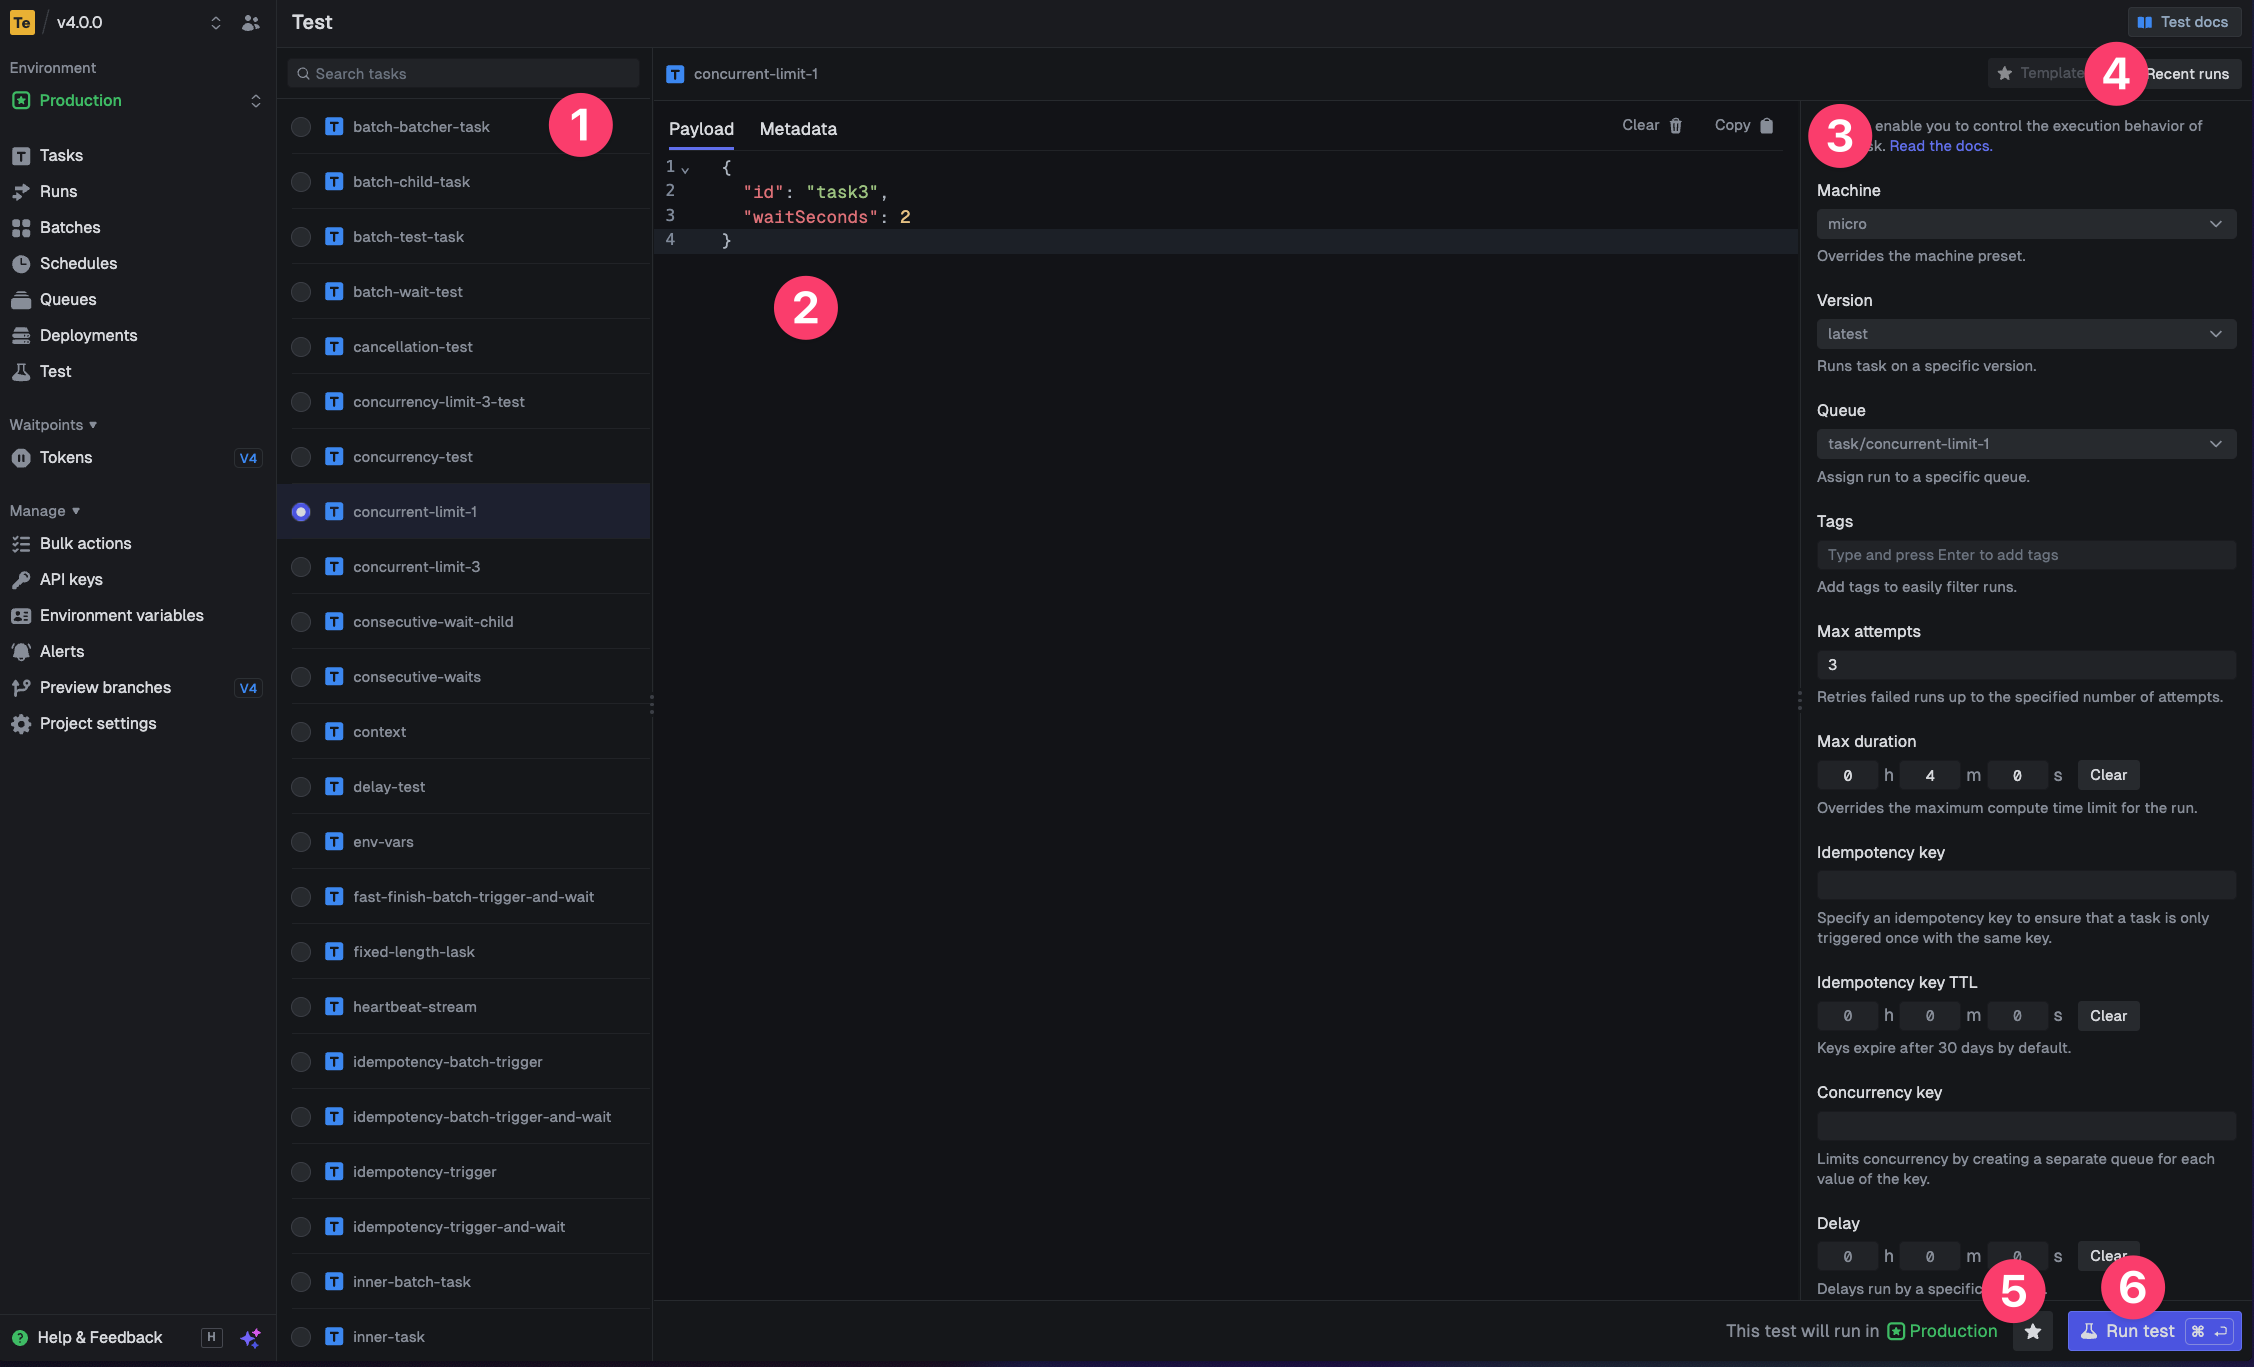
The CLI `dev` command spits out various useful URLs. Right now we want to visit the Test page.
You should see our Example task in the list , select it. Most tasks have a "payload" which you enter in the JSON editor , but our example task doesn't need any input.
You can configure options on the run , view recent payloads , and create run templates .
Press the "Run test" button .
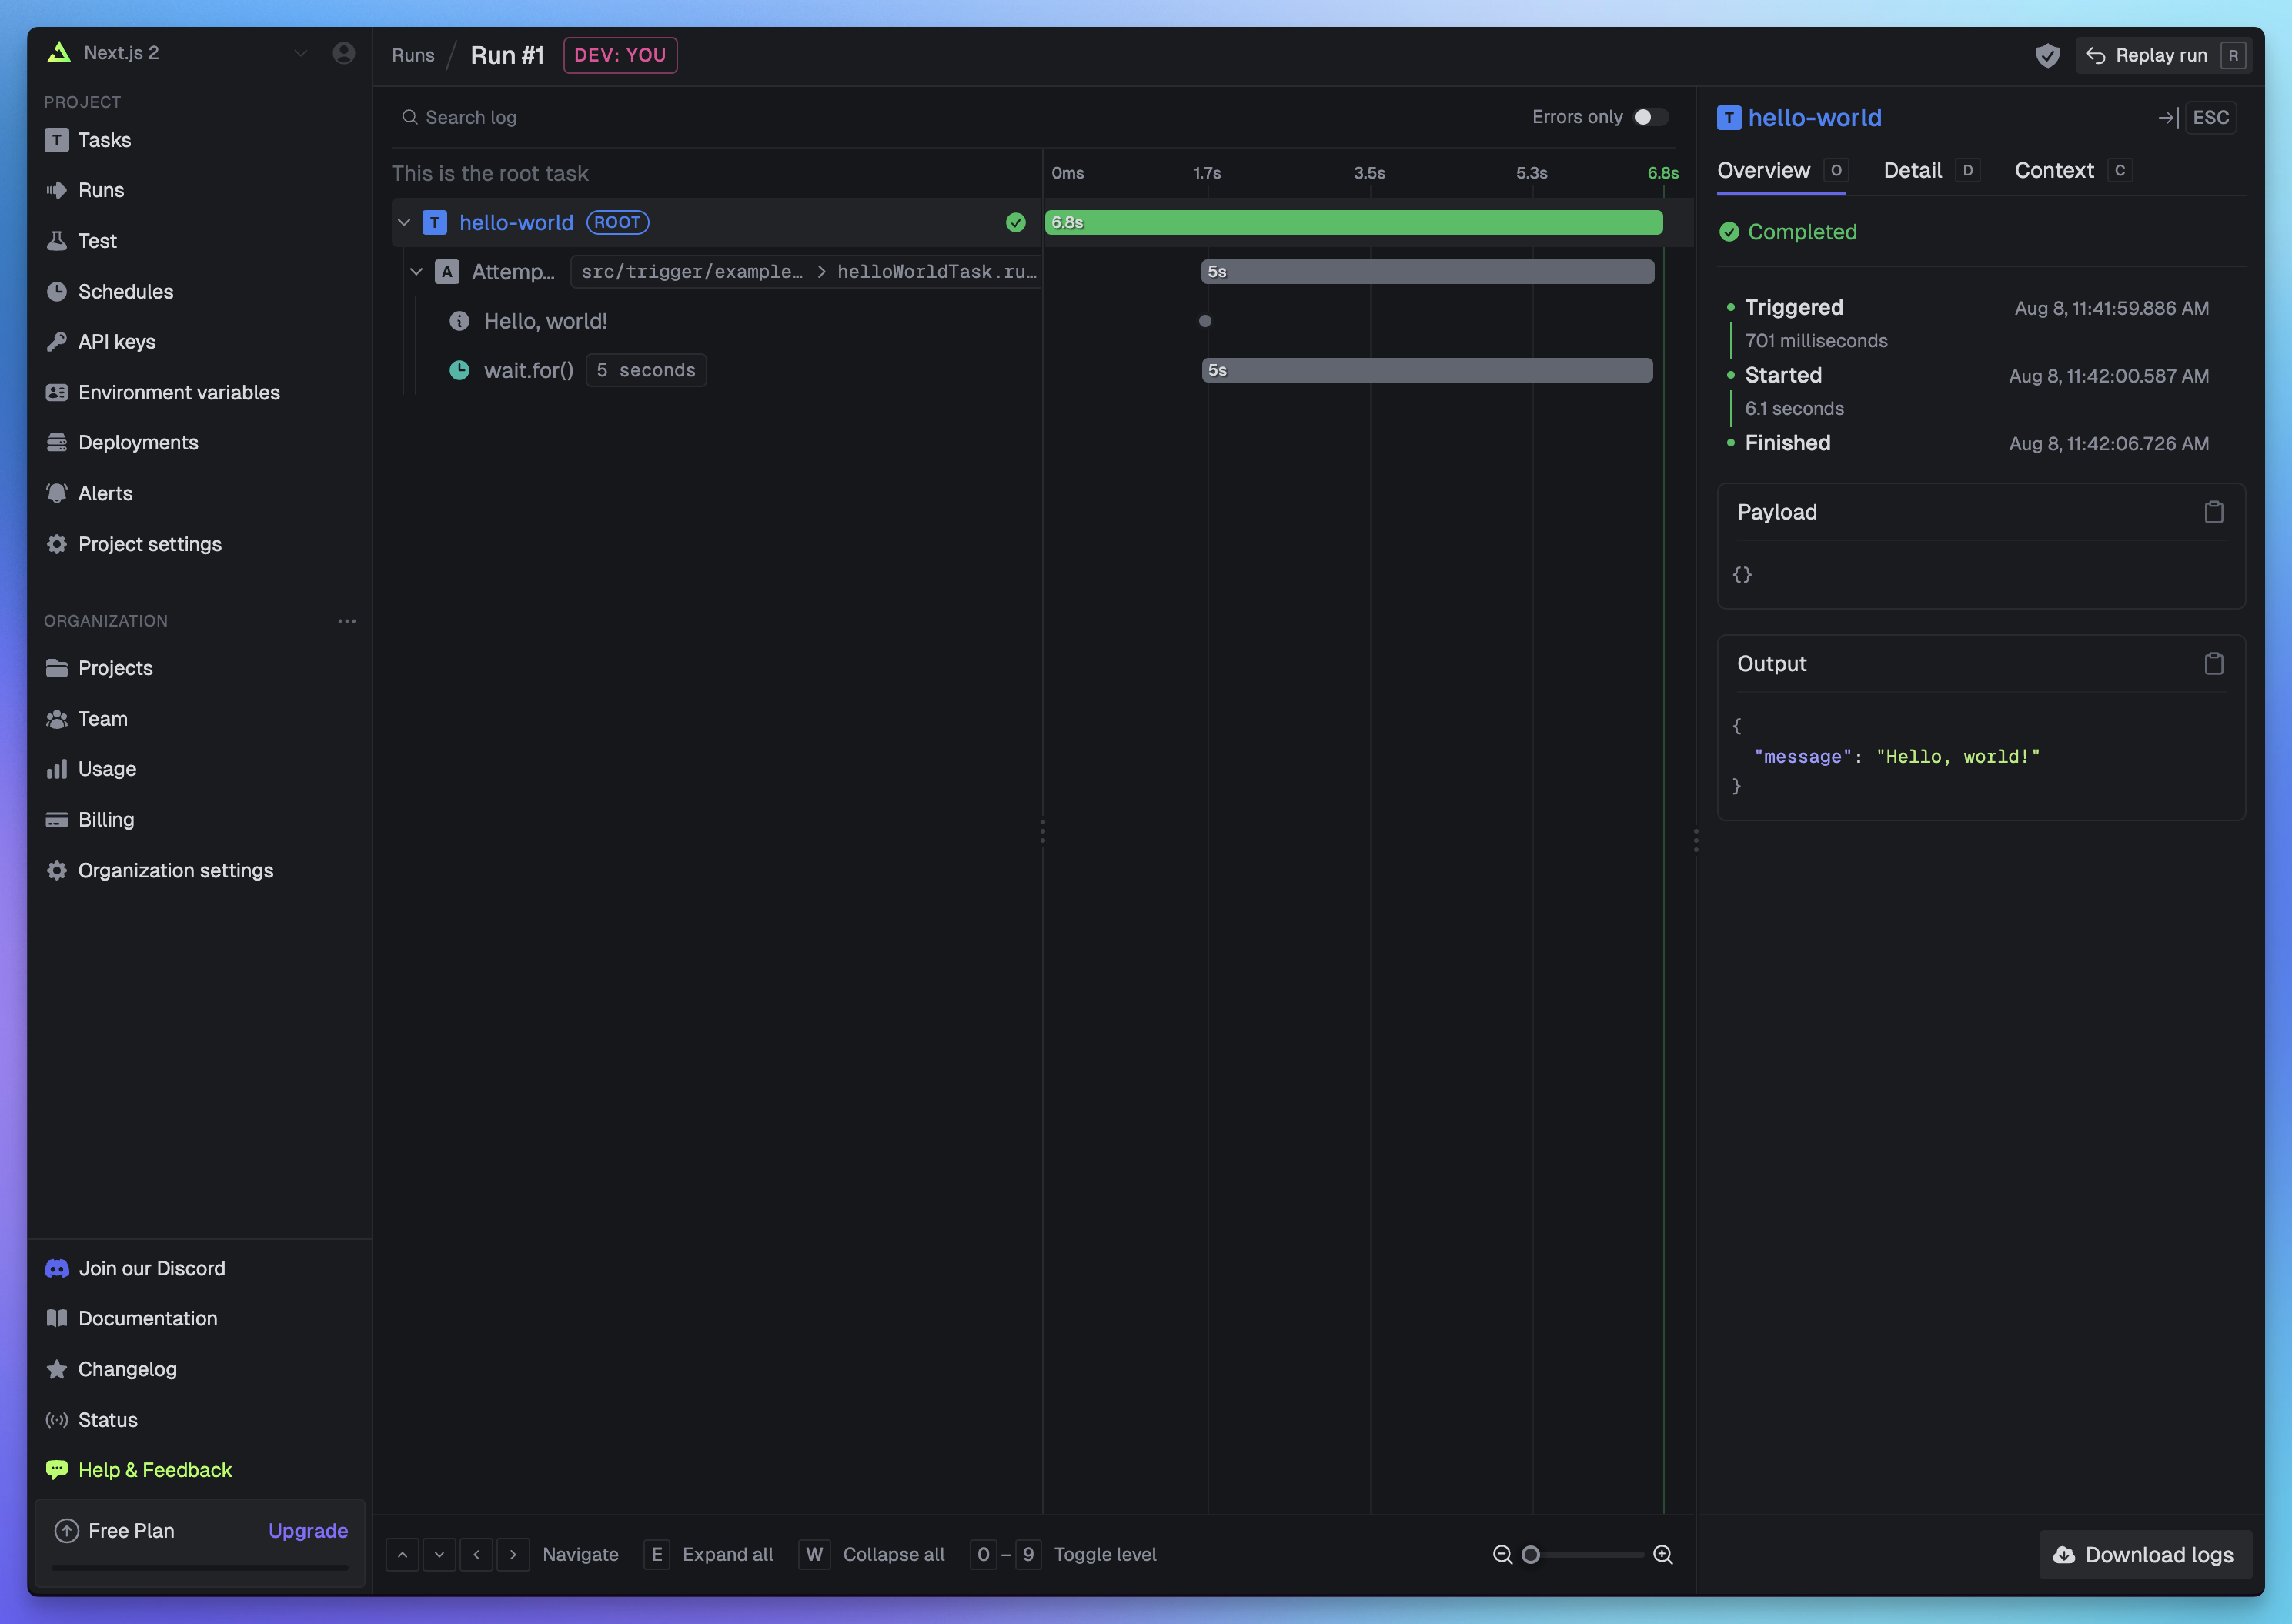
 Congratulations, you should see the run page which will live reload showing you the current state of the run.
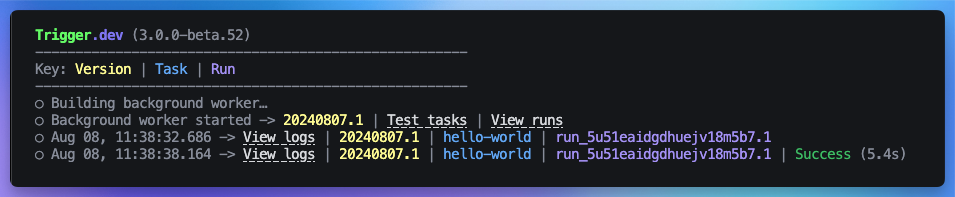
 If you go back to your terminal you'll see that the dev command also shows the task status and links to the run log.
 ## Creating a task using Prisma and deploying it to production
First, create a new task file in your `trigger` folder.
This is a simple task that will add a new user to the database.
For this task to work correctly, you will need to have a `user` model in your Prisma schema with
an `id` field, a `name` field, and an `email` field.
```ts /trigger/prisma-add-new-user.ts theme={"theme":"css-variables"}
import { PrismaClient } from "@prisma/client";
import { task } from "@trigger.dev/sdk";
// Initialize Prisma client
const prisma = new PrismaClient();
export const addNewUser = task({
id: "prisma-add-new-user",
run: async (payload: { name: string; email: string; id: number }) => {
const { name, email, id } = payload;
// This will create a new user in the database
const user = await prisma.user.create({
data: {
name: name,
email: email,
id: id,
},
});
return {
message: `New user added successfully: ${user.id}`,
};
},
});
```
Next, configure the Prisma [build extension](https://trigger.dev/docs/config/extensions/overview) in the `trigger.config.js` file to include the Prisma client in the build.
This will ensure that the Prisma client is available when the task runs.
```js /trigger.config.js theme={"theme":"css-variables"}
export default defineConfig({
project: "", // Your project reference
// Your other config settings...
build: {
extensions: [
prismaExtension({
mode: "legacy", // required
version: "5.20.0", // optional, we'll automatically detect the version if not provided
schema: "prisma/schema.prisma", // update this to the path of your Prisma schema file
}),
],
},
});
```
The `prismaExtension` requires a `mode` parameter. For standard Prisma setups, use `"legacy"`
mode. See the [Prisma extension documentation](/config/extensions/prismaExtension) for other modes
and full configuration options.
[Build extensions](/config/extensions/overview) allow you to hook into the build system and
customize the build process or the resulting bundle and container image (in the case of
deploying). You can use pre-built extensions or create your own.
We use OpenTelemetry to [instrument](https://trigger.dev/docs/config/config-file#instrumentations) our tasks and collect telemetry data.
If you want to automatically log all Prisma queries and mutations, you can use the Prisma instrumentation extension.
```js /trigger.config.js theme={"theme":"css-variables"}
import { defineConfig } from "@trigger.dev/sdk";
import { PrismaInstrumentation } from "@prisma/instrumentation";
import { OpenAIInstrumentation } from "@traceloop/instrumentation-openai";
export default defineConfig({
//..other stuff
instrumentations: [new PrismaInstrumentation(), new OpenAIInstrumentation()],
});
```
This provides much more detailed information about your tasks with minimal effort.
With the build extension and task configured, you can now deploy your task using the Trigger.dev CLI.
```bash npm theme={"theme":"css-variables"}
npx trigger.dev@latest deploy
```
```bash pnpm theme={"theme":"css-variables"}
pnpm dlx trigger.dev@latest deploy
```
```bash yarn theme={"theme":"css-variables"}
yarn dlx trigger.dev@latest deploy
```
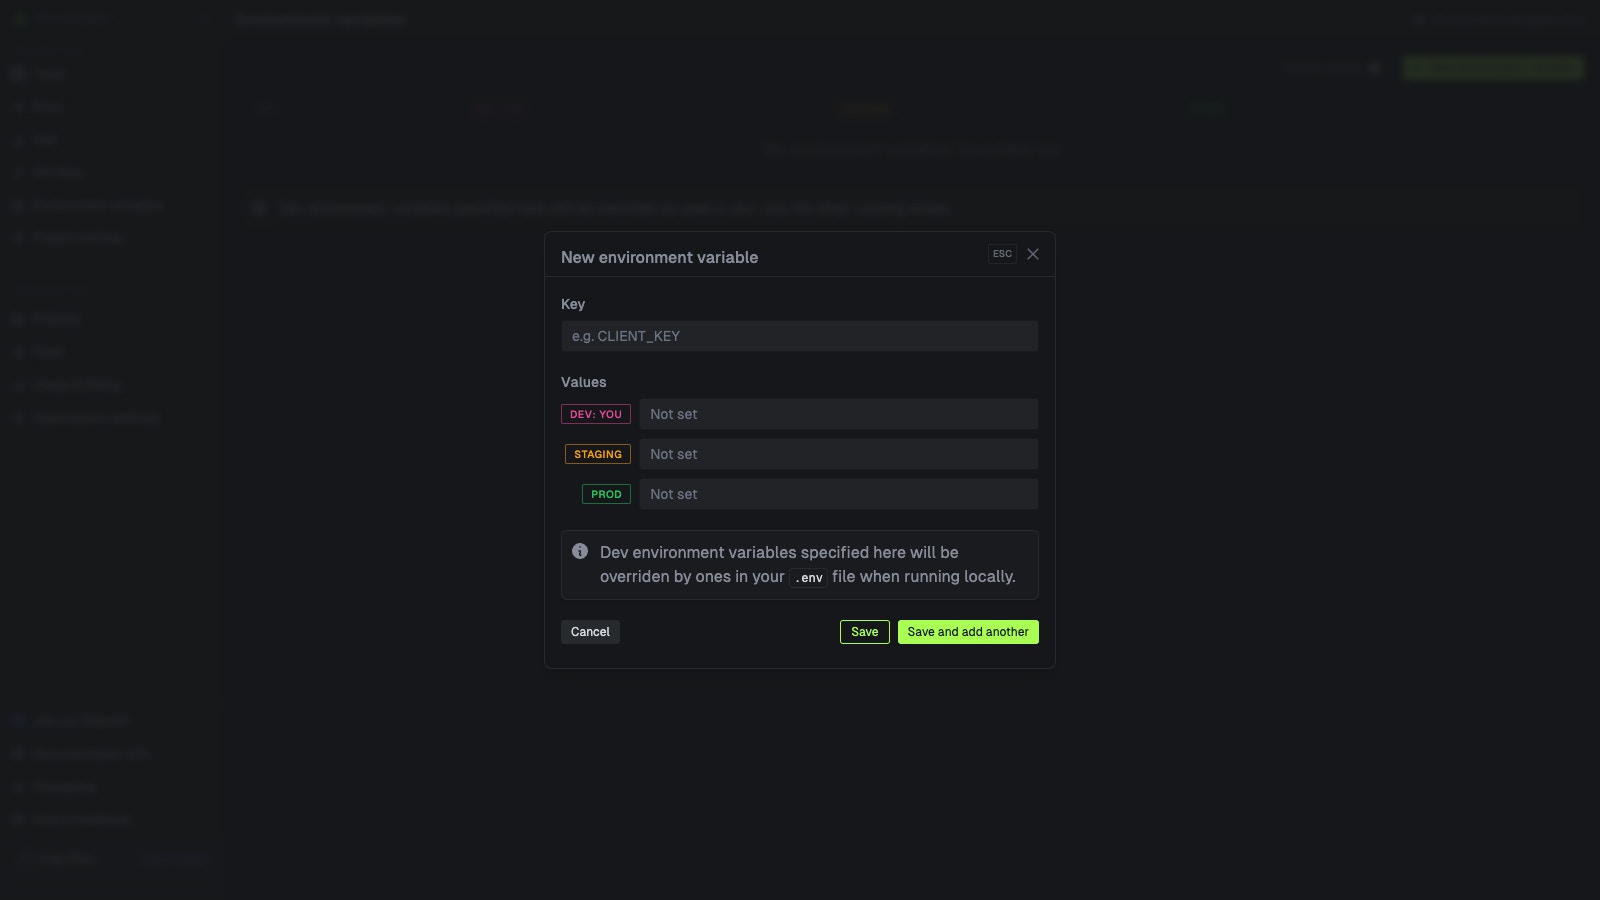
In your Trigger.dev dashboard sidebar click "Environment Variables" , and then the "New environment variable" button .
You can add values for your local dev environment, staging and prod. in this case we will add the `DATABASE_URL` for the production environment.
## Creating a task using Prisma and deploying it to production
First, create a new task file in your `trigger` folder.
This is a simple task that will add a new user to the database.
For this task to work correctly, you will need to have a `user` model in your Prisma schema with
an `id` field, a `name` field, and an `email` field.
```ts /trigger/prisma-add-new-user.ts theme={"theme":"css-variables"}
import { PrismaClient } from "@prisma/client";
import { task } from "@trigger.dev/sdk";
// Initialize Prisma client
const prisma = new PrismaClient();
export const addNewUser = task({
id: "prisma-add-new-user",
run: async (payload: { name: string; email: string; id: number }) => {
const { name, email, id } = payload;
// This will create a new user in the database
const user = await prisma.user.create({
data: {
name: name,
email: email,
id: id,
},
});
return {
message: `New user added successfully: ${user.id}`,
};
},
});
```
Next, configure the Prisma [build extension](https://trigger.dev/docs/config/extensions/overview) in the `trigger.config.js` file to include the Prisma client in the build.
This will ensure that the Prisma client is available when the task runs.
```js /trigger.config.js theme={"theme":"css-variables"}
export default defineConfig({
project: "", // Your project reference
// Your other config settings...
build: {
extensions: [
prismaExtension({
mode: "legacy", // required
version: "5.20.0", // optional, we'll automatically detect the version if not provided
schema: "prisma/schema.prisma", // update this to the path of your Prisma schema file
}),
],
},
});
```
The `prismaExtension` requires a `mode` parameter. For standard Prisma setups, use `"legacy"`
mode. See the [Prisma extension documentation](/config/extensions/prismaExtension) for other modes
and full configuration options.
[Build extensions](/config/extensions/overview) allow you to hook into the build system and
customize the build process or the resulting bundle and container image (in the case of
deploying). You can use pre-built extensions or create your own.
We use OpenTelemetry to [instrument](https://trigger.dev/docs/config/config-file#instrumentations) our tasks and collect telemetry data.
If you want to automatically log all Prisma queries and mutations, you can use the Prisma instrumentation extension.
```js /trigger.config.js theme={"theme":"css-variables"}
import { defineConfig } from "@trigger.dev/sdk";
import { PrismaInstrumentation } from "@prisma/instrumentation";
import { OpenAIInstrumentation } from "@traceloop/instrumentation-openai";
export default defineConfig({
//..other stuff
instrumentations: [new PrismaInstrumentation(), new OpenAIInstrumentation()],
});
```
This provides much more detailed information about your tasks with minimal effort.
With the build extension and task configured, you can now deploy your task using the Trigger.dev CLI.
```bash npm theme={"theme":"css-variables"}
npx trigger.dev@latest deploy
```
```bash pnpm theme={"theme":"css-variables"}
pnpm dlx trigger.dev@latest deploy
```
```bash yarn theme={"theme":"css-variables"}
yarn dlx trigger.dev@latest deploy
```
In your Trigger.dev dashboard sidebar click "Environment Variables" , and then the "New environment variable" button .
You can add values for your local dev environment, staging and prod. in this case we will add the `DATABASE_URL` for the production environment.
 To test this task, go to the 'test' page in the Trigger.dev dashboard and run the task with the following payload:
```json theme={"theme":"css-variables"}
{
"name": "", // e.g. "John Doe"
"email": "", // e.g. "john@doe.test"
"id": // e.g. 12345
}
```
Congratulations! You should now see a new completed run, and a new user with the credentials you provided should be added to your database.
## Useful next steps
Learn what tasks are and their options
Learn how to write your own tasks
Learn how to deploy your task manually using the CLI
Learn how to deploy your task using GitHub actions
To test this task, go to the 'test' page in the Trigger.dev dashboard and run the task with the following payload:
```json theme={"theme":"css-variables"}
{
"name": "", // e.g. "John Doe"
"email": "", // e.g. "john@doe.test"
"id": // e.g. 12345
}
```
Congratulations! You should now see a new completed run, and a new user with the credentials you provided should be added to your database.
## Useful next steps
Learn what tasks are and their options
Learn how to write your own tasks
Learn how to deploy your task manually using the CLI
Learn how to deploy your task using GitHub actions