> ## Documentation Index
> Fetch the complete documentation index at: https://trigger.dev/docs/llms.txt
> Use this file to discover all available pages before exploring further.
# Next.js setup guide
> This guide will show you how to setup Trigger.dev in your existing Next.js project, test an example task, and view the run.
export const framework_0 = "Next.js"
This guide can be followed for both App and Pages router as well as Server Actions.
## Prerequisites
* Setup a project in {framework_0}
* Ensure TypeScript is installed
* [Create a Trigger.dev account](https://cloud.trigger.dev)
* Create a new Trigger.dev project
## Initial setup
The easiest way to get started is to use the CLI. It will add Trigger.dev to your existing project, create a `/trigger` folder and give you an example task.
Run this command in the root of your project to get started:
```bash npm theme={"theme":"css-variables"}
npx trigger.dev@latest init
```
```bash pnpm theme={"theme":"css-variables"}
pnpm dlx trigger.dev@latest init
```
```bash yarn theme={"theme":"css-variables"}
yarn dlx trigger.dev@latest init
```
It will do a few things:
Our [Trigger.dev MCP server](/mcp-introduction) gives your AI assistant direct access to Trigger.dev tools; search docs, trigger tasks, deploy projects, and monitor runs. We recommend installing it for the best developer experience.
1. Ask if you want to install the [Trigger.dev MCP server](/mcp-introduction) for your AI assistant.
2. Log you into the CLI if you're not already logged in.
3. Ask you to select your project.
4. Install the required SDK packages.
5. Ask where you'd like to create the `/trigger` directory and create it with an example task.
6. Create a `trigger.config.ts` file in the root of your project.
Install the "Hello World" example task when prompted. We'll use this task to test the setup.
The CLI `dev` command runs a server for your tasks. It watches for changes in your `/trigger` directory and communicates with the Trigger.dev platform to register your tasks, perform runs, and send data back and forth.
It can also update your `@trigger.dev/*` packages to prevent version mismatches and failed deploys. You will always be prompted first.
```bash npm theme={"theme":"css-variables"}
npx trigger.dev@latest dev
```
```bash pnpm theme={"theme":"css-variables"}
pnpm dlx trigger.dev@latest dev
```
```bash yarn theme={"theme":"css-variables"}
yarn dlx trigger.dev@latest dev
```
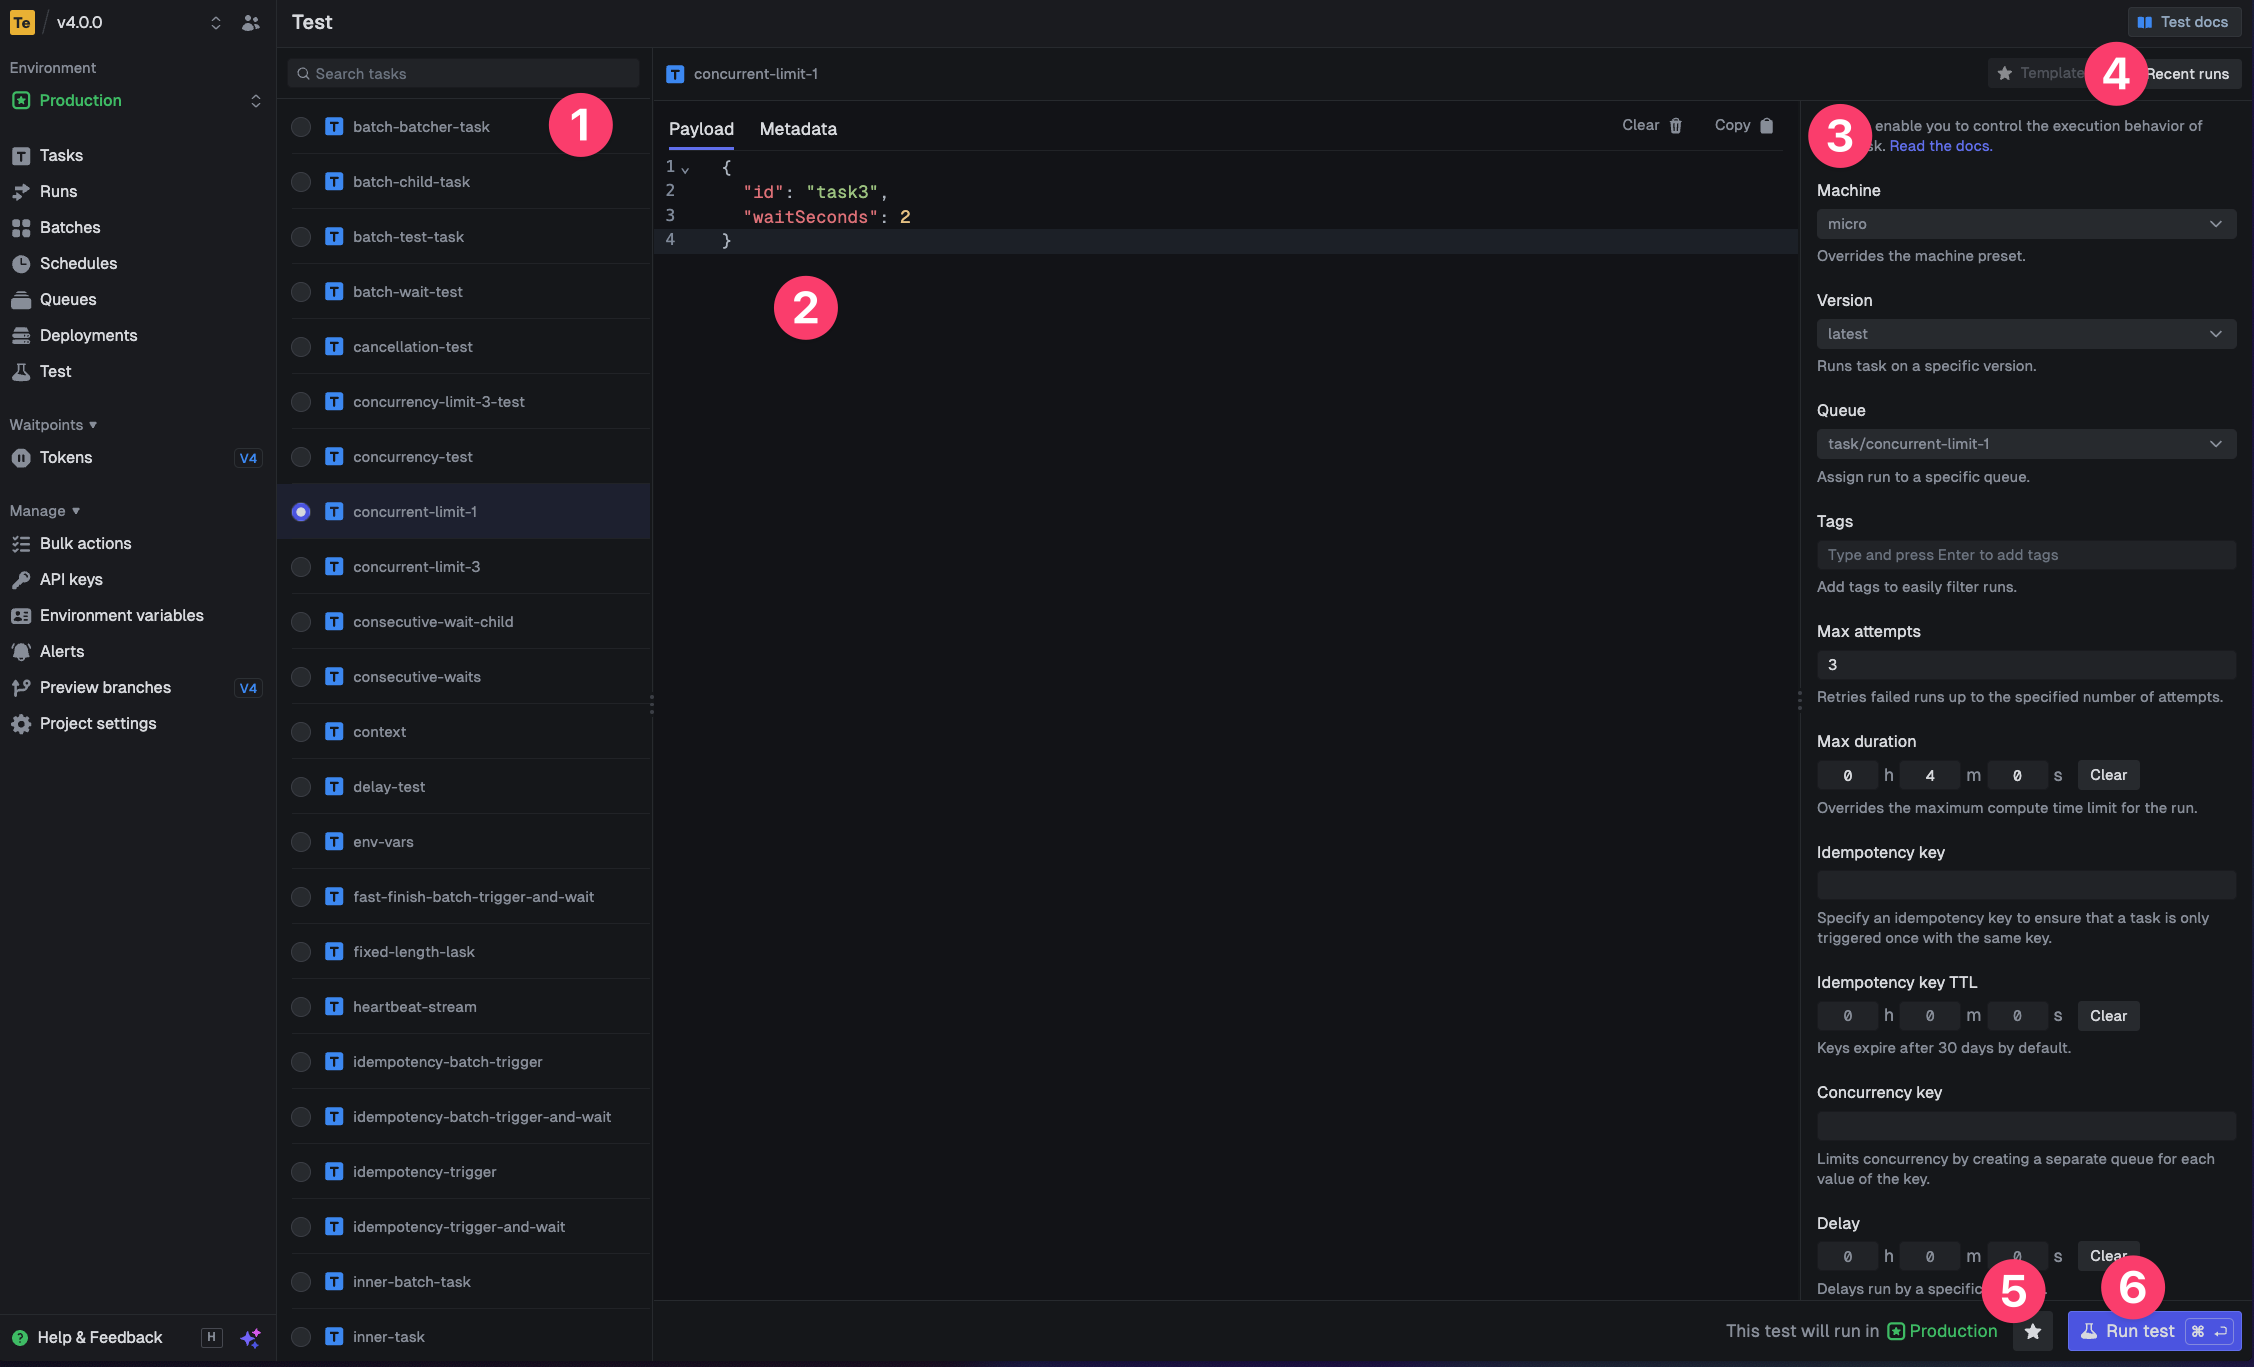
The CLI `dev` command spits out various useful URLs. Right now we want to visit the Test page.
You should see our Example task in the list , select it. Most tasks have a "payload" which you enter in the JSON editor , but our example task doesn't need any input.
You can configure options on the run , view recent payloads , and create run templates .
Press the "Run test" button .
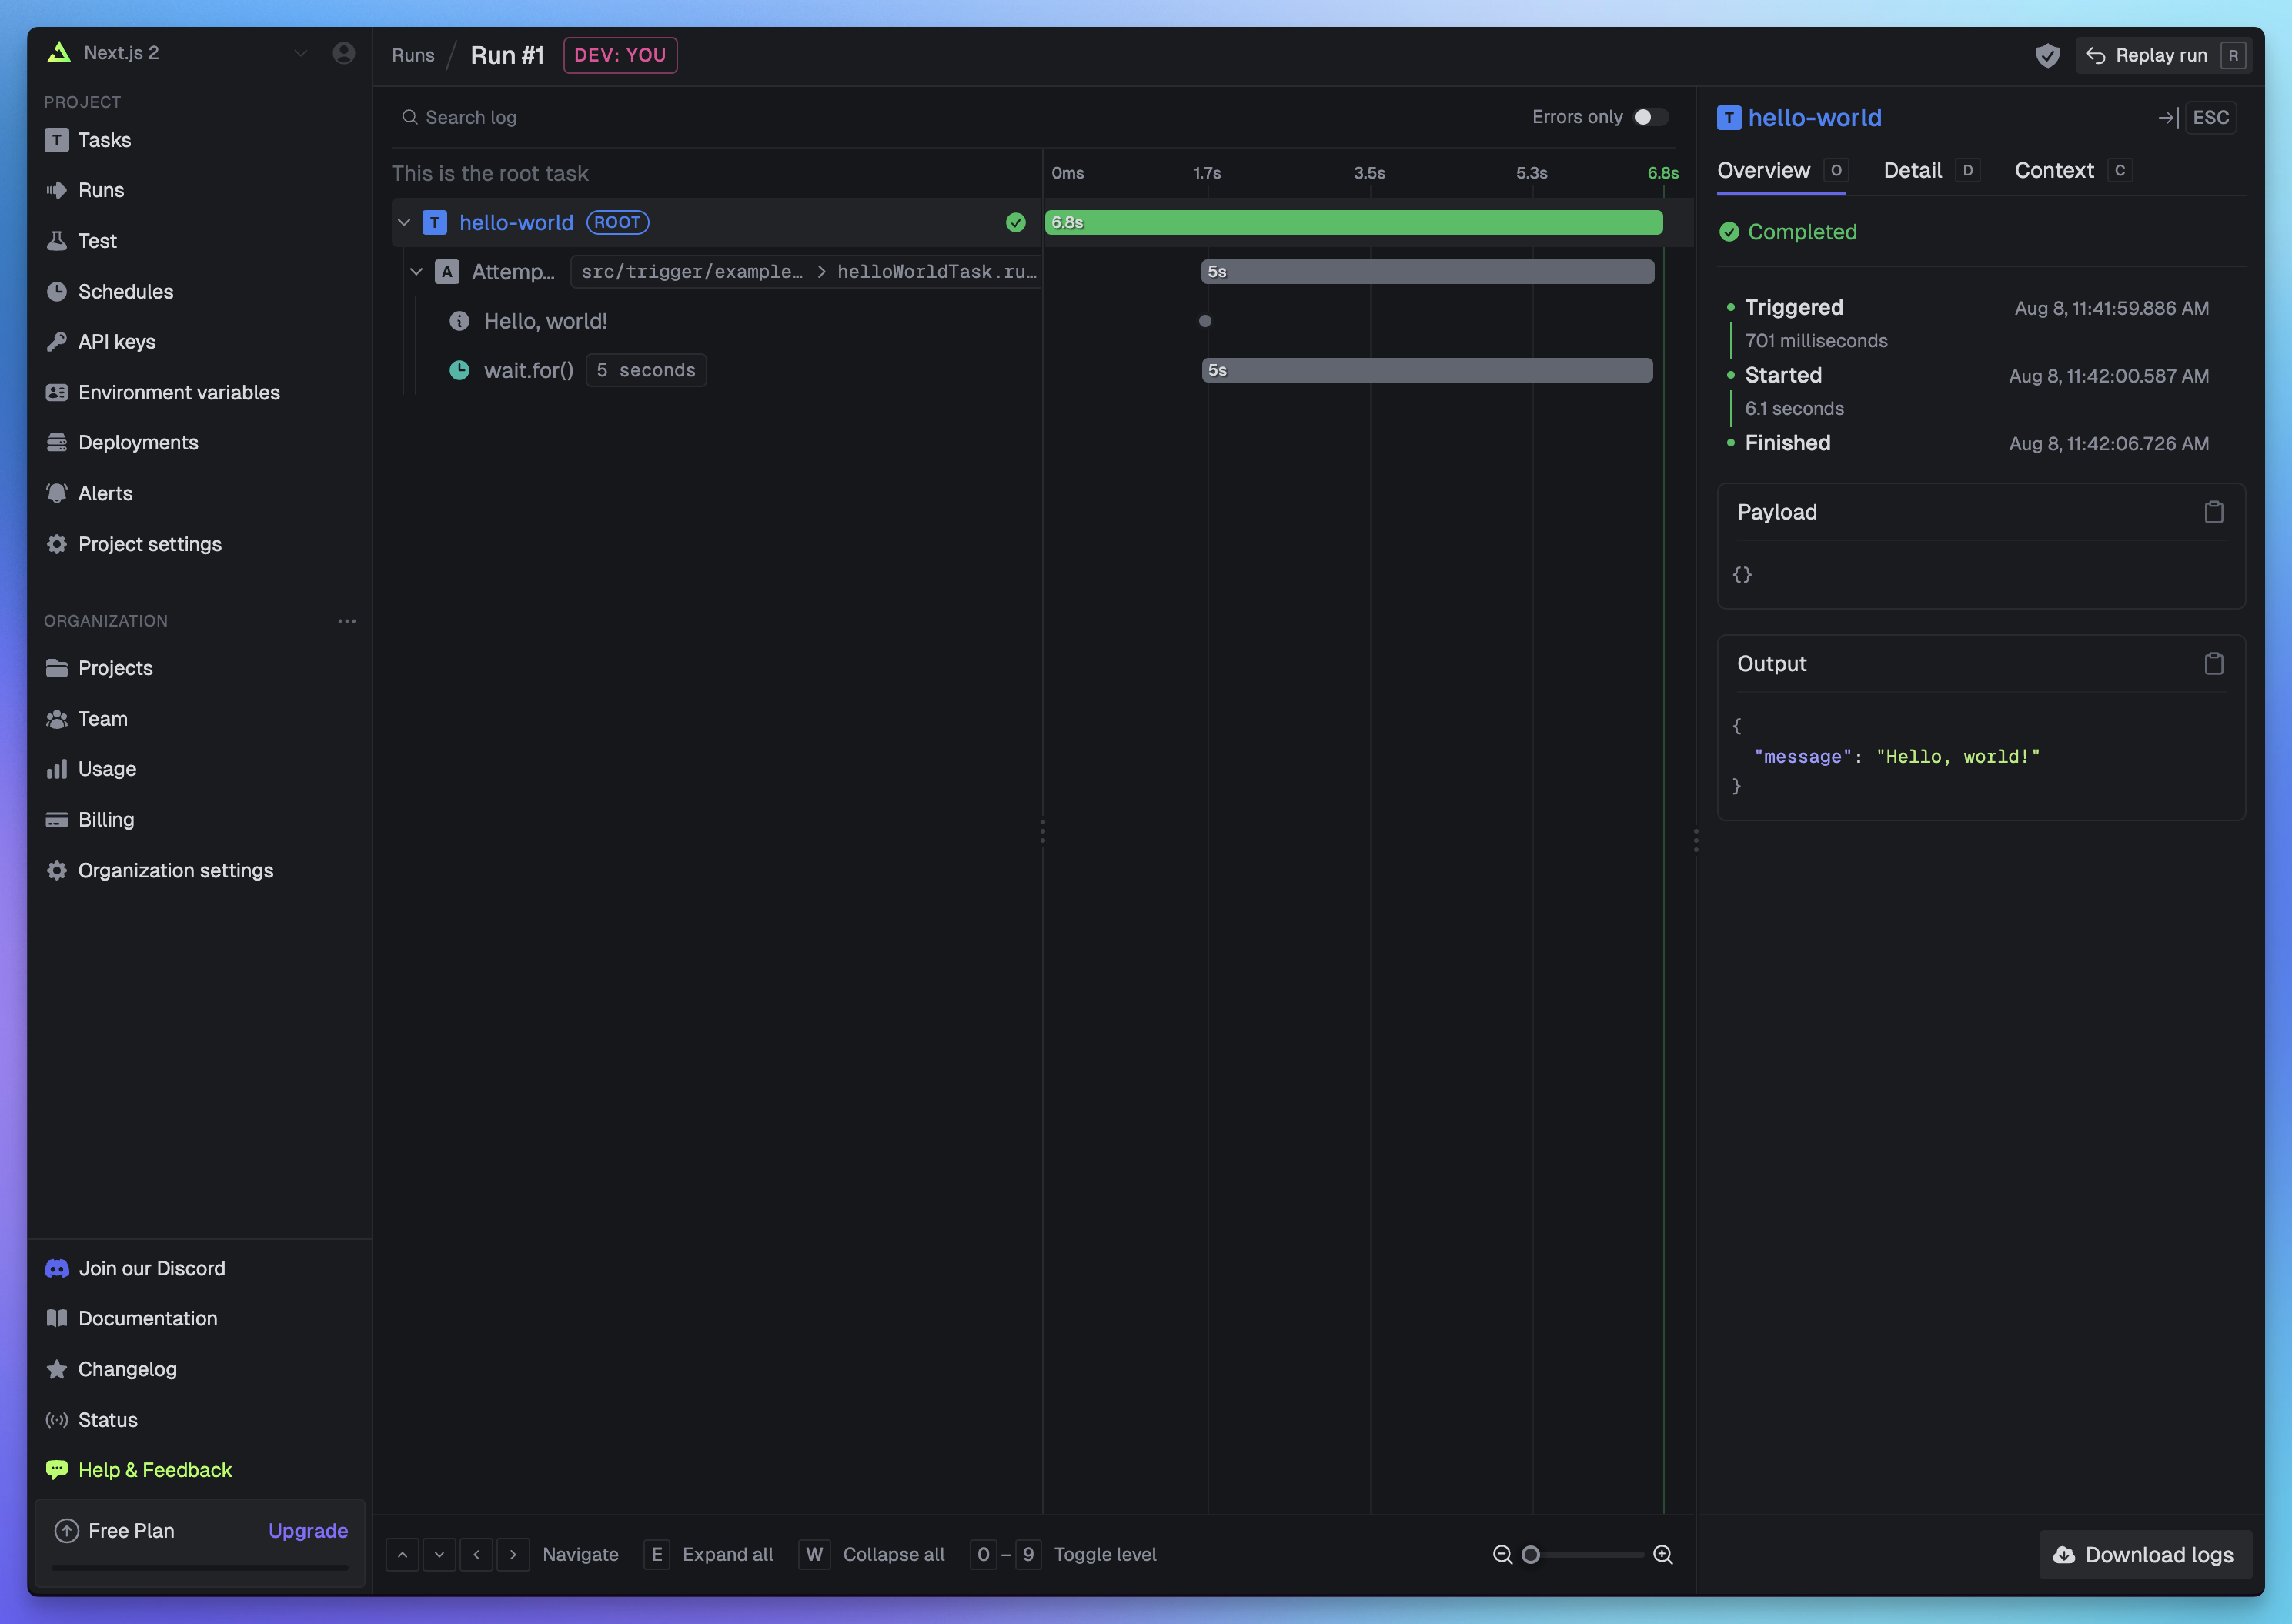
Congratulations, you should see the run page which will live reload showing you the current state of the run.
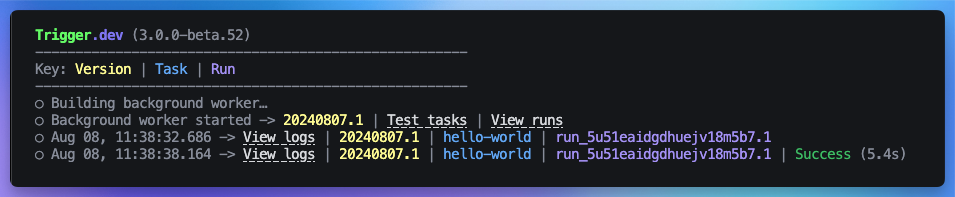
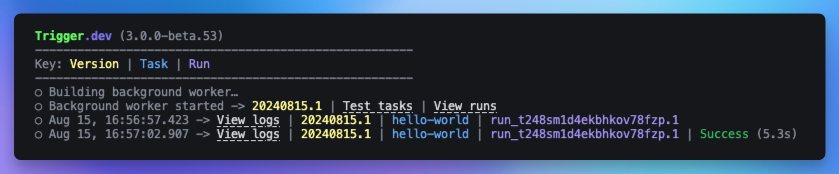
If you go back to your terminal you'll see that the dev command also shows the task status and links to the run log.
Instead of running your Next.js app and Trigger.dev dev server in separate terminals, you can run them concurrently. First, add these scripts to your `package.json`:
```json theme={"theme":"css-variables"}
{
"scripts": {
"trigger:dev": "npx trigger.dev@latest dev",
"dev": "npx concurrently --kill-others --names \"next,trigger\" --prefix-colors \"yellow,blue\" \"next dev\" \"npm run trigger:dev\""
}
}
```
Then, in your terminal, you can start both servers with a single command:
```bash theme={"theme":"css-variables"}
npm run dev
```
This will run both your Next.js app and Trigger.dev dev server in the same terminal window, with color-coded output to distinguish between them.
## Set your secret key locally
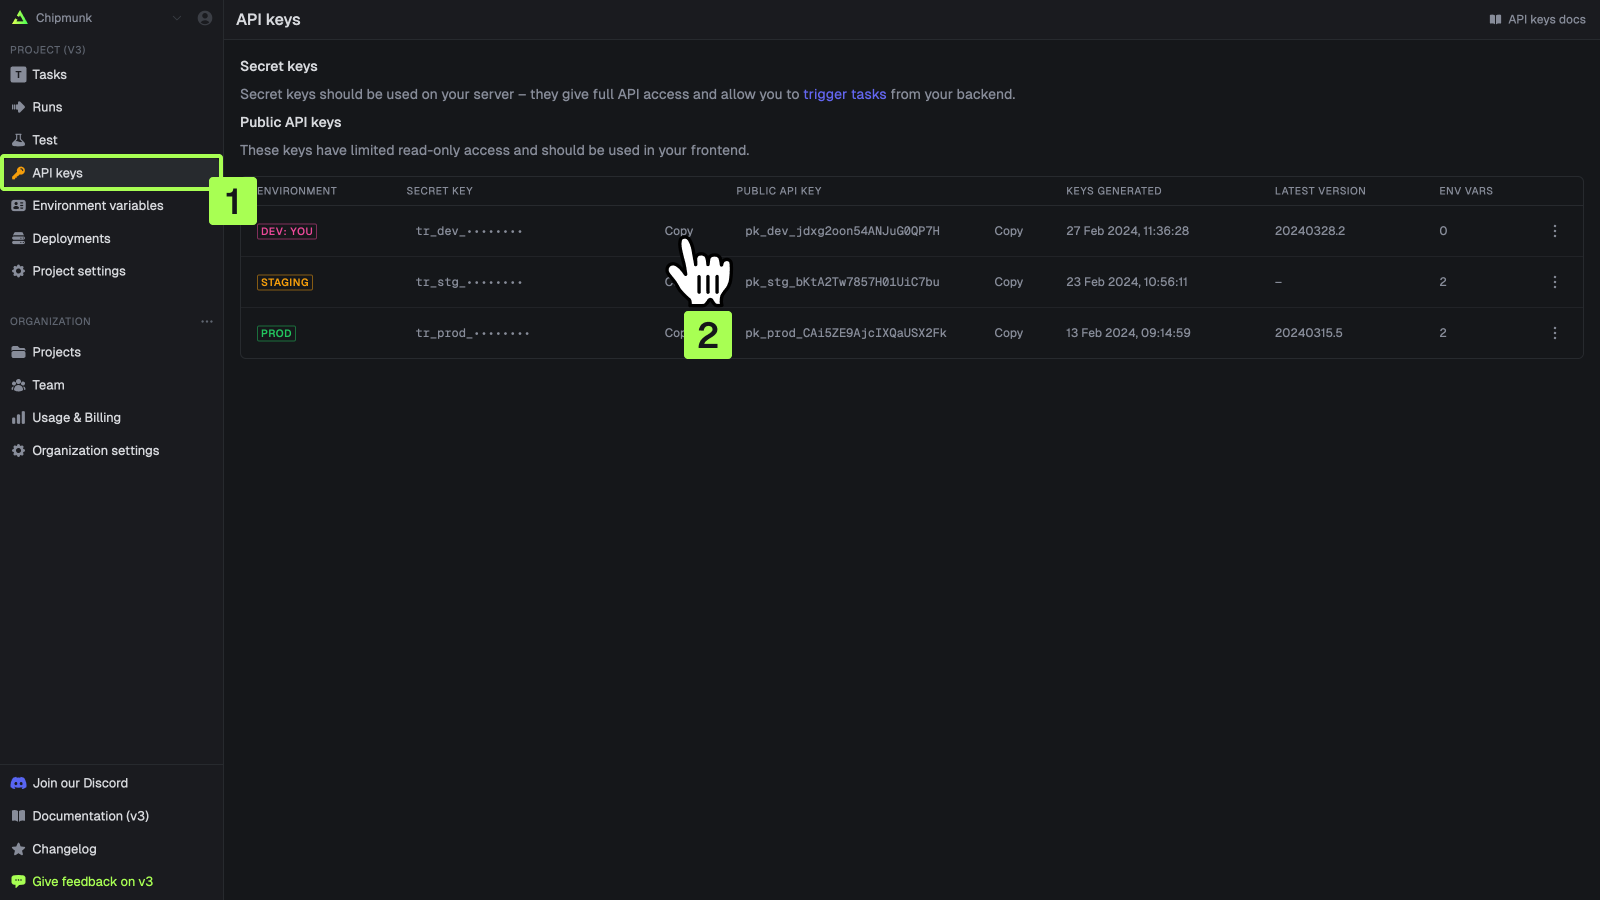
Set your `TRIGGER_SECRET_KEY` environment variable in your `.env.local` file if using the Next.js App router or `.env` file if using Pages router. This key is used to authenticate with Trigger.dev, so you can trigger runs from your Next.js app. Visit the API Keys page in the dashboard and select the DEV secret key.
For more information on authenticating with Trigger.dev, see the [API keys page](/apikeys).
## Triggering your task in Next.js
Here are the steps to trigger your task in the Next.js App and Pages router and Server Actions.
Add a Route Handler by creating a `route.ts` file (or `route.js` file) in the `app/api` directory like this: `app/api/hello-world/route.ts`.
Add this code to your `route.ts` file which imports your task along with `NextResponse` to handle the API route response:
```ts app/api/hello-world/route.ts theme={"theme":"css-variables"}
// Next.js API route support: https://nextjs.org/docs/api-routes/introduction
import type { helloWorldTask } from "@/trigger/example";
import { tasks } from "@trigger.dev/sdk";
import { NextResponse } from "next/server";
//tasks.trigger also works with the edge runtime
//export const runtime = "edge";
export async function GET() {
const handle = await tasks.trigger(
"hello-world",
"James"
);
return NextResponse.json(handle);
}
```
Run your Next.js app:
```bash npm theme={"theme":"css-variables"}
npm run dev
```
```bash pnpm theme={"theme":"css-variables"}
pnpm run dev
```
```bash yarn theme={"theme":"css-variables"}
yarn dev
```
Run the dev server from Step 2. of the [Initial Setup](/guides/frameworks/nextjs#initial-setup) section above if it's not already running:
```bash npm theme={"theme":"css-variables"}
npx trigger.dev@latest dev
```
```bash pnpm theme={"theme":"css-variables"}
pnpm dlx trigger.dev@latest dev
```
```bash yarn theme={"theme":"css-variables"}
yarn dlx trigger.dev@latest dev
```
Now visit the URL in your browser to trigger the task. Ensure the port number is the same as the one you're running your Next.js app on. For example, if you're running your Next.js app on port 3000, visit:
```bash theme={"theme":"css-variables"}
http://localhost:3000/api/hello-world
```
You should see the CLI log the task run with a link to view the logs in the dashboard.
Visit the [Trigger.dev dashboard](https://cloud.trigger.dev) to see your run.
Create an `actions.ts` file in the `app/api` directory and add this code which imports your `helloWorldTask()` task. Make sure to include `"use server";` at the top of the file.
```ts app/api/actions.ts theme={"theme":"css-variables"}
"use server";
import type { helloWorldTask } from "@/trigger/example";
import { tasks } from "@trigger.dev/sdk";
export async function myTask() {
try {
const handle = await tasks.trigger(
"hello-world",
"James"
);
return { handle };
} catch (error) {
console.error(error);
return {
error: "something went wrong",
};
}
}
```
For the purposes of this guide, we'll create a button with an `onClick` event that triggers your task. We'll add this to the `page.tsx` file so we can trigger the task by clicking the button. Make sure to import your task and include `"use client";` at the top of your file.
```ts app/page.tsx theme={"theme":"css-variables"}
"use client";
import { myTask } from "./actions";
export default function Home() {
return (
);
}
```
Run your Next.js app:
```bash npm theme={"theme":"css-variables"}
npm run dev
```
```bash pnpm theme={"theme":"css-variables"}
pnpm run dev
```
```bash yarn theme={"theme":"css-variables"}
yarn dev
```
Open your app in a browser, making sure the port number is the same as the one you're running your Next.js app on. For example, if you're running your Next.js app on port 3000, visit:
```bash theme={"theme":"css-variables"}
http://localhost:3000
```
Run the dev server from Step 2. of the [Initial Setup](/guides/frameworks/nextjs#initial-setup) section above if it's not already running:
```bash npm theme={"theme":"css-variables"}
npx trigger.dev@latest dev
```
```bash pnpm theme={"theme":"css-variables"}
pnpm dlx trigger.dev@latest dev
```
```bash yarn theme={"theme":"css-variables"}
yarn dlx trigger.dev@latest dev
```
Then click the button we created in your app to trigger the task. You should see the CLI log the task run with a link to view the logs.
Visit the [Trigger.dev dashboard](https://cloud.trigger.dev) to see your run.
Create an API route in the `pages/api` directory. Then create a `hello-world .ts` (or `hello-world.js`) file for your task and copy this code example:
```ts pages/api/hello-world.ts theme={"theme":"css-variables"}
// Next.js API route support: https://nextjs.org/docs/api-routes/introduction
import { helloWorldTask } from "@/trigger/example";
import { tasks } from "@trigger.dev/sdk";
import type { NextApiRequest, NextApiResponse } from "next";
export default async function handler(
req: NextApiRequest,
res: NextApiResponse<{ id: string }>
) {
const handle = await tasks.trigger(
"hello-world",
"James"
);
res.status(200).json(handle);
}
```
Run your Next.js app:
```bash npm theme={"theme":"css-variables"}
npm run dev
```
```bash pnpm theme={"theme":"css-variables"}
pnpm run dev
```
```bash yarn theme={"theme":"css-variables"}
yarn dev
```
Run the dev server from Step 2. of the [Initial Setup](/guides/frameworks/nextjs#initial-setup) section above if it's not already running:
```bash npm theme={"theme":"css-variables"}
npx trigger.dev@latest dev
```
```bash pnpm theme={"theme":"css-variables"}
pnpm dlx trigger.dev@latest dev
```
```bash yarn theme={"theme":"css-variables"}
yarn dlx trigger.dev@latest dev
```
Now visit the URL in your browser to trigger the task. Ensure the port number is the same as the one you're running your Next.js app on. For example, if you're running your Next.js app on port 3000, visit:
```bash theme={"theme":"css-variables"}
http://localhost:3000/api/hello-world
```
You should see the CLI log the task run with a link to view the logs in the dashboard.
Visit the [Trigger.dev dashboard](https://cloud.trigger.dev) to see your run.
## Automatically sync environment variables from your Vercel project (optional)
If you want to automatically sync environment variables from your Vercel project to Trigger.dev, you can add our `syncVercelEnvVars` build extension to your `trigger.config.ts` file.
You need to set the `VERCEL_ACCESS_TOKEN` and `VERCEL_PROJECT_ID` environment variables, or pass
in the token and project ID as arguments to the `syncVercelEnvVars` build extension. If you're
working with a team project, you'll also need to set `VERCEL_TEAM_ID`, which can be found in your
team settings. You can find / generate the `VERCEL_ACCESS_TOKEN` in your Vercel
[dashboard](https://vercel.com/account/settings/tokens). Make sure the scope of the token covers
the project with the environment variables you want to sync.
```ts trigger.config.ts theme={"theme":"css-variables"}
import { defineConfig } from "@trigger.dev/sdk";
import { syncVercelEnvVars } from "@trigger.dev/build/extensions/core";
export default defineConfig({
project: "",
// Your other config settings...
build: {
extensions: [syncVercelEnvVars()],
},
});
```
For more information, see our [Vercel sync environment
variables](/guides/examples/vercel-sync-env-vars) guide.
## Manually add your environment variables (optional)
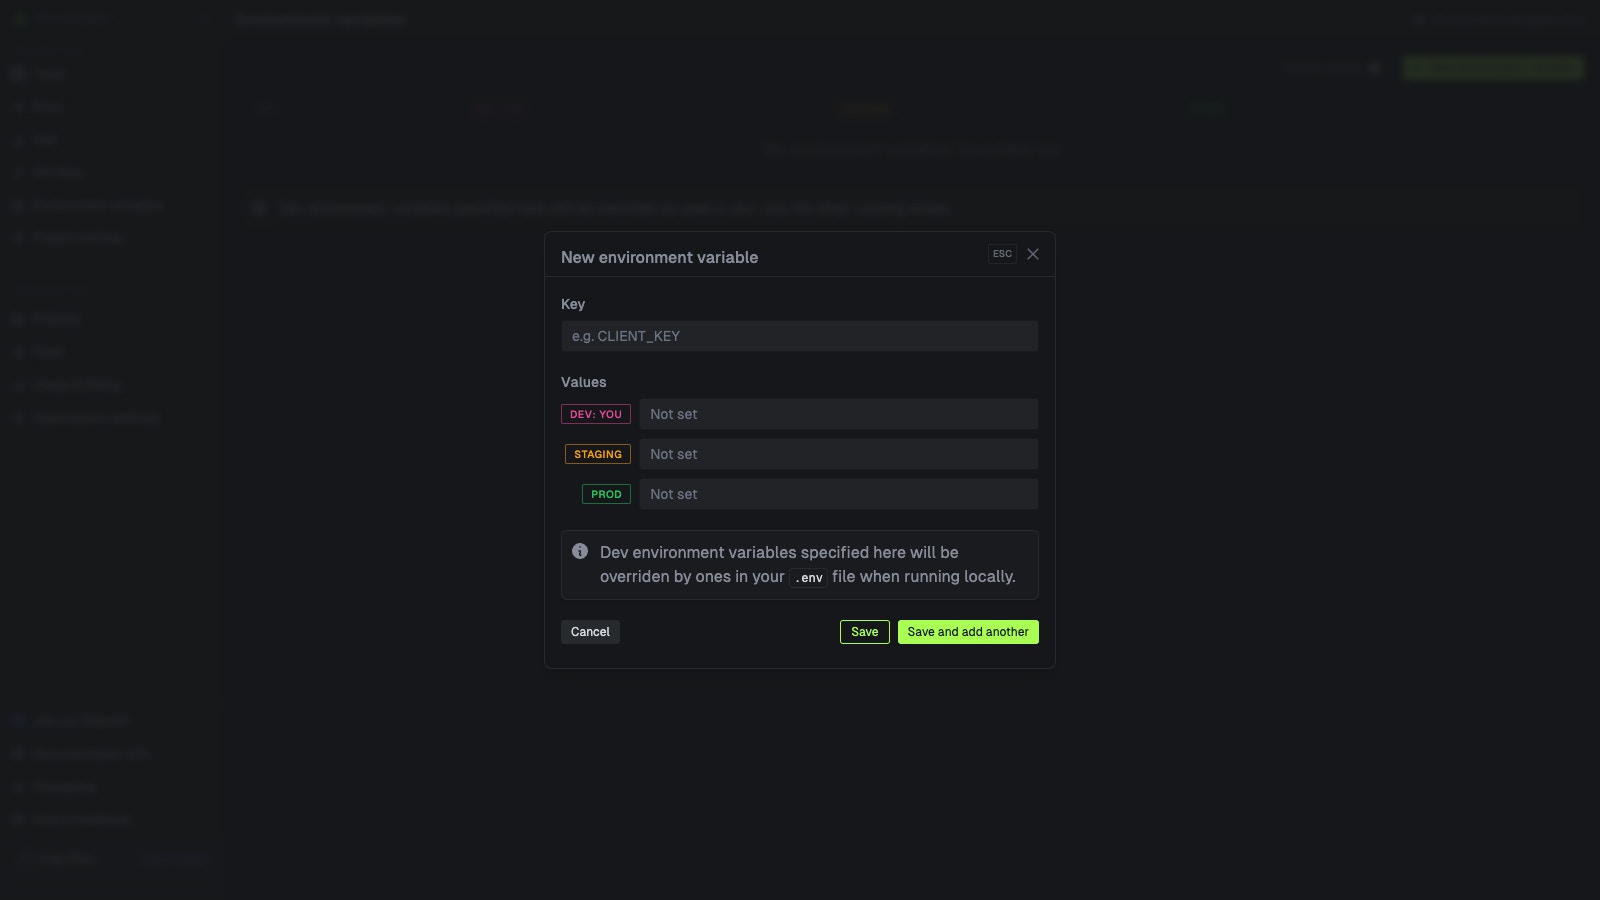
If you have any environment variables in your tasks, be sure to add them in the dashboard so deployed code runs successfully. In Node.js, these environment variables are accessed in your code using `process.env.MY_ENV_VAR`.
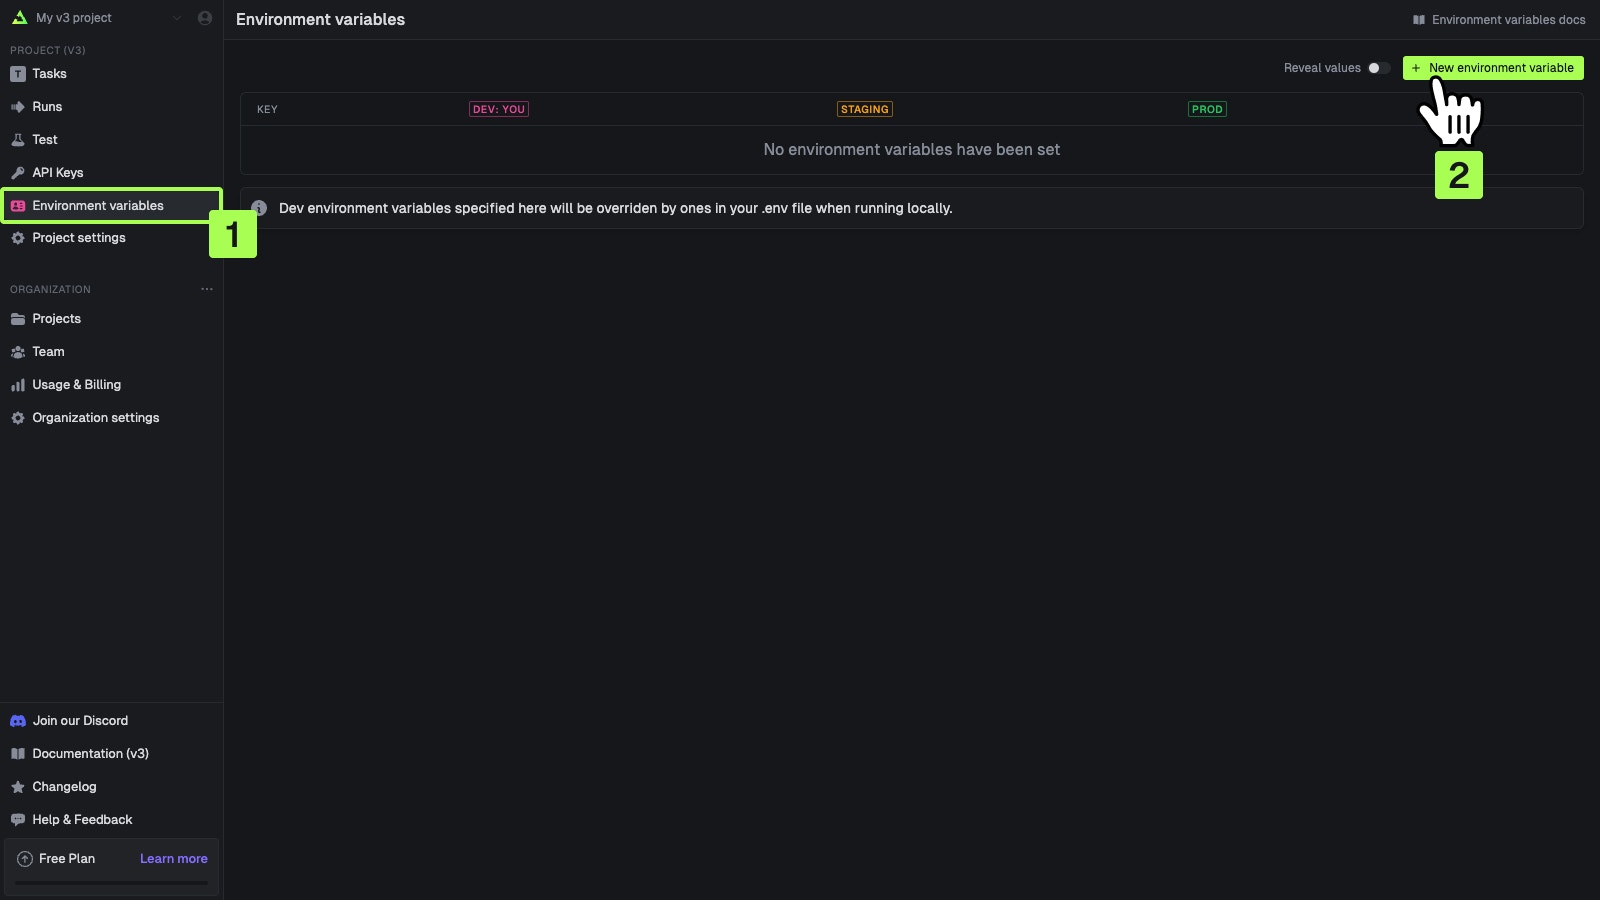
In the sidebar select the "Environment Variables" page, then press the "New environment variable"
button.
You can add values for your local dev environment, staging and prod.
You can also add environment variables in code by following the steps on the [Environment Variables page](/deploy-environment-variables#in-your-code).
## Deploying your task to Trigger.dev
For this guide, we'll manually deploy your task by running the [CLI deploy command](/cli-deploy) below. Other ways to deploy are listed in the next section.
```bash npm theme={"theme":"css-variables"}
npx trigger.dev@latest deploy
```
```bash pnpm theme={"theme":"css-variables"}
pnpm dlx trigger.dev@latest deploy
```
```bash yarn theme={"theme":"css-variables"}
yarn dlx trigger.dev@latest deploy
```
### Other ways to deploy
Use GitHub Actions to automatically deploy your tasks whenever new code is pushed and when the `trigger` directory has changes in it. Follow [this guide](/github-actions) to set up GitHub Actions.
We're working on adding an official [Vercel integration](/vercel-integration) which you can follow the progress of [here](https://feedback.trigger.dev/p/vercel-integration-3).
## Troubleshooting & extra resources
### Revalidation from your Trigger.dev tasks
[Revalidation](https://vercel.com/docs/incremental-static-regeneration/quickstart#on-demand-revalidation) allows you to purge the cache for an ISR route. To revalidate an ISR route from a Trigger.dev task, you have to set up a handler for the `revalidate` event. This is an API route that you can add to your Next.js app.
This handler will run the `revalidatePath` function from Next.js, which purges the cache for the given path.
The handlers are slightly different for the App and Pages router:
#### Revalidation handler: App Router
If you are using the App router, create a new revalidation route at `app/api/revalidate/path/route.ts`:
```ts app/api/revalidate/path/route.ts theme={"theme":"css-variables"}
import { NextRequest, NextResponse } from "next/server";
import { revalidatePath } from "next/cache";
export async function POST(request: NextRequest) {
try {
const { path, type, secret } = await request.json();
// Create a REVALIDATION_SECRET and set it in your environment variables
if (secret !== process.env.REVALIDATION_SECRET) {
return NextResponse.json({ message: "Invalid secret" }, { status: 401 });
}
if (!path) {
return NextResponse.json({ message: "Path is required" }, { status: 400 });
}
revalidatePath(path, type);
return NextResponse.json({ revalidated: true });
} catch (err) {
console.error("Error revalidating path:", err);
return NextResponse.json({ message: "Error revalidating path" }, { status: 500 });
}
}
```
#### Revalidation handler: Pages Router
If you are using the Pages router, create a new revalidation route at `pages/api/revalidate/path.ts`:
```ts pages/api/revalidate/path.ts theme={"theme":"css-variables"}
import type { NextApiRequest, NextApiResponse } from "next";
export default async function handler(req: NextApiRequest, res: NextApiResponse) {
try {
if (req.method !== "POST") {
return res.status(405).json({ message: "Method not allowed" });
}
const { path, secret } = req.body;
if (secret !== process.env.REVALIDATION_SECRET) {
return res.status(401).json({ message: "Invalid secret" });
}
if (!path) {
return res.status(400).json({ message: "Path is required" });
}
await res.revalidate(path);
return res.json({ revalidated: true });
} catch (err) {
console.error("Error revalidating path:", err);
return res.status(500).json({ message: "Error revalidating path" });
}
}
```
#### Revalidation task
This task takes a `path` as a payload and will revalidate the path you specify, using the handler you set up previously.
To run this task locally you will need to set the `REVALIDATION_SECRET` environment variable in your `.env.local` file (or `.env` file if using Pages router).
To run this task in production, you will need to set the `REVALIDATION_SECRET` environment variable in Vercel, in your project settings, and also in your environment variables in the Trigger.dev dashboard.
```ts trigger/revalidate-path.ts theme={"theme":"css-variables"}
import { logger, task } from "@trigger.dev/sdk";
const NEXTJS_APP_URL = process.env.NEXTJS_APP_URL; // e.g. "http://localhost:3000" or "https://my-nextjs-app.vercel.app"
const REVALIDATION_SECRET = process.env.REVALIDATION_SECRET; // Create a REVALIDATION_SECRET and set it in your environment variables
export const revalidatePath = task({
id: "revalidate-path",
run: async (payload: { path: string }) => {
const { path } = payload;
try {
const response = await fetch(`${NEXTJS_APP_URL}/api/revalidate/path`, {
method: "POST",
headers: {
"Content-Type": "application/json",
},
body: JSON.stringify({
path: `${NEXTJS_APP_URL}/${path}`,
secret: REVALIDATION_SECRET,
}),
});
if (response.ok) {
logger.log("Path revalidation successful", { path });
return { success: true };
} else {
logger.error("Path revalidation failed", {
path,
statusCode: response.status,
statusText: response.statusText,
});
return {
success: false,
error: `Revalidation failed with status ${response.status}: ${response.statusText}`,
};
}
} catch (error) {
logger.error("Path revalidation encountered an error", {
path,
error: error instanceof Error ? error.message : String(error),
});
return {
success: false,
error: `Failed to revalidate path due to an unexpected error`,
};
}
},
});
```
#### Testing the revalidation task
You can test your revalidation task in the Trigger.dev dashboard on the testing page, using the following payload.
```json theme={"theme":"css-variables"}
{
"path": "" // e.g. "blog"
}
```
### Next.js build failing due to missing API key in GitHub CI
This issue occurs during the Next.js app build process on GitHub CI where the Trigger.dev SDK is expecting the TRIGGER\_SECRET\_KEY environment variable to be set at build time. Next.js attempts to compile routes and creates static pages, which can cause issues with SDKs that require runtime environment variables. The solution is to mark the relevant pages as dynamic to prevent Next.js from trying to make them static. You can do this by adding the following line to the route file:
```ts theme={"theme":"css-variables"}
export const dynamic = "force-dynamic";
```
### Correctly passing event handlers to React components
An issue can sometimes arise when you try to pass a function directly to the `onClick` prop. This is because the function may require specific arguments or context that are not available when the event occurs. By wrapping the function call in an arrow function, you ensure that the handler is called with the correct context and any necessary arguments. For example:
This works:
```tsx theme={"theme":"css-variables"}
```
Whereas this does not work:
```tsx theme={"theme":"css-variables"}
```
## Realtime updates with React hooks
The `@trigger.dev/react-hooks` package lets you subscribe to task runs from your React components. Show progress bars, stream AI responses, or display run status in real time.
Hooks for subscribing to runs, streaming data, and triggering tasks from the frontend.
Pipe continuous data (like AI completions) from your tasks to the client while they run.
## Learn more about Next.js and Trigger.dev
### Walk-through guides from development to deployment
Learn how to setup Trigger.dev with Next.js, using either the pages or app router.
Learn how to create a webhook handler for incoming webhooks in a Next.js app, and trigger a task from it.
### Task examples
Generate an image from a prompt using Fal.ai and Trigger.dev Realtime.
Convert an image to a cartoon using Fal.ai.
Learn how to automatically sync environment variables from your Vercel projects to Trigger.dev.
Learn how to use the Vercel AI SDK, which is a simple way to use AI models from different
providers, including OpenAI, Anthropic, Amazon Bedrock, Groq, Perplexity etc.
## Useful next steps
Learn what tasks are and their options
Learn how to write your own tasks
Learn how to deploy your task manually using the CLI
Learn how to deploy your task using GitHub actions
 If you go back to your terminal you'll see that the dev command also shows the task status and links to the run log.
 For more information on authenticating with Trigger.dev, see the [API keys page](/apikeys).
## Triggering your task in Next.js
Here are the steps to trigger your task in the Next.js App and Pages router and Server Actions.
For more information on authenticating with Trigger.dev, see the [API keys page](/apikeys).
## Triggering your task in Next.js
Here are the steps to trigger your task in the Next.js App and Pages router and Server Actions.
 Visit the [Trigger.dev dashboard](https://cloud.trigger.dev) to see your run.
 You can add values for your local dev environment, staging and prod.
  You can also add environment variables in code by following the steps on the [Environment Variables page](/deploy-environment-variables#in-your-code).
## Deploying your task to Trigger.dev
For this guide, we'll manually deploy your task by running the [CLI deploy command](/cli-deploy) below. Other ways to deploy are listed in the next section.
You can also add environment variables in code by following the steps on the [Environment Variables page](/deploy-environment-variables#in-your-code).
## Deploying your task to Trigger.dev
For this guide, we'll manually deploy your task by running the [CLI deploy command](/cli-deploy) below. Other ways to deploy are listed in the next section.